

The Viewer Properties, Viewer tab lets you set up display and control options for the viewer computer.
To configure the viewer's display options
Windows uses special key sequences as shortcuts for frequently used commands. For example, a user can press Alt+Tab to switch between open windows or press the Windows key to open the Start menu. When you type these key sequences into the viewer, Remote Control must decide whether the key presses should operate on the remote computer or on the viewer computer.
This option affects the behavior of special key sequences typed when the viewer is in full screen mode. If enabled, all special key sequences made in full screen mode are redirected to the remote computer. If the option is not enabled, the special keys are redirected using the same rules for keyboard redirection in windowed mode.
Note: The only exception to this rule is the Ctrl+Alt+Del key sequence. This always operates on the local computer and is never redirected to the remote computer. However, you may create a hot key that simulates Ctrl+Alt+Del. See Step 5.
Default: True
This option affects the behavior of special key sequences typed when the viewer is in windowed mode or those typed in full screen mode, if the In full screen mode, redirect all special key sequences to the remote machine option is disabled.
When enabled, all special key sequences typed using the Alt, Ctrl, Shift and Windows keys on the right-hand side of the keyboard are redirected to the remote computer, while all key sequences typed using the same keys on the left-hand side of the keyboard affect the local computer. When disabled, all special key sequences affect the local computer and are not redirected to the remote computer.
For example, if enabled and the user presses the right-hand Windows key (or Right-Ctrl + Esc), the Start menu opens on the remote computer. If the user presses the left-hand Windows key, the Start menu opens on the viewer computer.
Note: The only exception to this rule is the Ctrl+Alt+Del key sequence. This always operates on the local computer and is never redirected to the remote computer. However, you may create a hot key that simulates Ctrl+Alt+Del. See Step 5.
Default: True
Note: On some European keyboards, the right-hand Alt key is labeled "Alt Gr" and is used to output additional European characters. For example, on a UK keyboard, Alt Gr+4 prints a Euro currency symbol. If the Redirect Extended keys option is enabled, the Alt Gr key functions like a normal left Alt key. To obtain the functionality of the Alt Gr key, you can press Ctrl+Alt instead.
Default: Insert
Specifies that the remote control, chat, and file transfer data is not encrypted.
Note: If the target host is operating in FIPS‑preferred or FIPS‑only mode, this option has no effect—the data is always encrypted using FIPS‑compliant cryptography.
Specifies that the remote control viewer and host session data is encrypted but not the data sent or received using file transfer and chat.
Specifies that all session data is encrypted including file transfer and chat communications. Authentication data (for example, user name and password) to establish the session is always encrypted regardless of the setting used for session data.
Default: Off
Note: Encryption for file transfer is also controlled on the File Transfer tab. For information about enabling encryption on a host computer, see the Remote Control Host Help.
Enables the viewer screen to follow the host's mouse when the viewer's mouse is not moving. This option does not enable or disable the scroll mode option for auto pan—it changes the way auto pan mode operates.
If this option is disabled and auto-pan mode is selected as the scroll mode configuration, movements of the host mouse do not cause the viewer window to pan and follow the mouse pointer. The viewer window only auto pans to follow the local mouse when moved over the host window.
If this option is enabled and auto-pan mode is selected as the scroll mode configuration, movements of the host mouse do cause the viewer window to pan and follow the mouse pointer.
Note: The local mouse pointer takes priority in dictating the auto pan position.
Default: True
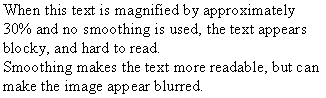
Specifies that a smoothing filter be applied to the image when scaling the host view up. The filtering removes the otherwise blocky effect of enlarging a screen image. The filter takes effect only when the viewer is in Scale to Fit mode and when magnifying the view to fill the viewer window.
Default: True
Example: Image Normal Size
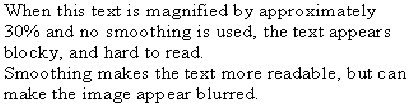
Example: Image Magnified, No Smoothing
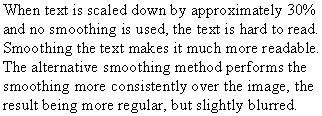
Example: Image Magnified with Smoothing

Specifies that a smoothing filter be applied to the image when scaling the host view down. This option is used with the scroll modes, Scale to Fit and Shrink to Fit. If True, the rows and columns of pixels that are lost in the scaling process are merged to give a more accurate image when scaling the recording down. This greatly improves the readability of text when scaling the image down. This filter takes effect only when the viewer is in Shrink to Fit or Scale to Fit mode and is shrinking the recording to fit in the viewer window.
Default: True
Example: Image Normal Size
Example: Image Shrunk, No Smoothing
Example: Image Shrunk with Smoothing
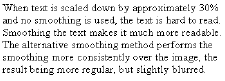
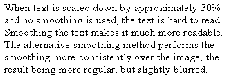
Specifies whether the Use Alternative Smoothing Method option is used with the scroll modes, Scale to Fit and Shrink to Fit. This setting changes the filtering method used by the Use Smoothing When Shrinking option. If True, a bilinear filter is used to provide a smoother scaled image, but the result is fuzzier and it is slower than the default smoothing mode.
Default: False
Example: Image Shrunk with Normal Smoothing
Example: Image Shrunk with Alternative Smoothing

Your viewer display and control options are saved.
|
Copyright © 2013 CA.
All rights reserved.
|
|