

A project is the most common work plan, and is typically derived from ideas, proposals, unapproved projects, your backlog, or service requests. You prioritize and approve projects based on a number of key factors, including the following items:
Projects are the core investment in the application. Understanding how to create projects enables you to properly manage them. Creating projects is the first step in the project management process.
The following diagram describes how a project manager sets up a CA Clarity PPM project.
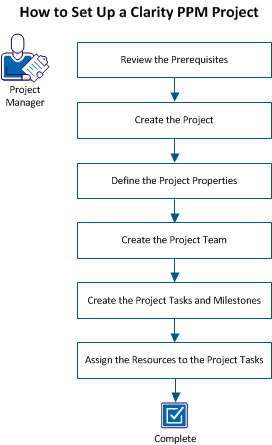
To set up a CA Clarity PPM project, perform these steps:
Note: This scenario does not include all of the terminology that is involved in setting up a CA Clarity PPM project. For more information, see the Project Management User Guide.
To complete all tasks in this scenario, consider the following information:
Initial Project Planning
Resources and roles
All resources who participate in the project are defined. All the roles in the project are defined.
Note: This scenario does not explain how to create a resource. For more information about creating a resource, see the Resource Management User Guide.
Departments
A department is created for the project.
Note: This scenario does not explain how to create a department. For more information about creating a department, see the Financial Management User Guide.
Access Rights
You need specific access rights to set up a project.
Note: For more information about access rights, see the Administration Guide or contact your system administrator.
As a project manager, you create the project to track the work plan for your investments. For example, you have a new development project that has been approved for the upcoming fiscal year.
To create the project, follow one of these methods:
Note: You can also create the project using XOG, by converting an idea to a project, using Open Workbench, and using Microsoft Project. This scenario does not explain these methods.
As a project manager, you can create the project from a template. Templates help enforce consistency and improve efficiency when creating projects.
You can create a project and save it as a template. Others can use this template to create a project.
When you create a project from a template, the following information is copied from the template to the new project:
Note: Start and finish dates, baseline information, and financial properties are not copied from templates to new projects. If hard-booked resources are defined in the project template, the resources are copied as soft-booked.
Follow these steps:
Specifies the method to calculate the % Complete value for the project and tasks.
Values:
Summary Task % Complete = Total Detail Task Duration Complete / Total Detail Task Duration
Summary Task % Complete = Sum of Detail Task resource assignment Actuals / Sum of Detail Task resource assignment Effort
Detail Task % Complete = Sum of resource assignment Actuals / Sum of resource assignment Effort
Default: Manual
Note: Set the % Complete Calculation Method at the beginning of your project and do not change this value.
Specifies the pool of resources that is allowed when assigning resources to tasks.
Values:
Default: Resource Pool
Specifies if the planned cost dates are synchronized with the investment dates. Selecting the option for a detailed financial plan does not affect the planned cost dates.
Default: Selected
Defines the percentage by which the work estimate on each task is required to be increased or decreased for the new project. The scaling is relative to the template.
Values: 0-100 (where zero means no change)
Default: Zero
Defines the percentage (positive or negative) as the scaling factor for the dollar amounts defined in the project cost plans and benefit plans.
Values: 0-100 (where zero means no change)
Default: Zero
Example: The template project from 1/1/2012 to 12/31/2012 allocates $10,000 for planned cost and $20,000 for planned benefit for the project duration. If a Scale Budget By value of 20 percent is defined, the plans copy over to the new project as follows. Assume that the project duration is same as the template project:
Specifies to replace the resources in the new project with the primary roles, or team roles of the named resources on the project template. If a named resource has no primary role or team role, the named resource is retained on the new project. This setting overrides the default project management setting on the settings page.
For example, a cost plan uses a resource as a grouping attribute. When you select this check box, the cost plan from the template is copied. However, the resource values are not converted to roles. The resource value can be the only value that differentiates one line item detail row from another. In the absence of the value, duplicate detail rows can result in the cost plan.
Default: Cleared
As a project manager, you can create the project manually, if you do not want to use an existing template.
Follow these steps:
Specifies the method to calculate the % Complete value for the project and tasks.
Values:
Summary Task % Complete = Total Detail Task Duration Complete / Total Detail Task Duration
Summary Task % Complete = Sum of Detail Task resource assignment Actuals / Sum of Detail Task resource assignment Effort
Detail Task % Complete = Sum of resource assignment Actuals / Sum of resource assignment Effort
Default: Manual
Note: Set the % Complete Calculation Method at the beginning of your project and do not change this value.
Specifies the pool of resources that is allowed when assigning resources to tasks.
Values:
Default: Resource Pool
Specifies if the planned cost dates are synchronized with the investment dates. Selecting the option for a detailed financial plan does not affect the planned cost dates.
After you create a project with the basic information, define the project properties. Project properties include the following:
To define the project properties, complete the following tasks:
Note: This scenario does not explain all of these tasks in detail. For more information about these tasks, see the Project Management User Guide.
Specifying the general properties of a project help identify it and define its characteristics.
Follow these steps:
Specifies the resource who created the project. If necessary, you can update this field.
Note: The list of participants that appear on the Team, Participant page also depends on the value that you select for the Administration, Project Management, Settings, Automatically Add Staff Members As Investment Participant option.
Specifies the page layout to view project information. The available layouts are company-specific and depend on the values set by your CA Clarity PPM administrator. Layouts also depend on whether an add-in is installed. If other layouts are not available, the field is read-only.
Default: Project Default Layout
Specifies the risk level of the project as defined by the severity levels you select for the predefined list of risk factors from the main risk page.
Specifies the purpose or business case for the project.
Values: Cost Avoidance, Cost Reduction, Grow the Business, Infrastructure Improvement, and Maintain the Business
Specifies the alignment with corporate objectives. Displays a stoplight that indicates the project alignment status.
Values:
Indicates the status of the investment.
Values: Approved, Rejected, Unapproved
Default: Unapproved
Specifies if the investment is active. Activate the investment to enable the posting of transactions and to view the investment in capacity planning portlets.
Default: Selected
Specifies that you want to use a program to create projects.
Default: Cleared
Specifies that you want to use the project as a project template to create other projects.
Default: Cleared
Specifies to pin this investment when added to a portfolio. This field is used during scenario generation.
Default: Cleared
You define scheduling properties for the following reasons:
Follow these steps:
Defines the date to include data in time and budget estimates. This date is used in Earned Value Analysis (EVA) calculations, such as Budgeted Cost of Work Scheduled (BCWS) and drives the calculations for costs. ETC for a project is not scheduled on or before the As of Date.
Defines the percent of work that has been completed on the project, based on the percentage of completion of the tasks and subprojects. This field is displayed only if the % Complete Calculation Method is set to Duration or Effort.
Default: 0
Values: 0 through 100
Specifies the method to calculate the % Complete value for the project and tasks.
Values:
Summary Task % Complete = Total Detail Task Duration Complete / Total Detail Task Duration
Summary Task % Complete = Sum of Detail Task resource assignment Actuals / Sum of Detail Task resource assignment Effort
Detail Task % Complete = Sum of resource assignment Actuals / Sum of resource assignment Effort
Default: Manual
Note: Set the % Complete Calculation Method at the beginning of your project and do not change this value.
Important! Verify that the start and finish dates of tasks and assignments are the same or within the start and finish dates of the project. Else, the start and end dates of the project are automatically redefined as per the start and end dates of the tasks and assignments.
Indicates the tracking method that is used by resource assignments to enter time spent on project tasks.
Values:
Default: Clarity
Defines the charge code against which transactions for the project are charged. If you also define task-level charge codes on timesheets, then the task charge codes override this code.
Defines the set default OBS unit that is used when you add team staff members to this project. This OBS unit describes a staffing requirement, and can be a resource pool, a specific location, or a department. By mapping roles with OBS units and resource managers, the roles can be filled more accurately. The default staff OBS unit is used during capacity planning for analyzing demand against your capacity using the staff OBS as filter criteria.
For more information about managing resources, see the Resource Management User Guide.
Example:
Use the OBS to find out if you have enough capacity for programmers in Atlanta to fulfill the demand for programmers in that location.
You can rate the risk for a project from a predefined list of risk factors by severity level.
Follow these steps:
Budget information is essential in managing and analyzing portfolios. Correctly defining and recording planned cost and benefit information help to assess and analyze projects.
Note: To see all data from an investment to a portfolio, your CA Clarity PPM administrator must run the Synchronize Portfolio Investment job.
With a budget, you can define metrics, such as the Net Present Value (NPV) of the project, Return on Investment (ROI), and breakeven information. You can also define project planned and budgeted costs and benefits over a specified time period.
Alternatively, you can define a detailed financial plan to budget costs and benefits over multiple periods. If you create a detailed financial plan, information from the detailed plan is automatically populated in the budget properties page.
Follow these steps:
Indicates whether you want the budget cost and benefit values to be equal to the planned cost and budget values. If you clear this check box, you can manually define the budget values.
Dependency relationships can exist between one investment and another in your portfolio. Use the Properties: Dependencies page for the investment to identify this relationship.
Dependencies can occur between the start and completion of conflicting work effort, or from budget overruns. From this page, you can do the following tasks:
Follow these steps:
Project members and tasks are the core elements of a project. Both are essential to meeting project objectives. You can build a project team with the following members:
The resources that the project manager assigns to tasks and performs the work. Team staff members are allocated to the project. A team staff member can consist of labor, materials, equipment, and expense resource or role types. You can include resources other than labor resources or roles to process financial transactions against them.
The resources that the project manager adds to the project. Participants can view the project properties, generate ideas, and monitor progress. By default, team staff members become automatic participants. However, you can also add resources that are not team staff members as participants on the project. The value selected for the Automatically Add Staff Members As Investment Participant option determines whether the team staff member automatically becomes a participant.
A group of resources who are project participants.
When necessary, add resources or roles to your project as team staff members. You can add resources or roles to a project automatically when you assign them to a project task in the work breakdown structure (WBS) in the Gantt view.
Follow these steps:
When necessary, define the resource allocations for the resources that you have staffed to the project. The Project Team Staff page lists the booking status for all the investments to which the resource is allocated. In addition, you can see the number of hours the resource is allocated to each investment and displays a list of planned and committed allocation for the project. This information helps you determine the resource availability for a project, or to determine when a resource is overbooked or under-booked and by how much. Unless you change the booking dates, the resource is automatically staffed to the project for the duration of the project.
Use the time-scaled column in the list to change most of the time-related values for the resources on the project. Allocation by resource, allocation, and time period is displayed in this column. You can edit information such as the time cells for each resource. Changing the time cells changes the way that planned and committed allocation is presented in the time-scaled column.
Follow these steps:
Defines the booking status for the resource.
Values:
Default: Soft
Defines the expected percentage of time for the resource to work (as tentative or committed) on the investment. The product assumes that each team staff member is assigned to the project and to each task at 100 percent of their available time. This assumption is true if the resource is not allocated to other tasks on other projects.
A project includes multiple tasks, which are activities that begin and end on defined dates.
You can create tasks using the following methods:
Note: This scenario does not explain all of the methods to create a task. For more information about creating tasks, see the Project Management User Guide.
You can create the following types of project tasks:
A milestone task indicates a critical point in a project, such as the completion of the first phase of the execution.
Specifies a major event or activity in a project and it indicates the phase completion or major deliverables or any significant achievement of your project during the execution of the project.
In the project plan, any task with zero duration is a milestone. That is, the Start date and Finish dates are the same for milestone tasks. Once saved, the Start field on the task properties page is locked.
Specifies whether you want to identify a task as a key task. A key task is significant for other tasks. For example, the start date of other tasks can depend on the key task.
Example: If a task is one in which the completion is essential to the start date of other tasks, then mark this task as a key task.
Default: Selected
Specifies the fixed length of working time between the start and finish of a task. The duration for the task remains at the value you enter and the application recalculates the resource units as you change assignments.
Before building your work breakdown structure (WBS), plan the tasks and structure to help ensure effective use.
Note: For new projects, a new empty row (task) appears, by default, in the WBS. When you configure the Gantt view to not display all of the required fields, an initial blank task for projects without tasks does not appear. In addition, you cannot perform inline edits.
A summary task includes subtasks and summaries of those subtasks. For example, a project can have the creation of a new division as a summary task and the training of new staff as a subtask. Dependencies can be among, and outside, tasks in the projects.
When necessary, insert a task to a specific location in the work breakdown structure (WBS) in the Gantt view.
Follow these steps:
Defines the percent of work that has been completed when the task is partially completed.
Values:
Default: 0
You can copy predefined tasks from a project template into your project. The process copies all the estimating, risk, and issue information that is associated with the tasks.
Follow these steps:
Resource utilization is the amount of resource effort it takes, or is expected to take, to complete a task. Using the Project: Tasks: Resource Utilization page, you can do the following tasks:
Total Effort = Actuals + Remaining ETC
By default, the Gantt chart displays total effort by task by week for all of the resources assigned to that task. You can change the chart configuration to display different variations of task and resource information.
Important! Assign staff to tasks before viewing resource utilization.
Follow these steps:
Defines the task name. Click the task name to open the task properties page.
Defines the task unique identifier (up to 16 characters).
Defines the date to start working on the task.
Default: Current date
Note: Work on a task cannot start before the project start date. If the task has already started or finished, this field is not available.
Defines the date for completing the task.
Default: Current date
Note: Work on a task cannot finish after the project finish date. If the task has already started or finished, the field is not available.
Assign labor resources to tasks so that they can perform work and record the work time in their timesheets.
You can also assign expense, material, and equipment resources to tasks. These types of resources can also be tracked using timesheets, and can have actuals that are logged through transactions.
Note: You cannot assign resources to milestone or summary tasks.
Using the task assignments page, you can view a list of resources that are assigned to a task.
Follow these steps:
You can assign resources to detail tasks from the work breakdown structure (WBS) in the Gantt view using one of the following methods:
To remove an assigned resource, click Remove in the Assigned Resources column. The resource is removed from the task when you save. If posted actuals exist for the resource, the resource is added back to the task when you save.
Note: You can only assign resources to detail tasks.
The assignment pool setting for the project determines the resources that you can assign to a task. The product supports the following assignment pool settings:
Select from a general list of resources accessible to you. When you assign a resource from outside the project team, the resource is added to the project team as a staff member.
Select from the available resources on the project team. The team members must be in the project staff before you can assign a task to them.
You can create projects from project templates based on standard task and role assignments based on a project type. Templates help ensure consistency and efficiency in creating projects.
Use a project template to copy the contents of the template into a new project instead of creating a project from scratch. You can also scale the overall project work estimate and budget. To scale, you require using a specified percentage rather than copying the contents of a template project as is. You can modify any of the information in the new project that is copied from the template.
You can change project templates to suit the needs of your organization. You can also duplicate templates to create new ones for each project type.
To make project creation more efficient, as a project owner, designate a project as a project template. Then, use the template to create new projects.
Before designating a project as a project template, verify that the following conditions are true:
Follow these steps:
The properties page appears.
Specifies using the project as a project template to create other projects.
Default: Cleared
Required: No
Select the check box.
To populate a new project, copy the information from an existing template. For example, you can copy the following types of information:
Follow these steps:
The properties page appears.
The select project template page appears.
The copy template options page appears.
Displays the name of the project template from which data is used to populate the new project. Use a template to create a project with the following types of information predefined:
A template enables you to implement projects with common elements throughout the organization.
not sure if we need to describe all this in the field definition. this info is already provided in the conceptual text that precedes the procedure and the field descriptions
Defines the percentage by which the work estimate on each task is required to be increased or decreased for the new project. The scaling is relative to the template.
Values: 0-100 (where zero means no change)
Default: Zero
Defines the percentage (positive or negative) as the scaling factor for the dollar amounts defined in the project cost plans and benefit plans.
Values: 0-100 (where zero means no change)
Default: Zero
Example: The template project from 1/1/2012 to 12/31/2012 allocates $10,000 for planned cost and $20,000 for planned benefit for the project duration. If a Scale Budget By value of 20 percent is defined, the plans copy over to the new project as follows. Assume that the project duration is same as the template project:
Specifies to replace the resources in the new project with the primary roles, or team roles of the named resources on the project template. If a named resource has no primary role or team role, the named resource is retained on the new project. This setting overrides the default project management setting on the settings page.
For example, a cost plan uses a resource as a grouping attribute. When you select this check box, the cost plan from the template is copied. However, the resource values are not converted to roles. The resource value can be the only value that differentiates one line item detail row from another. In the absence of the value, duplicate detail rows can result in the cost plan.
Default: Cleared
The following rules apply when you copy financial plans from a template to a new or existing project:
When copying financial plans from a project template, some of the fields from your first-created project are used. The following fields in the template project affect how the financial plans are copied over to a new project:
The time periods on the financial plans that are copied over from the project template shift in the new project according to this start date. The End Date field value in the project template is not relevant to financial plans. The end date is automatically calculated for each financial plan based on their original plan durations in the template and their new start dates.
This field is only considered when no budget plans exist in the project template. Selecting the option retains the same dates for planned cost and planned benefit on the budget properties page as the project start and end dates. If unselected, the dates for planned cost and planned benefit are shifted. The shifting is based on the difference between the template project start date and the new project start date.
The following rules apply to the department OBS:
Defines the percentage (positive or negative) as the scaling factor for the dollar amounts defined in the project cost plans and benefit plans.
Values: 0-100 (where zero means no change)
Default: Zero
Example: The template project from 1/1/2012 to 12/31/2012 allocates $10,000 for planned cost and $20,000 for planned benefit for the project duration. If a Scale Budget By value of 20 percent is defined, the plans copy over to the new project as follows. Assume that the project duration is same as the template project:
This example shows how the start and end time periods are set for financial plans that you create by copying from a template project.
The template project with a start date in December 2010 includes the following financial plans:
When you copy the template information into a new project with a start date in December 2011, the financial plans shift. Financial plans shift according to the new start date. But the plans maintain the same time lapse between the start and end dates originally defined in the template.
The financial plans now have the following new start and end time periods:
Use the following process to copy financial plans from project templates:
For more information, see the Financial Management User Guide.
Contact your CA Clarity PPM administrator or see the Administration Guide for more information.
Project properties comprise the following:
With the project open, access the links to define project characteristics.
You can:
For more information, see the Financial Management User Guide.
For more information, see the Financial Management User Guide.
Edit the general properties of any project to which you have access.
Follow these steps:
The properties page appears.
Specifies the pool of resources that is allowed when assigning resources to tasks.
Values:
Default: Resource Pool
Defines the name for the project.
Limits: 80 characters
Required: Yes
Defines the unique identifier for the project that is typically auto-numbered.
Limits: 20 characters
Required: Yes
Defines the description.
Limits: 240 characters
Required: No
Specifies the name of the resource that is responsible for managing the project. The manager of a project automatically receives certain rights for the project.
The project manager is not the same as the collaboration manager. The person creating the project becomes the collaboration manager for the project by default.
Default: The resource creating the project. If you are creating a project that someone else can manage, change the default to another resource.
Required: No
Specifies the page layout to view project information. Available layouts are company-specific and dependent on the values set by your CA Clarity PPM administrator. Layouts also depend on whether an add-in is installed. If other layouts are not available, the field is display only.
Default: Project Default Layout
Required: Yes
Displays the project risk status in the form of a stoplight. The stoplight colors are based on your selections on the main risk page. If you have detailed risks defined, the colors are derived from the risks page.
Values:
Red = High Risk
Specifies the purpose or business case for this project.
Values: Cost Avoidance, Cost Reduction, Grow the Business, Infrastructure Improvement, and Maintain the Business
Required: No
Specifies the alignment with corporate objectives. Displays a stoplight that indicates the project alignment status.
Values:
Indicates the status of the investment.
Values: Approved, Rejected, Unapproved
Default: Unapproved
Specifies if the investment is active. Activate the investment to enable posting transactions. Also, to view the investment in capacity planning portlets.
Default: Selected
Specifies using a program to create projects.
Default: Cleared
Required: No
Specifies using the project as a project template to create other projects.
Default: Cleared
Required: No
Specifies to pin this investment when added to a portfolio. This field is used during scenario generation.
Default: Cleared
Required: No
For more information, see the Portfolio Management User Guide.
For more information, see the Basics User Guide.
Defines the lines of business for your organization that is responsible for the proposal.
Defines the financial department associated with the investment.
Required: No
For more information, see the Financial Management User Guide.
This OBS is listed last if more than one OBS exists.
Defines the financial location that is associated with the investment. This location must belong to the same entity as the department.
You can process financial transactions for your project. But, before processing financial transactions, enable your project to set up financial transaction defaults, such as specifying the project and cost matrices. The selections automatically populate transaction entries upon selecting the project.
To set up a project for financial processing, set up the following:
For more information, see the Financial Management User Guide.
For more information, see the Financial Management User Guide.
For more information, see the Financial Management User Guide.
Use the following process to define the financial properties used in summary and detailed financial planning.
If the following conditions are true, when changing the financial status of a project from Open to Hold or Closed, an error message appears:
Follow these steps:
The properties page appears.
Defines the customer (internal or external) that drives rates and costs. You require creating a company profile.
Defines the unique identifier for the project that is typically auto-numbered.
Limits: 20 characters
Required: Yes
Defines the project that is financially tied to the project.
Defines the financial department associated with the investment.
Required: No
For more information, see the Financial Management User Guide.
Defines the financial location that is associated with the investment. This location must belong to the same entity as the department.
Specifies the status that determines how financial transactions entered against the project are handled.
Values:
Default: Hold
Required: Yes
Defines the billing method required for financial transaction processing.
Values:
Default: Standard
Required: Yes
For more information, see the Financial Management User Guide.
Defines the transaction category used to group projects for reporting.
Defines the class used to group projects for reporting purposes.
Defines the currency that is used to process chargebacks and financial transactions on the project. After you process transactions or create detailed financial plans for the project, you cannot change this currency code value.
Defines the cost/rate matrix used to calculate the benefit amount of the transaction entry.
Defines the cost/rate matrix used to calculate the cost amount of the transaction entry.
Displayed only when multiple currencies are available. Defines the exchange rate type for transactions for the project. When the project is approved, you cannot modify the exchange rate type.
Values:
To use detailed financial planning and process financial transactions, financially enable your project.
For more information, see the Financial Management User Guide.
Follow these steps:
The properties page appears.
Defines the financial department associated with the investment.
Required: No
For more information, see the Financial Management User Guide.
Defines the financial location that is associated with the investment. This location must belong to the same entity as the department.
Specifies the status that determines how financial transactions entered against the project are handled.
Values:
Default: Hold
Required: Yes
Select the "Open" status.
Financially closing a project helps ensure that additional funds are not assigned to the project.
Follow these steps:
The properties page appears.
The financial page appears.
Specifies the status that determines how financial transactions entered against the project are handled.
Values:
Default: Hold
Required: Yes
Use the following process to set up projects for tracking costs:
For more information, see the Financial Management User Guide.
For more information, see the Financial Management User Guide.
Contact your CA Clarity PPM administrator or see the Administration Guide for more information.
The financial cost/rate matrix is used for tracking purposes. You can associate the matrix to your project so that budgeted cost of work performed (BCWP) and earned value (EV) information is calculated. You can associate the financial cost matrix at the project level for labor, material, and equipment resources, and for expenses incurred against your projects.
The financial cost matrix is also used when you generate reports containing certain project cost information. To enable the values to calculate, assign resources or roles to tasks. Also, have your CA Clarity PPM administrator schedule the Rate Matrix Extraction job to run periodically.
Contact your CA Clarity PPM administrator or see the Administration Guide for more information.
If you do not associate the financial cost, or rate matrix to the project, your finance manager requires specifying a cost when creating transactions.
For more information, see the Financial Management User Guide.
Use this procedure to associate the financial cost matrix to a project resource type. The financial cost matrix is used to calculate project rates.
Important! Before you can associate the financial cost matrix to your project, create the matrix.
For more information, see the Financial Management User Guide.
Follow these steps:
The properties page appears.
The financial properties page appears.
Defines the cost or rate matrix used for calculating the benefit amount of the transaction entry.
Defines the cost or rate matrix used for calculating the cost amount of the transaction entry.
Displayed only when multiple currencies are available. Defines the exchange rate type that is used for transactions entered against the project. When the project is approved, you cannot modify the exchange rate type.
Values:
Use the Access to This Project pages to view, grant, and edit the instance-level access rights to your project. You can view access rights on the full view page. You can also edit and grant access rights on the resource, group, and OBS unit pages.
The Estimate to Complete (ETC) is the estimated time for a resource to complete an assignment. The value is important for both project planning and revenue recognition. In the short run, estimates help project managers more effectively allocate work hours. In the end, project managers can compare estimates to actuals, which can help produce more accurate forecasting and planning.
The estimating properties display the current and new ETC values. To view the page, open the project, click the Properties menu, and click Estimating.
You can do the following from this page:
The following process outlines how to define the estimates for a project:
When you assign a resource to a task, the estimate to complete (ETC) for the task is automatically calculated. Allocation (percent) and availability (Hours) for a resource assignment determines the ETC for the task based on the assignment start and finish dates. The calculation is based on the following formula:
ETC = the number of working days the resource is assigned to work on the task * the number of hours each day that the resource is available for work
The calendar and daily availability for a resource is used to determine the total availability for the resource. Unless you specify a different number in the resource profile, eight hours of work time are available daily, by default, for each resource is assumed.
Example 1
You allocate Aaron Connors 100 percent to a project and assign him to a task for 5 days with 8 hours availability. The ETC for Aaron is 40 hours. You allocate Patty Chen 50 percent to a project and assign her to the same task for 5 days. The ETC for Patty is 20 hours.
Example 2
You schedule a task between 6/30/11 and 7/30/11. The task contains 22 working days and has one resource assigned to it for 8 hours a day for all 22 days. The ETC for the task is calculated at 176 hours (22 days * 8 hours each day). You assign two resources to the task, each with a total daily availability of 8 hours. One resource for 50 percent of the available time and the other resource for 100 percent. The combined ETC calculates to 264.
For more information about managing resources, see the Resource Management User Guide.
You can change the project-level ETC in the following ways:
Important! Assign staff to tasks before you can view and edit ETC.
You can apply estimates (ETC) across all tasks by editing and applying the ETC at the project level. Applying ETC at the project level distributes the ETC value across all the project tasks according to task duration, resource availability, and resource allocation. The current ETC assumes the new value.
Follow these steps:
The properties page appears.
The estimating properties page appears.
Defines the new estimate to apply across all the tasks in the project.
The new ETC is applied.
Use this procedure to view and edit the combined ETC of all the tasks in the project and to apply ETC. The estimating page displays a breakdown of project ETC by phase or task grouping. You can expand the list to view the ETC for each task in the phase or group. Once a project or task is underway, ETC reflects the number of remaining hours estimated to complete the project.
To apply top-down estimating, enter the percentage share of the top-down estimate distributed for each task.
Follow these steps:
The properties page appears.
The estimating properties page appears.
Specifies the mode for estimating.
Values:
Default: Top-Down Estimating
Displays the current estimate to complete (ETC) for the project. The value for this field is derived from the Current ETC on the estimating properties page.
Required: No
Defines the new estimate to apply across all the tasks in the project.
The list of tasks display.
Defines the name of the task. Clicking the plus sign or summary task name displays subtasks below the summary task.
Displays the unique identifier for the task.
Displays the total Estimate To Complete (ETC) for the task. The value for this field is derived from the ETC field on the task estimating properties page.
Displays the percentage of the top-down estimate from the project that is distributed to the task.
Displays the new estimate to apply to the task.
The ETC is distributed to the tasks set up to receive the top-down distribution.
Use sub projects to group related projects under one master project for scheduling purposes. Establishing sub project associations lets you create plans and track and analyze an individual project in detail. The associations also help viewing, summarizing, and analyzing the progress of several projects at the master project level. You can use master projects with subprojects to perform top-down planning and to share resource availability across projects.
Subprojects are allocated at 100 percent to the master project, and participate in the master project baseline and earned value metrics. You cannot change the allocation percentages.
You can associate any number of projects together. Information is not shared between the subprojects and the master project, or between the subprojects themselves.
Example
You create a master project named Database Reconstruction which contains three subprojects: Oracle, Sybase, and FoxPro.
Use the following procedure to add an existing subproject to a master project. You can add an unlimited number of subprojects to a master project.
Use the properties page, or Gantt view to add a project as a subproject. You can open a subproject from the master project and modify it.
Follow these steps:
The properties page appears.
The subprojects properties page appears.
Follow these steps:
The properties page appears.
The Gantt view appears.
The select subprojects page appears.
Use this procedure to create a subproject using a project template. The default field values, defined in the project template, vary depending on the selections made in the template.
Follow these steps:
The properties page appears.
The Gantt view appears.
The available project templates appear.
The create page appears.
Specifies the pool of resources that is allowed when assigning resources to tasks.
Values:
Default: Resource Pool
Defines the name for the project.
Limits: 80 characters
Required: Yes
Defines the unique identifier for the project that is typically auto-numbered.
Limits: 20 characters
Required: Yes
Defines the description.
Limits: 240 characters
Required: No
Specifies the name of the resource that is responsible for managing the project. The manager of a project automatically receives certain rights for the project.
The project manager is not the same as the collaboration manager. The person creating the project becomes the collaboration manager for the project by default.
Default: The resource creating the project. If you are creating a project that someone else can manage, change the default to another resource.
Required: No
Specifies the page layout to view project information. Available layouts are company-specific and dependent on the values set by your CA Clarity PPM administrator. Layouts also depend on whether an add-in is installed. If other layouts are not available, the field is display only.
Default: Project Default Layout
Required: Yes
Defines the initial start date for a project. As you create tasks and assignments, this date is auto-calculated to match the first date that a task is scheduled to start. At that point, to edit this date, adjust the following dates:
Important! Verify that the start dates of tasks and assignments are the same or later than the start date of the project. Else, the start date of the project is automatically redefined as per the start dates of the tasks and assignments.
Default: Current date
Required: Yes
Defines the initial finish date for a project. As you create tasks and assignments, this date is auto-calculated to match the last date that a task is scheduled to finish. At that point, to edit this date, adjust the following dates:
Important! Verify that the finish dates of tasks and assignments are the same or before the finish date of the project. Else, the end date of the project is automatically redefined as per the end dates of the tasks and assignments.
Default: Current date
Specifies if the planned cost dates are synchronized with the investment dates. Selecting the option for a detailed financial plan does not affect the planned cost dates.
Default: Selected
Defines the stage in the investment lifecycle. The list of choices is company-specific and depends on the values that your administrator sets.
The metric is used in portfolio analysis when you use comparable stage criteria across all portfolio investments.
Specifies the purpose or business case for this project.
Values: Cost Avoidance, Cost Reduction, Grow the Business, Infrastructure Improvement, and Maintain the Business
Required: No
Defines the relative importance of this investment in relation to all other investments. The priority controls the order in which tasks are scheduled during autoscheduling. The priority is subject to dependency constraints.
Values: 0 - 36 (where zero is the highest importance)
Default: 10
Required: No
Indicates the level of work that is completed on the tasks.
Values:
Default: Not Started
Required: Yes
Indicates the status for the project.
Values: Approved, Unapproved, and Rejected
Default: Unapproved
Required: Yes
Specifies to pin this investment when added to a portfolio. This field is used during scenario generation.
Default: Cleared
Required: No
For more information, see the Portfolio Management User Guide.
Specifies the method to calculate the % Complete value for the project and tasks.
Values:
Summary Task % Complete = Total Detail Task Duration Complete / Total Detail Task Duration
Summary Task % Complete = Sum of Detail Task resource assignment Actuals / Sum of Detail Task resource assignment Effort
Detail Task % Complete = Sum of resource assignment Actuals / Sum of resource assignment Effort
Default: Manual
Note: Set the % Complete Calculation Method at the beginning of your project and do not change this value.
Defines the department OBS for the project.
Defines the location OBS for the project.
Displays the name of the project template from which data is used to populate the new project. Use a template to create a project with the following types of information predefined:
A template enables you to implement projects with common elements throughout the organization.
not sure if we need to describe all this in the field definition. this info is already provided in the conceptual text that precedes the procedure and the field descriptions
Defines the percentage by which the work estimate on each task is required to be increased or decreased for the new project. The scaling is relative to the template.
Values: 0-100 (where zero means no change)
Default: Zero
Defines the percentage (positive or negative) as the scaling factor for the dollar amounts defined in the project cost plans and benefit plans.
Values: 0-100 (where zero means no change)
Default: Zero
Example: The template project from 1/1/2012 to 12/31/2012 allocates $10,000 for planned cost and $20,000 for planned benefit for the project duration. If a Scale Budget By value of 20 percent is defined, the plans copy over to the new project as follows. Assume that the project duration is same as the template project:
The planned benefit shows $24,000 (scaled up by an extra 20 percent of the original value).
Specifies to replace the resources in the new project with the primary roles, or team roles of the named resources on the project template. If a named resource has no primary role or team role, the named resource is retained on the new project. This setting overrides the default project management setting on the settings page.
For example, a cost plan uses a resource as a grouping attribute. When you select this check box, the cost plan from the template is copied. However, the resource values are not converted to roles. The resource value can be the only value that differentiates one line item detail row from another. In the absence of the value, duplicate detail rows can result in the cost plan.
Default: Cleared
Use this procedure to create a subproject from the work breakdown structure of the master projects.
Follow these steps:
The properties page appears.
The Gantt view appears.
The create page appears.
Specifies the pool of resources that is allowed when assigning resources to tasks.
Values:
Default: Resource Pool
Defines the name for the project.
Limits: 80 characters
Required: Yes
Defines the unique identifier for the project that is typically auto-numbered.
Limits: 20 characters
Required: Yes
Defines the description.
Limits: 240 characters
Required: No
Specifies the name of the resource that is responsible for managing the project. The manager of a project automatically receives certain rights for the project.
The project manager is not the same as the collaboration manager. The person creating the project becomes the collaboration manager for the project by default.
Default: The resource creating the project. If you are creating a project that someone else can manage, change the default to another resource.
Required: No
Specifies the page layout to view project information. Available layouts are company-specific and dependent on the values set by your CA Clarity PPM administrator. Layouts also depend on whether an add-in is installed. If other layouts are not available, the field is display only.
Default: Project Default Layout
Required: Yes
Defines the initial start date for a project. As you create tasks and assignments, this date is auto-calculated to match the first date that a task is scheduled to start. At that point, to edit this date, adjust the following dates:
Important! Verify that the start dates of tasks and assignments are the same or later than the start date of the project. Else, the start date of the project is automatically redefined as per the start dates of the tasks and assignments.
Default: Current date
Required: Yes
Defines the initial finish date for a project. As you create tasks and assignments, this date is auto-calculated to match the last date that a task is scheduled to finish. At that point, to edit this date, adjust the following dates:
Important! Verify that the finish dates of tasks and assignments are the same or before the finish date of the project. Else, the end date of the project is automatically redefined as per the end dates of the tasks and assignments.
Default: Current date
Specifies if the planned cost dates are synchronized with the investment dates. Selecting the option for a detailed financial plan does not affect the planned cost dates.
Default: Selected
Defines the stage in the investment lifecycle. The list of choices is company-specific and depends on the values that your administrator sets.
The metric is used in portfolio analysis when you use comparable stage criteria across all portfolio investments.
Specifies the purpose or business case for this project.
Values: Cost Avoidance, Cost Reduction, Grow the Business, Infrastructure Improvement, and Maintain the Business
Required: No
Defines the relative importance of this investment in relation to all other investments. The priority controls the order in which tasks are scheduled during autoscheduling. The priority is subject to dependency constraints.
Values: 0 - 36 (where zero is the highest importance)
Default: 10
Required: No
Indicates the level of work that is completed on the tasks.
Values:
Default: Not Started
Required: Yes
Indicates the status for the project.
Values: Approved, Unapproved, and Rejected
Default: Unapproved
Required: Yes
Specifies to pin this investment when added to a portfolio. This field is used during scenario generation.
Default: Cleared
Required: No
For more information, see the Portfolio Management User Guide.
Specifies the method to calculate the % Complete value for the project and tasks.
Values:
Summary Task % Complete = Total Detail Task Duration Complete / Total Detail Task Duration
Summary Task % Complete = Sum of Detail Task resource assignment Actuals / Sum of Detail Task resource assignment Effort
Detail Task % Complete = Sum of resource assignment Actuals / Sum of resource assignment Effort
Default: Manual
Note: Set the % Complete Calculation Method at the beginning of your project and do not change this value.
For more information, see the Basics User Guide.
You can view combined subproject actuals and estimates for all the master project subprojects using the properties page of subprojects.
The following list describes the columns and data that display on this page:
Displays the project name and links to the project properties.
Displays the project ID that is typically autonumbered.
Indicates the number of subprojects for a subproject (or for a program, a project).
Displays the actuals that are posted for the tasks in each subproject. The value in the Total cell reflects the combined actuals for all the project subprojects.
Displays the subproject estimate to complete. The Estimate to Complete (ETC) is the estimated time for a resource to complete an assignment. The value in the Total cell reflects the combined ETC for all the subprojects.
Displays the subproject total effort based on the following formula:
Total Effort = Actuals + Remaining ETC
The value in the Total cell reflects the combined effort for all the project subprojects.
Displays the percentage of resource usage expended on the subproject. The value in the Total cell reflects the combined percentage for all the project subprojects.
Displays the subproject usage value for the most current baseline based on the following formula:
Usage = Total Effort (Actuals + Remaining ETC) to date
Displays a stoplight indicator with the subproject overall approval status.
Specifies if the subproject is accessible to project participants as read-only.
By default, all project participants have read/write access to any subproject added to the project. However, you can change the access settings of individual subprojects to read-only. You can also change the ones set to read-only back to read/write.
Follow these steps:
The properties page appears.
The list page appears.
The subproject is now only accessible to project participants as read-only. A check appears in the Read Only column for that subproject.
Follow these steps:
The properties page appears.
The list page appears.
The subproject is now accessible to project participants as read/write. A check disappears from the Read Only column for that subproject.
Baselines are snapshots of the total actual and planned effort and total actual and planned cost estimates for a project at the moment of capture. They are static. The changes you make to your project after you create your baseline do not affect the current baseline. You explicitly update a baseline to reflect changes to project scope or cost.
You can view baseline cost and work allocation information. Also, you can view other information, such as earned value (EV) and project performance that is most relevant to your project and organization. View the information about the baseline properties page and on the baseline revision properties page.
You can create baselines for the entire project from the baseline properties page, or from the work breakdown structure (WBS) page. This procedure details how to create a baseline from the baselines page.
You can create an unlimited number of project baselines. Create an initial baseline before resources enter time on a project. After the initial baseline, you can create additional ones at various intervals. You can create a baseline midway through the project, when different phases complete, or at the end of the project.
The project must be unlocked before you can create a baseline. To perform detailed baselining, open the project in a desktop scheduler, such as Open Workbench or Microsoft Project.
Follow these steps:
The properties page appears.
The baseline properties page appears.
The baseline revision properties page appears.
Defines the name of the baseline revision.
Example:
Initial Baseline, Mid-Term Baseline, or Final Baseline.
Required: Yes
Defines the unique identifier for the baseline revision.
Example:
The baseline version number, such as v1 or v5.
Required: Yes
Defines the description for the baseline revision.
Required: No
Specifies to make this baseline the current baseline. The field is display only if a baseline revision exists.
Default: Selected
Edit baselines from the baseline properties page. You can edit the revision name, revision ID, and description. You can also delete baselines. If you delete the current baseline and another baseline revision exists, the remaining baseline becomes the current revision.
Follow these steps:
The properties page appears.
The baseline properties page appears.
The baseline revision properties page appears.
Specifies to make this baseline the current baseline. The field is display only if a baseline revision exists.
Default: Selected
Defines the name of the baseline revision.
Example:
Initial Baseline, Mid-Term Baseline, or Final Baseline.
Required: Yes
Defines the unique identifier for the baseline revision.
Example:
The baseline version number, such as v1 or v5.
Required: Yes
Defines the description for the baseline revision.
Required: No
Displays the project or task start date at the time you create the baseline. The value for the field is taken from the start date field on the scheduling properties page.
Displays the project or task finish date at the time you take the baseline. The value for the field is taken from the finish date field on the scheduling properties page.
Displays the system-generated usage at the time you take for baselining using the following formula:
Usage = Total of Actuals + ETC
In lists and in portlets, the usage field displays the value from baseline usage field on the revision properties page.
Displays the system-calculated value of Budgeted Cost of Work Performed (BCWP). The value is calculated and recorded when you baseline a project, or when you update earned value totals. BCWP is also referred to as the earned value (EV). BCWP represents the amount of the budgeted cost (BAC) completed based on performance as measured using the Task EV Calculation method.
Calculations are made based on the level at which the calculation is made. BCWP is calculated at the following levels:
Current Baseline Required: Yes
Use the following procedure to define a baseline revision as the current baseline. You can view the current baseline revision from the baseline properties page. A checkmark icon displays in the Current Revision field for the current revision. By default, the baseline you create last becomes the current project baseline. If you have defined only one baseline, that becomes the current baseline.
Follow these steps:
The properties page appears.
The baseline properties page appears.
Specifies to make this baseline the current baseline. The field is display only if a baseline revision exists.
Default: Selected
Select the check box.
Use this procedure to update master project and subproject baselines. You can update existing project baselines to reflect changes to task assignments and other information, such as recently posted actuals. When you update a baseline, it becomes the current baseline revision.
When you update a project baseline, the changes to task assignments, estimates, and the financial summary from the last update get included. Updating a baseline changes its values accordingly.
Follow these steps:
The properties page appears.
The baseline properties page appears.
The confirmation page appears.
Use this procedure to update the current baseline for a specific task. You can select an unlimited number of tasks from the list. When you update the task baseline, the changes to assignments and estimates from the last baseline update get included. Financial summary changes are not included.
Follow these steps:
The list page appears.
The Gantt view appears.
The confirmation page appears.
The master project baseline information is an aggregation of its own baseline information and subprojects. The baseline is dynamically aggregated at the time you set the baseline. The master project resource baseline information is an aggregation of the team baseline information.
When you open a baselined master project and add a new subproject, the current baseline for the subproject is saved. When you baseline the master project, the new baseline replaces the subproject baseline. The baseline becomes the current baseline for the master project. The subproject information is aggregated and rolled up to the master project baseline.
If subprojects of the master project have more than one baseline, the current baseline displays in views. The subproject baseline inherits the name and the ID of the master project baseline. If the subproject already has a baseline with the same ID, that baseline is updated and a new baseline is not created. The link between the master project baseline and the subproject baseline is created based on the baseline ID. The baseline ID is shared between the two baselines.
When you delete a master baseline, the subproject baseline is also deleted.
When you update the baseline for a master project, the baselines for each subproject are also updated. The baseline becomes the current baseline for the master project and its subprojects.
When you update a subproject baseline, baseline and earned value (EV) information are not rolled up. To update the master project roll up the baseline information from the sub projects.
Suppose, you open a master project that is not baselined, but have baselined one of the subprojects. The current baseline for the subproject is displayed in views.
Example
You have a master project with two subprojects, SB1 and SB2, and only SB1 has a current baseline, Baseline1. You rename Baseline1. You baseline a selected task in SB2. You delete SB1 baseline and replace it with SB2 baseline. SB2 baseline is the current revision.
Earned value (EV) is the value of work performed expressed in terms of the approved budget assigned to that work for a scheduled activity or work breakdown structure. Earned value is also referred to as the budgeted cost of work performed (BCWP).
You can use the EV information to review historical performance and to predict future performance.
If your organization uses earned value management methodology for measuring project performance, you can set the project-level default earned value calculation method. Use the fields in the Earned Value section of the scheduling properties page to set the method. You can also use this page to associate your project to an earned value reporting period.
The earned value reporting period defines the frequency and the interval for the Update Earned Value History job. The job takes historical earned value snapshots of performance and saves them in the earned value history table. When using earned value methodologies to analyze project performance, the job uses the earned value reporting period to take the snapshot. It saves the snapshot based on the project association to the period. The project manager associates the project to the appropriate period.
You can use the earned value (EV) fields to track work performance to account for cost and schedule variances. Baseline information is factored in to the calculations performed in earned value analysis. All earned value fields contain the fundamental calculations used for earned value analysis (EVA).
The following EV values are calculated for every scheduled activity:
Displays the system-calculated value of Budget at Completion (BAC), which is the budgeted total cost at the time of the baseline. This value is calculated based on the following formula:
BAC = ((Actuals + Remaining Work) x Billing Rate) taken at time of baseline
Current Baseline Required: Yes
Displays the system-calculated value of Budgeted Cost of Work Scheduled (BCWS). BCWS is the budgeted amount to spend on the project in a given time period. If not specified, the date is either the current date for the project, or the system date. BCWS is also referred to as the planned value (PV).
The BCWS is calculated based on the following formula:
BCWS = Sum of BAC through a point in time
Current Baseline Required: Yes
Displays the system-calculated value of Actual Cost of Work Performed (ACWP), which is the total direct cost incurred in performing work based on posted actuals. ACWP is calculated at the following levels:
ACWP = Sum of Actual Cost for all the assignments on the task
ACWP = Sum of ACWP for all detail tasks in project
ACWP = Sum of ACWP for all summary tasks in project
Current Baseline Required: No
Displays the system-calculated value of Budgeted Cost of Work Performed (BCWP). The value is calculated and recorded when you baseline a project, or when you update earned value totals. BCWP is also referred to as the earned value (EV). BCWP represents the amount of the budgeted cost (BAC) completed based on performance as measured using the Task EV Calculation method.
Calculations are made based on the level at which the calculation is made. BCWP is calculated at the following levels:
Current Baseline Required: Yes
Displays the aggregated total for the cost of all actuals over time.
Displays the system-calculated value of Estimate At Completion (EAC). This calculation is most often used when current variances are seen as typical of future variances. The calculation is based on the following formula:
EAC (T) = ACWP + ETC
Current Baseline Required: No
Displays the system-calculated value of estimate at completion (EAC). This calculation is most often used when current variances are seen as atypical. And the project management team expectations are that similar variances will not occur in the future. The calculation is based on the following formula:
EAC (AT) = (ACWP + (BAC - BCWP))
Current Baseline Required: Yes
Displays the system-calculated value of estimate at completion (ETC) using earned value data. This calculation is most often used when current variances are seen as atypical. And the project management team expectations are that similar variances will not occur in the future. The calculation is based on the following formula:
ETC (AT) = BAC - BCWPc
Current Baseline Required: Yes
Displays the system-calculated value of Estimate To Completion (ETC), and is calculated based on the following formula:
ETC (Cost) = remaining labor cost + remaining non-labor cost
Current Baseline Required: No
Displays the system-calculated value of estimate at completion (ETC) using earned value data. This calculation is most often used when current variances are seen as typical of future variances. This value is calculated based on the following formula:
ETC (T) = (BAC - BCWPc)/CPIc
Current Baseline Required: Yes
The following values are used together to determine if work is performed as planned. The most frequently employed measures are:
Displays the system-calculated value of Cost Variance (CV). The CV is the value of what is accomplished to date as opposed to what is spent to date. The calculation is based on the following formula:
CV = BCWP - ACWP
Current Baseline Required: Yes
Displays the system-calculated value of Schedule Variance (SV). The SV is the value of what is scheduled to date as opposed to what is performed to date. A positive value indicates that the work is ahead of the baseline schedule. A negative value indicates that the work is behind the baseline schedule. The calculation is based on the following formula:
SV = BCWP - BCWS
Current Baseline Required: Yes
Displays the system-calculated value of Cost Performance Index (CPI), which is an efficiency rating for work accomplished. A value equal to or greater than one indicates a favorable condition. A value less than one indicate an unfavorable condition. The calculation is based on the following formula:
CPI = BCWP / ACWP
Current Baseline Required: Yes
Displays the system-calculated value of Schedule Performance Index (SPI), which is the ratio of work performed to work scheduled. A value less than one indicate the work is behind schedule. The calculation is based on the following formula:
SPI = BCWP / BCWS
Current Baseline Required: Yes
Follow these steps:
Contact your CA Clarity PPM administrator or see the Administration Guide for more information.
An earned value calculation method is the method for calculating the various earned value (EV) metrics. Some of the methods are system calculated. For methods that are not system calculated, manually enter the Budgeted Cost of Work Performed (BCWP) for your project.
If you use an EV calculation method for your project and all of its tasks that are not system calculated, define your project BCWP value. To define the value, baseline the project or updating the earned value totals. You can also override BCWP for specific tasks.
Regardless of the earned value calculation method you set for your project, the value entered in the BCWP Override field overrides the system-calculated BCWP values. The value is used in all EV calculations that require BCWP as a parameter.
The following EV calculation methods are available:
Defines an estimate expressed as a percent of the amount of work that has been completed on a task or work breakdown structure. The EV calculation method where Budgeted Cost of Work Performed (BCWP) is system calculated using the following formula:
BCWP = Budget at Completion (BAC) * % complete
Defines the EV calculation method where Budgeted Cost of Work Performed (BCWP) is system calculated using the following fixed formula:
If % complete = 100, then BCWP = Budget at Completion (BAC); otherwise, BCWP = zero.
Use this method when project work begins and completes in a single reporting period. Also, use when credit is only earned when the project or task is 100 percent complete.
Defines the EV calculation method where Budgeted Cost of Work Performed (BCWP) is system calculated using the following formula:
If % complete > zero but < 100, then BCWP = Budget at Completion (BAC) / 2. If % complete = 100, then BCWP = BAC. If % complete = zero, then BCWP = zero.
Use this method when project work begins and completes within two reporting periods. Also use when 50 percent credit is earned when a project or task is started and the remaining 50 percent is earned upon completion.
Defines the EV calculation method where Budgeted Cost of Work Performed (BCWP) is system calculated using the following formula:
BCWP = Budgeted Cost of Work Scheduled (BCWS)
Defines the EV calculation method where Budgeted Cost of Work Performed (BCWP) is user-defined. The project manager assigns weights to milestones across the duration of the summary task. As each milestone in the summary task is reached, a specific percent of the work is completed until 100 percent is reached. Use this method if your organization uses earned value management methodology for measuring project performance and has projects and tasks that use this method. When you use this method, you enter the BCWP at the task level. Use the BCWP Override field in the Earned Value section of the task properties page.
Defines the EV calculation method where Budgeted Cost of Work Performed (BCWP) is not system calculated but user-defined. Dollar amounts are selected for the weighting of each time period, instead of a percentage. EV credit is earned as a percent of the milestone value assigned. Use this method if your organization uses earned value management methodology for measuring project performance and has projects and tasks that use this method. When you use this method, you enter the BCWP at the task level. Use the BCWP Override field in the Earned Value section of the task properties page.
Defines the EV calculation method where Budgeted Cost of Work Performed (BCWP) is not system calculated but is user-defined. Task work effort is tied to other task work efforts. As the base task completes work, the apportioned task earns completed work. The task uses the work effort tied to other tasks to drive its performance. Use this method for discrete work that is related to other discrete work. Use this method if your organization uses earned value management methodology for measuring project performance and has projects and tasks that use this method. When you use this method, you enter the BCWP at the task level. Use the BCWP Override field in the Earned Value section of the task properties page.
By default, the earned value (EV) calculation method for projects and tasks is percent complete. If your organization uses earned value management methodology for measuring project performance, your CA Clarity PPM administrator can change the default earned value calculation method setting. Change the setting to the method your company uses for projects and tasks.
Best Practice: Have your CA Clarity PPM administrator define the object-level default setting for projects and tasks. In this way, the EV calculation method defaults to this object-level setting when you create new projects or tasks.
You can override the object-level EV calculation method setting at the project and at the task level. When calculating the earned value metrics, the EV calculation method setting you establish at the task level is used. The results are rolled up to the project. If you do not define a method for the task, the task inherits the method from its parent task. If you do not define the method for the summary task, it inherits the method value from the project. If you do not set the method for the project, the task is ignored when the earned value is calculated.
If you create projects from project templates, you can set the EV calculation method in the project template. The projects, created from the template, inherit the setting.
Note: If you are using CA Clarity PPM with Microsoft Project and specify an earned value calculation method other than percent complete, use CA Clarity PPM to calculate, display, and report earned value metrics.
Use the following process to close projects:
The following process outlines how to delete a project:
For more information, see the Financial Management User Guide.
For more information, see the Basics User Guide.
Note: Your CA Clarity PPM administrator schedules and runs the job on a regular basis.
For more information, see the Administration Guide.
Active projects display by default on the projects list page. Deactivate a project before removing it from the list of active projects. A deactivated project can be reactivated again.
Follow these steps:
The properties page appears.
Specifies if the investment is active. Clear the check box to deactivate the investment.
Default: Selected
You can mark a project for deletion only when the project is inactive. Projects so marked remain listed on the projects list page until the Delete Investments job runs.
Follow these steps:
The list page appears.
The inactive projects display in the list.
The confirmation page appears.
You can cancel projects marked for deletion when the following conditions are true:
When you cancel an inactive project marked for deletion, the project is not deleted when the Delete Investments job runs. Inactive projects continue to appear in the list of inactive projects.
Follow these steps:
The list page appears.
A list of inactive projects displays on the projects list page.
The confirmation page appears.
|
Copyright © 2013 CA.
All rights reserved.
|
|