

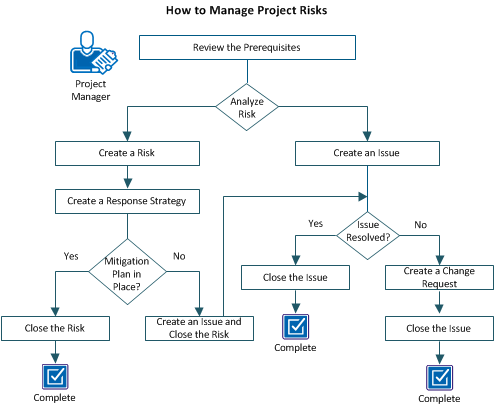
A risk management process includes identifying, analyzing, planning, tracking, and communicating risk. Risk management involves risks, issues, and change requests. Making informed decisions by consciously assessing potential problems and the severity of their impact is the heart of project risk management.
The project manager creates a risk or an issue based on the impact of the risk after identifying and analyzing the risk.
You can identify risks at any time during a project life cycle. You can escalate a risk to an issue when it appears likely to affect the project in a significant way. Change requests result from issues and can help facilitate effective resolutions.
The following diagram and this scenario, describe one way of managing project risks. For more information about other ways of managing project risks, see the Project Management User Guide.
Example: Create and manage a project risk
In this example, the project team at Forward Inc. is developing a new product using a niche technology. The resources within the organization having experience with this technology are limited and so the team must use external resources to complete the project. Additionally, the product is bundled with third-party APIs for which legal approvals are required.
The team identifies two risks affecting their project in a significant way for analysis:
After the analysis, based on the impact of the risk on the project, the project manager creates a risk for the limited resources and an issue for the dependency.
To manage project risks, perform these steps:
To complete all tasks in this scenario, you need the following access rights:
A risk is a potential future event that has a positive or negative impact on a project objective. Identify the risks early in a project to become aware of potential effects on the project scope, schedule, budget and other factors. In this scenario, the team decides to mitigate the limited resources risk by employing external resources. The project manager creates a detailed risk providing all the information and selects Resource Availability from the Category drop-down list.
If the overall score for a detailed risk differs from the rating you assigned to it, the two risk management components interact. The score of the detailed risk overrides the rate you assigned. If you create a detailed risk without assigning rates, scores from the risk entries color the appropriate factor in the list. Deleting a detailed risk changes the project overall risk score and the combined risk score for that particular risk category.
Follow these steps:
Defines the category to which the risk belongs.
Values:
Note: When you specify a risk category, the overall risk score overrides any differing status selection you make for the risk category or factor.
Defines the name of the resource who is managing the risk. This resource is responsible for verifying that the risk is managed and tracked appropriately through its life cycle.
Default: The resource currently logged in.
Defines the date by which repercussions from this risk could affect the project. If you identify an impact date, enter a date in the Target Resolution Date field.
Default: Current date
Defines the assumptions that determine that this item could be a risk. You can verify these assumptions to help ensure that they continue to be valid through the duration of the risk life. If the assumptions change, the impact or probability of the risk can also change.
Defines the risks within the project that are associated with this risk. You can only link this risk to risks within this project.
Defines the issues within the project that are associated with this risk. You can only link this risk to issues within this project.
Defines the type of response you want to make with this risk.
Values:
Default: Watch
Note: In this scenario, select Mitigate.
Defines the probability that the risk can occur. The risk probability is used to calculate the risk exposure.
Values: Low (1), Medium (2), or High (3)
Default: Low
Displays the score calculated based on the selections you make in the Probability and Impact fields.
Values:
Defines the effect of the risk on the project. The effect of the risk on the project performance, supportability, cost, and schedule determines the impact. This value is used to calculate the risk exposure.
Default: Low
Defines the final resolution of this risk once the risk is mitigated. The resolution data is useful for recalling the outcome of a risk response strategy when planning or approaching future project risk plans.
Note: You can define a resolution while creating the risk, or before closing it.
Specifies the risks encountered or created within the project as a result of the mitigation that is taken to resolve the risk. Unlike associated risks, residual risks do not share similar outcomes, but result from an action you take in resolving a risk.
Once a decision is made to mitigate the risk, the project manager creates and assigns the owner of the risk to develop a response strategy. Risk response strategies document the actions, tracking requirements, and other supporting information that is required to reduce the risk probability and impact.
Regardless of who owns the risk, you can assign individual response strategies to different resources, and each response strategy can have its own due date. These dates and names can be used with processes to send notifications and reminders to risk owners. You typically create a risk response strategy when you select a Response Type of Mitigate.
In some cases, you can accept the risk exposure and not pursue the risk.
Follow these steps:
Once the risk is successfully mitigated, change the status of the risk to Closed and enter the final resolution. A detailed resolution can help you recall the outcome of a risk response strategy when planning, or approaching future project risk plans.
Follow these steps:
An issue is an event that has affected the project. When the risk mitigation plan fails, you can escalate the risk to an issue. Create an issue from the existing risk and then close the risk. The new issue inherits the risk name, description, and some of its values, such as Status ("Open") and Date Created (current calendar date). You can always link back to the originating risk. Creating an issue from a risk brings awareness, actions, and tasks around an issue for the conclusion by the project team. Additionally, it allows the team to keep a record of issues and their outcome for analysis at project closure and future project planning.
You can also connect other risks or issues that are related to this issue. Connecting all related issues and risks helps you trace dependencies and recognize trends in future analysis and audits.
In this scenario, as part of the mitigation plan, external contractors are hired to complete the project. However the contractors hired do not have the required level of experience which is impacting the progress of the project delivery. The risk now becomes an issue and the project manager then creates an issue from this risk and closes the risk.
Follow these steps:
Defines the category to which the issue belongs.
Values:
Defines the name of the resource who is managing the issue. This resource is responsible for verifying that the issue is managed and tracked appropriately through its life cycle.
Default: The resource currently logged in.
Create an issue when the risk impacts the project in a significant way. Since the delay in the approval process is anticipated, the project manager creates an issue and assigns the category as dependency.
Follow these steps:
Defines the unique identifier for the issue. You cannot change the identifier, once you save the issue.
Defines the category that the issue belongs to.
Values:
Defines the name of the resource who is managing the issue. This resource is responsible for verifying that the issue is managed and tracked appropriately through its life cycle.
Default: The resource currently logged in.
Displays the name of the resource who created the issue.
Default: The resource currently logged in.
Once the issue is resolved, change the status to Closed, and enter a final resolution. A detailed resolution can help you recall the outcome of an issue when planning or approaching future projects issue plans.
Follow these steps:
A change request is an alteration to expand or contract the project scope, schedule, or budget. Create a change request when the issue resolution impacts the project scope, schedule, or budget or when the issue is not resolved. Recording a change request helps you analyze the project and also learn from past events.
In this scenario, the project manager creates a change request to extend the project deadline to address both the issues:
Follow these steps:
Defines the category to which the change request belongs.
Values:
Technical - The project technology is unproven and new internal or external expertise is required.
Defines the name of the resource who is managing the change request. This resource is responsible for verifying that the change request is managed and tracked appropriately through its life cycle.
Default: The resource currently logged in.
Describes how the changes in the request can affect the project baseline.
Describes how the request can affect other projects.
Defines the amount by which the request can change the budget cost of the project. The budget cost is a field that is defined on the budget properties page.
Defines the number of days by which the request can delay or accelerate the overall project schedule.
Defines a number that reflects the request for an increase or decrease in the number of resources that are needed for the project.
You can create risks to address uncertainty, minimizing the costly consequences of unforeseen or unmanaged problems. You can create response strategies for risks and associate risks with tasks and processes.
The risks list page displays a list of existing risks. A checkmark icon in the Above Threshold column of the risks page indicates that the risk score exceeds the risk threshold.
You can manage risks in the following ways:
You can create risks in the following ways:
You can create risks from existing issues. Basic information from common fields is carried over to the new issue for easy setup. You can link back to the originating issue from the risk for easy navigation between the records. In addition, you can manually associate risks or issues to each other. Manual association is useful for understanding the relationships between the risks and issues, providing better overall management of a project.
Follow these steps:
Defines the category to which the risk belongs.
Values:
Defines the name of the resource who is managing the risk. This resource is responsible for verifying that the risk is managed and tracked appropriately through its lifecycle.
Default: The resource that is currently logged in.
Displays the name of the resource who created this risk.
Default: The resource currently logged in.
Defines the symptoms that identify this item as a risk.
Displays a description of the result the risk had on the project.
Displays the date when the repercussions from the risk impacted the project.
Displays the target date of resolving the risk.
Displays the assumptions that determined the risk.
Defines the risks within this project that are associated with this risk. You can only link this risk to risks within this project.
Defines the issues within this project that are associated with this risk. You can only link this risk to risks within this project.
Defines the type of response you want to make with this risk.
Values:
Default: Watch
Defines the probability that the impact can occur. The risk probability is used to calculate the risk exposure.
Values: Low (1), Medium (2), or High (3)
Default: Low
Displays the score calculated based on the selections you make in the Probability and Impact fields.
Risk values:
Defines the effect of the particular risk on the project, determined by the risk effect on project performance, supportability, cost, and schedule. This value is used to calculate the risk exposure.
Values: Low (1), Medium (2), or High (3)
Default: Low
Defines the final resolution once the risk is mitigated. The resolution data is useful for recalling the outcome of a risk response strategy when planning or approaching future project risk plans.
Specifies the risks encountered or created within the project as a result of the mitigation taken to resolve the risk. Unlike associated risks, residual risks do not share similar outcomes, but result from an action you take in resolving a risk.
When you create a risk from a change request, some of the fields are populated with information from the related change request. To view the original change request from the risk, open the risk, and click the ID in the Originating Change Request field.
Follow these steps:
Defines the category to which the risk belongs.
Values:
Defines the name of the resource who is managing the risk. This resource is responsible for verifying that the risk is managed and tracked appropriately through its lifecycle.
Default: The resource that is currently logged in.
Displays the name of the resource who created this risk.
Default: The resource currently logged in.
Defines the symptoms that identify this item as a risk.
Displays a description of the result the risk had on the project.
Displays the date when the repercussions from the risk impacted the project.
Defines the assumptions that determine that this item could be a risk. You can verify these assumptions to help ensure that they continue to be valid through the duration of the risk life. If the assumptions change, the impact or probability of the risk can also change.
Defines the risks within this project that are associated with this risk. You can only link this risk to risks within this project.
Defines the issues within this project that are associated with this risk. You can only link this risk to risks within this project.
Defines the probability that the impact can occur. The risk probability is used to calculate the risk exposure.
Values: Low (1), Medium (2), or High (3)
Default: Low
Defines the effect of the particular risk on the project, determined by the risk effect on project performance, supportability, cost, and schedule. This value is used to calculate the risk exposure.
Values: Low (1), Medium (2), or High (3)
Default: Low
Displays the score calculated based on the selections you make in the Probability and Impact fields.
Risk values:
1 - 3 (Green). The calculated risk is low.
Defines the final resolution once the risk is mitigated. The resolution data is useful for recalling the outcome of a risk response strategy when planning or approaching future project risk plans.
Specifies the risks encountered or created within the project as a result of the mitigation taken to resolve the risk. Unlike associated risks, residual risks do not share similar outcomes, but result from an action you take in resolving a risk.
Organizations typically prefer to fund projects which offer low and medium risks. Unless a high-risk project can provide substantial benefits, or is strategically essential to business goals, it can be terminated.
You can rate a predefined list of possible risk factors for each project on the main risk page.
The following colors are used to display the risk score in the form of a stoplight:
After you assign risk rates to the individual factors, an overall risk level for the project is calculated. The calculation is based on the combined risk levels of all the risk factors in the list. The overall risk level appears at the top of the factor list.
You can rate your risks on the main risk page. All the other risk management components and actions that you can perform are on the risks page within a project. Create a detailed risk on the risks page and assign it to a risk category. The category is equivalent to one of the risk categories or factors listed on the main risk page.
If the overall score for a detailed risk differs from the rating you assigned to it on the main risk page, the two risk management components interact. The score of the detailed risk overrides the rate you assigned. If you create detailed risk without assigning rates, scores from the risk entries color the appropriate factor in the list.
Example
Suppose, you delete a detailed Funding risk, and multiple risks of the risk category type exist. The risk score for that risk category/factor is recalculated based on the combined score of all the risks remaining in that category. If, however, you delete a Funding Risk and only one risk of the category remains, you can select a risk value from the Funding drop-down.
You can assign rates to the project risk factors using the main risk page. The risk factors display in the Contributing Factors section of the page. The Risk field, at the top of the page, indicates a combined risk level for the project. The risk level is based on all the selections made in the Contributing Factors section of the page.
Follow these steps:
Specifies if the requirements, objectives, scope, and benefits are reasonable, clearly defined, measurable, and verifiable.
Specifies if the sponsorship is clearly identified and committed.
Specifies if the project funding is available without constraints.
Specifies if internal resources are available for the project without constraints and external resources are not required.
Specifies if the project is not dependent on other projects.
Specifies if the project technology is proven and new internal or external expertise is required.
Specifies if the project has a well-defined user interface (UI).
Specifies if the project requires little change to the organization culture, business processes, procedures, or policies.
Specifies if the project is easy to support in the future and do not require major updating.
Specifies if minor uncertainties exist in the implementation effort and user acceptance.
Specifies if the project is easily adaptable.
The stoplights are changed next to each risk factor to the color assigned to the level you selected for each risk.
You can enter and view a detailed calculated risk score in the Quantify Risk section of the risk properties page. The risk score is calculated based on the selections you make in the Probability and Impact fields on this page.
Probability and impact levels are rated as follows:
Example
You set the risk probability level to High (3) and the impact level to Medium (2). The calculated risk score is 6.
The calculated risk score works with the system-level risk threshold value for all projects, set by your CA Clarity PPM administrator. The risk threshold is the acceptable level of risk that can be tolerated without acting out the risk response strategy. The risk threshold is useful because projects can have hundreds of risks. The only way to manage them is to focus on the most important ones.
The risk score matrix and the risk threshold contain default values. You can set the values as high or low as appropriate for your organization. You can view whether your risk is above the threshold on the risks page. You can design procedures or processes to deal with risks that exceed the threshold.
You can add notes to record additional information about a risk (issue or change request). The notes you add are displayed in a list on the risk notes page. They are listed in the order in which they were created, with the most recent note appearing at the top of the list. From this page, you can sort the list of notes and add additional notes.
You cannot edit or create replies to risk notes.
Follow these steps:
You can assign a risk to an existing task, or create a task. You can also assign risks to one or more key tasks. A key task is significant in some way. For example, the start date of other tasks can depend on the key task. Using the risk associated tasks page, you can view a list of the tasks associated with the risk.
You can associate the risks you create with your tasks and view them on the task associated risks page. You cannot reply to or edit the risks that are listed on the page.
Use the following procedure to view a list of risks. The page displays the name of the risk, priority, status, impact date, and the name of the assignee. Resources with project access can view the risks.
Follow these steps:
Follow these steps:
Specifies to designate the task as a milestone task. Milestones are tasks that have a due date but not a duration (a period between a start and finish date). Once saved, the Start field on the task properties page is locked.
Default: Cleared
Note: You cannot assign staff to milestones or designate them as summary tasks.
Specifies whether you want to identify this task as a key task. A key task is significant in some way. For example, the start date of other tasks can depend on the key task.
Example: If this task is one whose completion is essential to the start date of other tasks, then mark this task as a key task.
Default: Selected
Displays the status of the task based on the value of % Complete. This field is automatically calculated and updated based on the task % Complete value.
Values:
Default: Not Started
Defines the percent of work that has been completed when the task is partially completed.
Values:
Defines the charge code for the task. Task-level charge codes supersede project-level charge codes where both are specified.
Defines the date on which the task is required to start. This date is used as a date constraint during autoscheduling.
Defines the date on which the task is required to finish. This date is used as a constraint during autoscheduling.
Defines the earliest possible start date for a task. This date is used as a constraint during autoscheduling.
Defines the latest possible start date for the task. This date is used as a constraint during autoscheduling.
Defines the earliest possible finish date for a task. This date is used as a constraint during autoscheduling.
Defines the latest possible finish date for a task. This date is used as a constraint during autoscheduling.
Specifies excluding the dates for this task during the auto-scheduling process.
Default: Cleared
Required: No
Note: This field works with the Schedule Assignments on Excluded Tasks field on the auto-schedule page. Suppose, you exclude the task from auto-scheduling. But you specify allowing changes to excluded task resource assignment dates during auto-scheduling. The auto-schedule process changes the task resource assignment dates, while remaining within the start and finish dates for the task.
Creating an association between a risk and a task, helps you view the association on the task associated risks page.
Follow these steps:
The risk audit trail page lets you view when certain risk fields are changed, and by whom. In this way, you can track changes by resource and date.
Your CA Clarity PPM administrator can set up the auditing to audit and preserve a record of operations performed on risks. When you edit a risk, the change is displays on the Audit Trail page when viewed in CA Clarity PPM.
For more information, see the Studio Developer’s Guide.
You can view the fields that have changed for a risk. The fields display in the list on the risk audit trail page with the name of the resource who changed it, and when.
Before you can view the risk audit trail page, your CA Clarity PPM administrator requires setting up risks for auditing.
For more information, see the Studio Developer’s Guide.
Follow these steps:
You can use processes to automate certain elements of the risk management process. Before you begin creating and maintaining risk management processes, be sure that you understand the process and how it works.
For more information, see the Basics User Guide.
The issues page helps you create and manage issues. You can create issues from risks to escalate a serious risk to a higher level. Or, create issues that are independent of risks and change requests. As with risks, you can associate issues with action items, tasks, and processes.
The issues list page displays a list of existing issues. To access the issues list page, open the project, and from the Risks/Issues/Changes menu, click Issues.
You can manage an issue in the following ways:
You can create any number of issues for each project. Like projects, programs, and risks, you can create issues in the following ways:
You can create issues from change requests.
Follow these steps:
Defines the name of the resource who is managing the risk. This resource is responsible for verifying that the issue is managed and tracked appropriately through its lifecycle. If you create an issue from a closed risk, the value for this field is from Owner field on the risk properties page.
Default: The resource currently logged in
Displays the name of the resource who created the issue.
Default: The resource currently logged in
If your organization uses a different system such as Microsoft Excel or Access to create and monitor issues, use the XML Open Gateway (XOG) to import them into CA Clarity PPM.
For more information, see the XML Open Gateway Developer Guide.
You can quickly create a change request from an existing issue. Basic information from common fields is carried over to the new change request for easy setup. A link back to the originating change request is provided on the issue properties page for easy navigation between the records.
In addition, you can manually associate issues or change requests to each other. Association can help you understand the relationships between the issues and change requests, and provide better overall project management.
Click the ID in the Originating Change Request field to view the originating change request.
Follow these steps:
Defines the name of the resource who is managing the risk. This resource is responsible for verifying that the issue is managed and tracked appropriately through its lifecycle. If you create an issue from a closed risk, the value for this field is from Owner field on the risk properties page.
Default: The resource currently logged in
Displays the name of the resource who created the issue.
Default: The resource currently logged in
Defines the date for resolving the issue. The date requires to be the same or earlier than the impact date.
Default: Current date
You can add notes to record additional information about an issue. The notes are displayed in a list on the Issue Notes page. They are listed in the order in which they were created, with the most recent note appearing at the top of the list. From this page, you can sort the list of notes and add additional notes.
You cannot enter a reply to issue notes.
View notes in the list section of the issues page. But you cannot create replies to notes or edit notes to issues. Users with access to the Risks/Issues/Changes page for a project can view notes.
Follow these steps:
Use the issue associated tasks page to associate tasks with the issue and to view a list of tasks associated with the issue. You can associate tasks, key tasks, and milestones with an issue. You cannot reply to, or edit the issues listed on the page.
By default, not all tasks associated with the issue are displayed in the list. To view all tasks associated with the issue, expand the filter section, select All at the Key Task filter field, and then click Filter.
Use the following procedure to view a list of issues. This page displays the name for the issue, priority, target resolution date, and the name of the assignee. Resources with project access can view the issues.
Follow these steps:
Creating an association between the issue and the task helps to view the same using the task associated issues page.
Follow these steps:
Use the issue audit trail page to view changes in certain issue details and the resources who changed them. You can track changes by resource and date.
Your CA Clarity PPM administrator determines the property fields required to be set up for audit trail.
For more information, see the Studio Developer’s Guide.
You can view attributes that have changed, or as changed in a filter for an issue. The fields display in the list on the issue audit trail page, with the name of the resource who changed it, and when.
Follow these steps:
Use processes to automate certain elements of the Issue management process. For example, you can create processes to notify when issue-related tasks are completed. Before you begin creating and maintaining Issue Management processes, understand the process and how it works.
For more information, see the Administration Guide.
For more information, see the Basics User Guide.
You can create change requests to submit and track stakeholder requests. Change requests are requests to expand or reduce the project scope or plans or to revise schedules. A change request can be raised for a new product feature, enhancement request, defect, or changed requirement. You can track the change request status throughout the project lifecycle.
The change request list page displays a list of existing change requests. To access the page, open the project, and from the Risks/Issues/Changes menu, click Change Requests.
You can manage change requests in the following ways:
You can create any number of change requests for each project in the following ways:
You can create a change request using the following steps.
Follow these steps:
Specifies the name of the resource managing the request. The resource is responsible for verifying that the request is managed and tracked appropriately through its lifecycle.
Default: The resource currently logged in
Displays the name of the resource who created the request.
Default: The resource currently logged in
Defines how the changes in the request can affect the project baseline.
Defines how the request can affect other projects.
Defines how this change can benefit the project.
Defines the amount by which the request can change the budget cost of the project. The budget cost is a field defined on the budget properties page.
Defines the number of days by which the request can delay or hasten the overall project schedule.
Defines the number that reflects the request for an increase or decrease in the number of resources required for the project.
You can create change requests from existing risks. In addition, the Originating Risk field displays on the change request properties page. This field is a link to the risk from which the change request derived. Basic information, such as the risk name and ID number, are carried over to the new change request for easy setup.
Follow these steps:
Specifies the name of the resource managing the request. The resource is responsible for verifying that the request is managed and tracked appropriately through its lifecycle.
Default: The resource currently logged in
Displays the name of the resource who created the request.
Default: The resource currently logged in
Defines the effect of the change request on the project baseline.
Defines the effect of the change request on other projects.
Describe how this change can benefit the project.
Defines the amount by which the request can change the budget cost of the project. The budget cost is a field defined on the budget properties page.
Defines the number of days by which the request can delay or hasten the overall project schedule.
Defines the number that reflects the request for an increase or decrease in the number of resources needed for the project.
Note: To close the change request, change the status to Closed.
Once a change request is resolved, change its status to "Closed", and enter a final resolution for the request. A detailed resolution can help recall the outcome of a request when planning or approaching future projects.
Follow these steps:
The change request main page appears.
Specifies the status of the change request.
Values: Open, Work in Progress, Closed, or Resolved
Default: Open
Required: Yes
Select "Closed" as the status.
Enter the reason for the requested change.
You can add notes to record additional information about a request. The notes, you add, are displayed in a list on the change request notes page. They are listed in the order of creating, with the most recent note appearing at the top of the list. From the page, you can sort the list of notes and add additional notes. You cannot create a reply to change request notes.
The new change requests appear on the change request notes page. Change request notes display in the list section of the page. You can only view the notes on the page.
Follow these steps:
The change request audit trail page lets you view when certain request fields are changed, and by whom. In this way, you can track changes by resource and date.
Your CA Clarity PPM administrator can set up the auditing to audit and preserve a record of operations performed on change requests. When you edit a change request, the change is displayed on the Audit Trail page when viewed in CA Clarity PPM.
For more information, see the Studio Developer’s Guide.
You can view the attributes of a request that have undergone a change. The fields display on the bottom half of the change request audit trail page. The details include the name of the resource who changed it, and when.
Before you can view the change request audit trail page, your CA Clarity PPM administrator sets up the risks for auditing.
For more information, see the Studio Developer’s Guide.
Follow these steps:
The risks page appears.
The change requests page appears.
The change request audit trail page appears.
The audit fields for the request display.
Use processes to automate certain elements of the change request process. For example, you can create processes to notify you when change request audit trails undergo changes. Before you begin creating and maintaining change request processes, understand the process and how it works.
For more information, see the Basics User Guide.
Action items are units of non-task work that you assign to yourself or to others and that others assign to you. You can use action items to track the progress of projects and to help ensure that a project is complete and on time.
Project-related action items are listed in the Action Items portlet on the Overview page. They are also listed on the Organizer Action Items page and within the project on the Action Items page.
You can modify the general, notification, and assignee properties of an action item from the Action Item Properties page. You can only update your status on the action items that other resources create and assign to you.
You can manage the action items in the following ways:
Create your project-related action items from within a project. When you create an action item, you become the owner of the action item or you can assign it to resources that access the item. As the owner, you can modify and delete it.
Follow these steps:
Indicates if the action item occurs at regular intervals. If the action item occurs only once, clear the check box.
Specifies how often the action item to recur. For example, if you require a status report each week, enter 1 in the Frequency field.
Indicates if the assigned resource receives a notification by email or SMS on the Overview page.
Default: Cleared
Indicates if a reminder email notification is sent to the assigned resource (or resources) when the action item is due.
Default: Cleared
If the Send Reminder check box is selected, the field defines the amount of time before the item is due for the reminder to occur. For example, enter 15 in the field, and select Minutes in the Units field.
You can add notes to record additional information about a risk, issue or change request. The notes, you add, are displayed in a list on the notes page. They are listed in the order of creating, with the most recent note appearing at the top of the list. From the page, you can sort the list of notes and add additional notes. You cannot create a reply to notes.
Follow these steps:
View notes in the list section of the issues page. But you cannot create replies to notes or edit notes to issues. Users with access to the Risks/Issues/Changes page for a project can view notes.
Follow these steps:
The new change requests appear on the change request notes page. Change request notes display in the list section of the page. You can only view the notes on the page.
Follow these steps:
Use the issue audit trail page to view changes in certain issue details and the resources who changed them. You can track changes by resource and date.
Your CA Clarity PPM administrator determines the property fields required to be set up for audit trail.
For more information, see the Studio Developer’s Guide.
You can view attributes that have changed, or as changed in a filter for an issue. The fields display in the list on the issue audit trail page, with the name of the resource who changed it, and when.
Follow these steps:
You can view attributes that have changed, or as changed in a filter for an issue. The fields display in the list on the issue audit trail page, with the name of the resource who changed it, and when.
Follow these steps:
You can view attributes that have changed, or as changed in a filter for a change request. The fields display in the list on the change request audit trail page, with the name of the resource who changed it, and when.
Follow these steps:
|
Copyright © 2013 CA.
All rights reserved.
|
|