

This section contains the following topics:
How to Work with the Gantt View Toolbar
Task Dependencies and Relationships
Estimate to Complete (ETC) (Tasks)
You can create, manage, and view all project tasks in the Gantt view. This view is divided into a work breakdown structure (WBS) on the left and a Gantt chart on the right.
Use the Gantt chart to view and edit tasks and dependencies in a timeline. You can change task dates and create finish-start dependencies by using a drag-and-drop operation with the Gantt bars. The Gantt chart includes information from the master project and subprojects based on the WBS for the current project.
By default, late tasks and milestones display in the Gantt chart with exclamation points on the task or milestone Gantt bar. Completed tasks and milestones display with checkmarks on the task or milestone Gantt bar.
The green progress bar above the task Gantt bar indicates how much work is complete for the task. You can change the progress bars by changing the Gantt chart display settings.
For more information, see the Personalizing CA Clarity PPM User Guide.
By default, no object actions display for the Gantt view. To display object actions for the Gantt view, contact your CA Clarity PPM administrator to configure the Actions menu for the Gantt view.
In the Gantt view, you can change the WBS or the Gantt itself and these changes are stored as pending edits. You can either explicitly save, or discard these pending edits.
Sometimes, when you try to save your pending edits, an error message can appear informing you about any error in your edits. For example, an error message appears, if you try to create a task with an ID that is not unique. You can either resolve your error or discard your edits that caused the error in the error message window. Also, save any other pending edits you make outside the error.
Best Practice: Maximize your work area by promoting the detail panel to the workspace, or by maximizing the page.
Some toolbar options become active only when you select items in the work breakdown structure. If you do not have the access right, a toolbar option can be disabled.
You can use the icons on the Gantt view toolbar to do the following:
|
Icon |
Action |
|---|---|
|
|
Saves your changes. Note: Your changes are saved only when you explicitly save. |
|
|
Discards your currently unsaved changes. |
|
|
Inserts a new task in the WBS. |
|
|
Copies a task from a project template. |
|
|
|
|
|
|
|
|
Creates a subproject from a project template and adds it to the WBS. |
|
|
Assigns a resource to the selected task. |
|
|
Outdents the selected task. |
|
|
Indents the selected task. |
|
|
|
|
|
|
|
|
Removes task dependencies between the selected tasks. |
|
|
|
|
|
|
|
|
Indicates the project is locked. Hovering over the icon indicates the user that locked the project. If you have administrative rights, you can click the icon to unlock the project. A project is automatically locked when there are pending edits for it. The lock is removed when you save or discard the edits or if you unlock the project. |
|
|
Indicates the project is not locked. |
|
|
|
|
|
|
|
|
|
|
|
|
|
|
Deletes the tentative schedule. |
|
|
|
|
|
|
|
|
|
|
|
Deletes a task or removes a subproject from the master project. |
|
|
|
|
|
|
|
|
Collapses the Gantt view to display only the WBS. |
Changes you make to the WBS or the Gantt itself are stored as pending edits until you explicitly save or discard these changes. The edits on a project persist beyond a session for a specific user. These edits include edits to the rollup fields which are recalculated only after a save is performed. For example, if you extend the date for a subtask, the parent task dates are not extended until you save the change.
Pending edits include the following types of edits in the WBS:
The following actions outside the WBS are unavailable while there are pending edits. Save or discard your edits to enable these actions:
Whereas changes outside the Gantt view are saved directly to the database, pending edits are saved temporarily until you accept or discard these changes. If you do not save or discard your changes, the pending edits are discarded when your session expires.
When you start making edits in the Gantt view, the project is automatically locked. If someone else already locked the project, the lock icon appears on the toolbar. If you hover over the lock icon, it displays the user who locked the project.
Only the current project is locked. Subprojects are not locked.
All project pages are locked as they are when you open the project in an external scheduler. The pages are locked for all users including the user who locked the project. The Gantt view is an exception to this rule. The current user with the lock can edit in the Gantt view. If the project management setting Allow Edit of Allocations when Investment is Locked is selected, any user with resource management rights to the project can add staff to the project.
As soon as you or the user who locked the project saves their edits, the project is unlocked.
Administrators with the Administration – Application Setup right can unlock the project.
If you open the project in an external scheduler, the Gantt view is locked for all users including the current user.
You can view and edit project tasks in the Gantt view in a separate window in the following ways:
The following rules apply for opening a project in Gantt view:
You can open the legend from the Gantt View toolbar. The Gantt chart displays the following indicators to specify the type or status of a task:
|
Indicator |
Description |
|---|---|
|
|
Task. A task is an activity that is required to be accomplished within a time frame. Tasks define the project work, the staff member, and the resource that performs the work. |
|
|
Progress Through Bar |
|
|
Completed Task. A completed task is a task where its status is set to "Completed". |
|
|
Late Task. A late task is a task or milestone where the Finish date field value is later than the Baseline Finish date field value. |
|
|
Summary Task. A summary task is a task that has one or more subtasks nested beneath it. |
|
|
External Task displayed in the Gantt chart. An external task is a task in another project on which a task within the project has a dependency. |
|
|
Subproject displayed in the Gantt chart. A subproject is a project located within a master project. |
|
|
External Task displayed in the WBS. An external task is a task in another project on which a task within the project has a dependency. |
|
|
Subproject displayed in the WBS. A subproject is a project located within a master project. |
|
|
Milestone. Milestones are tasks that have a due date but not a duration (a period between a start and finish date). |
|
|
Completed task. A completed task is a task where its status is set to "Completed". |
|
|
Late task. A late task is a task or milestone where the Finish date field value is later than the Baseline Finish date field value. |
|
|
External Milestone. An external milestone task is a milestone in another project on which a task within the project has a dependency. |
|
|
Critical Path. The critical path determines the earliest finish date of the project. |
|
|
Link to hidden task. |
You can change the Gantt chart timescale as needed so that you can zoom in and out of the timeline. Click the single arrow at the top left or right of the Gantt chart to scroll one time unit at a time. Or, click the double arrows to jump to the next set of time periods.
Follow these steps:
The Gantt timescale changes based on your selection.
Tasks identify the work required to complete a project. Tasks have a start date, an end date, and a period in between when the work is performed. Generally speaking, project managers assign resources to tasks and set milestones to measure their progress.
You can create and manage project tasks and assign resources to them. You can define the tasks for a project to start and complete within the start and finish dates of a project.
The work breakdown structure (WBS) is a hierarchical list of tasks showing relationships between the tasks. The WBS displays in the Gantt view with the Gantt chart. Use the WBS to create and organize tasks and to view resource utilization by task assignment. The Gantt view displays summary tasks, milestone tasks, and detail tasks.
All tasks that you create are added at the same level in the WBS. You can then group the detail tasks under summary tasks. You can create an unlimited number of hierarchical levels in a WBS. You can filter the list to find specific tasks based on simple or complex filter criteria.
The tasks are displayed in the Gantt view in the order you create them. The order and level indicate their relationship with each other. The task above a detail task can be a summary task, or a second-, third-, or fourth-level task relative to the task above it.
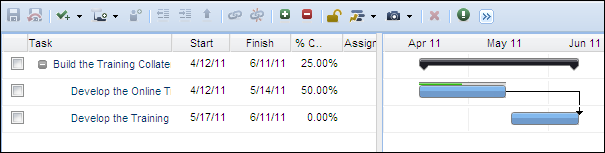
By Example: Building a WBS
You create a summary task named Build the Training Collateral that contains two detail tasks: Develop the Online Training and Develop the Training Quiz. You create the three tasks, and indent the detail tasks one level under the summary task.
A placeholder effort task is automatically created when you staff your project and before you create tasks. You can delete the effort task, or continue to use it by redefining its properties.
Your CA Clarity PPM administrator can change the Allow Effort Task Creation default project management setting so that the effort task is not created by default.
A summary task is a task that has one or more subtasks nested beneath it. You can indent tasks to be included as subtasks to the summary task. A subtask is any task that is nested under a task. Subtasks can be detail tasks or summary tasks. You can nest summary tasks under other summary tasks. You can indent and outdent summary tasks, in which case, their nested subtasks move with them.
When creating a summary task, give it a name that implies a logical, organizational grouping. For example, use Phase I, Phase 2, Planning Phase, and Build Phase.
Level 1 tasks are the top-level tasks in a work breakdown structure (WBS). You cannot outdent Level 1 tasks because they are already at the top-most level. A detail task is a task that has assignments tracked for effort. A detail task can be a Level 1 task, but it can also be a subtask to a summary task.
Detail task dates determine summary task dates. The earliest start date of one or more of its detail tasks determines the summary task start date. The latest end date of one or more of its detail tasks determines the summary task finish date. The summary task dates change as you edit the detail task dates. Total Effort and cost for a summary task are calculated based on the detail task information.
You can:
Use this procedure to edit tasks directly in the work breakdown structure (WBS) in the Gantt view. You can edit subproject tasks by expanding the subproject in the WBS and clicking the task, which opens the Gantt view for the subproject.
You can delete tasks and milestones from the WBS. When you delete a task or milestone:
If a task has a resource assignment with posted actuals, you cannot delete the task. Instead, the task is placed in a deleted tasks phase. The estimates for the task are set to zero and its status is set to "Complete."
Follow these steps:
The properties page appears.
The Gantt view appears.
Defines the name of the task. The value for the field is derived from the Name field on the task properties page. On list pages or in portlets, displays the name of the task. You can click the task name to open the task properties page.
Limits: 64 characters
Required: Yes
Defines the date of starting the task assignment for a resource. The list pages or portlets display the start date.
Default: Task start date
Required: Yes
Note: Define the assignment to start on or after the task start date. If an assignment has actuals, the field is view only.
Defines the date of completing the task assignment for a resource. The list pages or portlets display the completion date.
Default: Task completion date
Required: Yes
Note: Define the assignment to finish on or before the task completion date.
Defines the percent of work that has been completed when the task is partially completed.
Values:
Default: 0
Defines the name of the resource assigned to the task.
Required: No
You can edit the start and finish dates for an existing task in the Gantt chart. To edit, use the Gantt view by dragging the beginning, middle, or end of a taskbar. Drag the middle of the taskbar left or right to change the start and finish dates. Or, drag the shaded beginning or end of the taskbar to the desired location.
If a task has actuals posted against it, you cannot change the start date by dragging.
As you drag a taskbar, the effective date appears above the mouse pointer. If you change a value, a red triangle displays in the upper left area of the field in the WBS and the Gantt chart. On saving the changes, the red triangle is cleared.
Use this procedure to open the task and edit its properties. The task properties include the general properties, the earned value options, the date constraints, task relationships, and resource assignments.
Note: A locked task cannot be edited. Click Unlock to unlock the task and enable editing.
Follow these steps:
The list page appears.
The properties page appears.
Defines the name of the task. The list pages display the name of the task. You can click the task name to open the task properties page.
Limits: 64 characters
Defines the unique identifier for the task. The list pages or portlets display the ID.
Limits: 16 characters
Required: No
Defines the date of starting the task assignment for a resource. The list pages or portlets display the start date.
Default: Task start date
Required: Yes
Note: Define the assignment to start on or after the task start date. If an assignment has actuals, the field is view only.
Defines the date of completing the task assignment for a resource. The list pages or portlets display the completion date.
Default: Task completion date
Required: Yes
Note: Define the assignment to finish on or before the task completion date.
Displays the status of the task based on the value of % Complete. This field is automatically calculated and updated based on the task % Complete value.
Values:
Default: Not Started
Defines the percent of work that has been completed when the task is partially completed.
Values:
Default: 0
Defines the file path and file name for the guidelines your organization follows for this task.
Example: \\CA Clarity PPM\Guidelines\Project\Plan.doc.
Defines the charge code for the task. Task-level charge codes supersede project-level charge codes where both are specified.
Defines the date on which the task is required to start. This date is used as a date constraint during autoscheduling.
Defines the date on which the task is required to finish. This date is used as a constraint during autoscheduling.
Defines the earliest possible start date for a task. This date is used as a constraint during autoscheduling.
Defines the latest possible start date for the task. This date is used as a constraint during autoscheduling.
Defines the earliest possible finish date for a task. This date is used as a constraint during autoscheduling.
Defines the latest possible finish date for a task. This date is used as a constraint during autoscheduling.
Specifies excluding the dates for this task during the auto-scheduling process.
Default: Cleared
Required: No
Note: This field works with the Schedule Assignments on Excluded Tasks field on the auto-schedule page. Suppose, you exclude the task from auto-scheduling. But you specify allowing changes to excluded task resource assignment dates during auto-scheduling. The auto-schedule process changes the task resource assignment dates, while remaining within the start and finish dates for the task.
Task-level earned value fields are available. But the Earned Value section does not display by default on the task properties page. The Earned Value section includes the earned value (EV) fields. Configure the page to include the section and the fields, or let the CA Clarity PPM administrator use Studio to add globally to the page.
For more information, see the Studio Developer’s Guide.
Suppose, your company uses an earned value (EV) management methodology for measuring project performance. Use the following fields to override the task default EV calculation method and to override the Budgeted Cost of Work Performed (BCWP) value manually.
Follow these steps:
The list page appears.
The properties page appears.
Defines the default earned value (EV) calculation method that is used when calculating EV. This method sets the default if you have not selected an EV calculation method for the task.
Values: Percent Complete, 0/100, 50/50, Level of Effort, Weighted Milestones, Milestone Percent Complete (PC), and Apportioned Effort (AE)
Default: Percent Complete
Defines the Budgeted Cost of Work Performed (BCWP). The value overrides the system-calculated BCWP and is used for all earned value metrics that are based on BCWP. If you use an earned value calculation method, such as Weighted Milestones, Milestone Percent Complete (PC), and Apportioned Effort (AE), enter the BCWP value manually.
Best Practices: Enter a value in this field only if you are tracking and calculating earned value in an external system. Also, if you are not using CA Clarity PPM to calculate earned value.
Displays the system-calculated value of Budgeted Cost of Work Performed (BCWP). The value is calculated and recorded when you baseline a project, or when you update earned value totals. BCWP is also referred to as the earned value (EV). BCWP represents the amount of the budgeted cost (BAC) completed based on performance as measured using the Task EV Calculation method.
Calculations are made based on the level at which the calculation is made. BCWP is calculated at the following levels:
Current Baseline Required: Yes
Displays the date that the earned value was last updated.
Task dependencies allow you to designate a successor, or predecessor task for a task. Also, to indicate the type of relationship for the tasks. You can create better project plans by using task dependencies and defining lag and lead time. Task relationships display in the Gantt chart in the Gantt view.
You can define the following task dependency relationship types:
|
Gantt Bars |
Description |
|---|---|
|
|
Finish-Start. The predecessor task must finish before the successor task can start. This dependency is the most common type. |
|
|
Start-Start. The predecessor task must start before the successor task can start. |
|
|
Start-Finish. The predecessor task must start before the successor task can finish. |
|
|
Finish-Finish. The predecessor task must finish before the successor task can finish. |
You can auto-schedule to see the results of creating dependencies between tasks. Auto-schedule uses task dependencies to help determine a work sequence for the project.
Example
The Object Design task is required to be completed a day before the Object Integration task begins.
In the Gantt view, drag and drop Gantt bars to create dependencies between tasks or to edit task dates. In the WBS, drag and drop tasks to move up or down in the hierarchy, or change the order of the tasks. The WBS is refreshed after you move or edit a task.
If pending edits exist, the options to drag bars to create dependencies, or move tasks in the WBS are unavailable. You can still move the task dates though.
Use the following guidelines for editing and linking tasks using drag-and-drop:
Create task dependencies in the same project from the Gantt view. When you link two tasks in the WBS, a finish-start dependency is created by default. The topmost task in the hierarchy sequence becomes the predecessor and the bottommost task the successor.
Drag-and-drop the Gantt bars to create any type of task dependency. Once created, you cannot change the dependencies using drag-and-drop, but can move tasks without affecting the dependency. To edit the task dependencies, use the task properties page.
You cannot create dependencies to and from summary tasks.
In the WBS, expand a collapsed summary task to view the dependency lines between its detail tasks and other tasks.
Follow these steps:
The properties page appears.
The Gantt view appears.
You can open any active projects you have rights to view or edit from CA Clarity PPM. If you have the access rights to view or edit a project, open the project as read-only. Or, open as read/write from CA Clarity PPM in Open Workbench. Format the projects in Open Workbench. If you have the read-only access rights to a project, or if the project is currently locked, you can open the project as read-only.
Note: You cannot open projects with the same project ID and .rmp file name in Open Workbench from different CA Clarity PPM servers on your computer. To open a project under the conditions, delete the .rmp file you have saved locally. Then, try to open the project with the duplicate project ID from the other CA Clarity PPM servers.
For more information, see the Open Workbench User Guide.
Follow these steps:
The list page appears.
Default: Read-Write
Note: If you have access rights only to view the project, or if another user locks the project, Read-Only is selected by default. The list box is unavailable in this case.
The project opens in Open Workbench.
Use this procedure to edit the task dependency relationship, such as predecessor or successor, the names of the dependent tasks, and so on. You can delete dependencies using the task dependencies page.
Follow these steps:
The list page appears.
The properties page appears.
The task dependencies page appears.
The task dependency properties page appears.
Defines the relationship between the current task and the task selected. To have the selected task precede the current task, select Predecessor. To have the selected task succeed the current task, select Successor.
Values: Predecessor, Successor
Default: Predecessor
Defines the type of relationship to set between two tasks.
Values:
Default: Finish-Start
Example: If you select predecessor as the relationship and Finish-Start as the type, the predecessor task is scheduled to finish before the successor task starts. Alternatively, if you select successor as the relationship, and Finish-Finish as the type, the successor task can finish once the predecessor task finishes.
Identifies the lag period between the two tasks.
Default: 0.00
Example: For a Finish-Start type of relationship, create a lag period of five days between the finish date of the predecessor task and the start of the successor task.
Specifies the type of lag between two dependent tasks.
Values: Daily or Percent
Default: Daily
Example: If you enter 5 as the lag and daily as the lag type, a lag period of five days between the tasks is created. Suppose, the duration specified is 100 days, 20 as the lag, and 20 percent as the lag type (20 percent of 100 days). A lag period of 20 days between the tasks is created. A lag time percent is based on the duration of the predecessor task.
A dependency chain is a relationship between multiple tasks or milestones. The dependency chain is created relative to the task or milestone positions in the work breakdown structure in the Gantt view. The type of dependency created is a finish-start dependency with zero lag. The next task or milestone in the chain relies on the completion of the previous task before it can start.
Example of finish-start dependency chain
Suppose, you have three tasks: Task 1, Task 2, and Task 3. Task 3 can start after completing Task 2, and Task 2 only after completing Task 1. You can create a dependency chain from Task 1 to Task 2, and from Task 2 to Task 3.
Use the following procedure to create and change dependencies between tasks in different projects.
Follow these steps:
The list page appears.
The properties page appears.
The task dependencies page appears.
The select task page appears.
The task dependency properties page appears.
Displays the name of the project upon which the task depends.
Displays the name of the task upon which the task depends.
Defines the relationship between the current task and the task selected. To have the selected task precede the current task, select Predecessor. To have the selected task succeed the current task, select Successor.
Values: Predecessor, Successor
Default: Predecessor
Defines the type of relationship to set between two tasks.
Values:
Default: Finish-Start
Example: If you select predecessor as the relationship and Finish-Start as the type, the predecessor task is scheduled to finish before the successor task starts. Alternatively, if you select successor as the relationship, and Finish-Finish as the type, the successor task can finish once the predecessor task finishes.
Identifies the lag period between the two tasks.
Default: 0.00
Example: For a Finish-Start type of relationship, create a lag period of five days between the finish date of the predecessor task and the start of the successor task.
Specifies the type of lag between two dependent tasks.
Values: Daily or Percent
Default: Daily
Example: If you enter 5 as the lag and daily as the lag type, a lag period of five days between the tasks is created. Suppose, the duration specified is 100 days, 20 as the lag, and 20 percent as the lag type (20 percent of 100 days). A lag period of 20 days between the tasks is created. A lag time percent is based on the duration of the predecessor task.
The Gantt view displays externally dependent tasks. The dependent task is displayed before or after the task based on whether it is a predecessor or successor task. If multiple tasks are dependent on an external task, the list displays the first task out of the multiple that is dependent on the external task. The external project name is prefixed to the externally dependent task name.
Use the Gantt view icons to organize your tasks:
Moving tasks moves all of the subtasks. You cannot move tasks across or between projects. If the task has a dependency, moving the task does not remove the dependency.
Follow these steps:
You can expand the work breakdown structure (WBS) to see the summary tasks. Subtasks are nested one level under the nearest higher-level task. A plus (+) sign appears in front of the higher-level task.
You can also expand and collapse all tasks using the Expand All and Collapse All icons on the Gantt view toolbar.
The collapsed view is useful to view a small group of items (a parent and descendants) alone. For example, you can expand the summary task to view all the nested subtasks. Collapse it back up to the summary level when finished. Use the Plus (+) or Minus (-) icon next to expand or collapse the summary tasks.
The expand and collapse states of the WBS of a CA Clarity PPM session are retained when you next open the page.
Resource utilization is the amount of resource effort it takes, or is expected to take to complete a task. Using the Project: Tasks: Resource Utilization page, you can:
Total Effort = Actuals + Remaining ETC
By default, the Gantt chart displays total effort by task by week for all of the resources assigned to that task. You can change the chart configuration to display different variations of task and resource information.
Important! Assign staff to tasks before viewing resource utilization.
You can view resource utilization:
This version of the resource utilization page of project tasks displays data in aggregate. The utilization (Total Effort) is displayed, task-wise, for all the resources assigned to that task.
The blue Gantt bar in the task date cell represents a resource allocated to the task. The default period is weekly, always starting with the current week. The colored bars in the Total row at the bottom of the chart indicate total resource allocation (or over-allocation) for each time period. When you scroll over a cell, a note displays that lets you compare total effort with total allocation (Project Aggregate Allocation) for that period. Red in the Total row means that resources are over-allocated.
By default, the resource utilization color code works as follows:
Note: A task name suffixed with a plus sign indicates that the task has child tasks. Click the sign to expand and view the resource utilization for all the child and summary tasks.
You can change the values displayed in the Gantt chart.
Follow these steps:
The properties page appears.
The resource utilization page of project tasks appears. All the resources assigned to the task with their resource utilization display in the list.
When you adjust the fields on the resource utilization page of project tasks, the graph displays accordingly. For example, if you enter the name of a new task or ID, data in the other cells change to reflect resource utilization for that task. If you change the start or finish dates for a task, the time cells in the graph change to reflect the new dates.
A change to the name or ID of the task is reflected on the list and WBS pages of project tasks, and on the staff assignment pages.
Follow these steps:
The properties page appears.
The utilization page of project tasks appears.
Defines the task name. Click the task name to open the task properties page.
Defines the task unique identifier (up to 16 characters).
Defines the date to start working on the task.
Default: Current date
Note: A task work cannot start before the project start date. If the task has already started or finished, this field is not available.
Enter the date for completing the task.
Default: Current date
Note: A task work cannot finish after the project finish date. If the task has already started or finished, the field is not available.
The Estimate to Complete (ETC) is the estimated time for a resource to complete an assignment. This value is important for project planning and revenue recognition. In the short run, estimates help project managers more effectively allocate work hours. In the end, project managers can compare actuals to estimates, which can help produce more accurate forecasting and planning.
You can set up tasks for top-down estimating. You can also apply top-down distributions at the project level. Use the following process to set up tasks for top-down estimating:
Before you can set up and apply top-down estimating at the task level, zero out existing estimates. To set up top-down estimating for detail tasks, zero out the ETC amount of the summary task.
Follow these steps:
The list page appears.
The task estimating properties page appears.
Defines the total remaining work for the task. The list displays the value for the ETC field on the task estimating properties page.
Required: No
Verify that the ETC field is set to zero (0.00). If it is not, delete the amount and enter 0.
Enter a distribution percentage for each task to share a portion of the top-down distribution.
Follow these steps:
The list page appears.
The task estimating properties page appears.
Displays the percentage of the top-down estimate from the project that is distributed to the task.
Defines the percentage of time to allocate the resource to the project (you can enter 0 percent). If you change the amount in this field, the value replaces the value in the Default % Allocation field on the staff member properties page.
You can apply top-down estimating to the tasks set up to receive the top down distribution using the estimating rules mode. Use this mode when you have a good idea of the number of hours necessary to complete all the tasks in a grouping or project. At the summary-task level, the number is distributed through all the detail tasks that have resource assignments.
The top-down method can be most effectively used when assignments have no existing estimates. That is, the ETC field is set to 0). Prepare the tasks to receive the top-down distribution.
Example
Suppose you know that Phase I requires 100 hours to complete. Before you can enter the number and apply it, you set up the tasks for the phase to receive some percentage of those 100 hours. In this case, you can enter 60 percent for Task A, and 40 percent for Task B. Once the tasks are set up to receive a percentage, you can apply the ETC. The number is distributed accordingly.
Follow these steps:
The list page appears.
The task estimating properties page appears.
Defines the total remaining work for the task. The list displays the value for the ETC field on the task estimating properties page.
Required: No
Enter the amount to distribute down to the detail tasks.
The preview ETC change page appears.
The ETC is distributed to the detail tasks, and the distribution is saved.
Create and apply estimating rules to calculate ETC automatically. For example, you can create an estimating rule for a group of tasks that considers the budgeted cost of the tasks in the ETC. Though you can create multiple task estimating rules for the same task, only one can serve as the default rule.
Create estimating rules at the task level, and run the rules for the tasks for which they were created. Suppose, you create a rule at the phase level for a phase containing two detail tasks. The rule is applied to the tasks in the phase. If you create the rule at the detail-task level, you can only run the rule for that task.
You can run any task estimating rule from any page on which it exists at any time. Create an execution condition for all rules except the default rule, which cannot have an execution condition.
You can run individual estimating rules or run them all. Rules are verified in the order listed. You require having two or more estimating rules with estimating conditions displayed in the list to reorder the list. You cannot reorder the default task estimating rule.
If you do not require a task estimating rule, delete the rule.
Use the following process to apply estimates (ETC):
Use the following process to create a task estimating rule:
A new row, for every new task estimating rule, displays in the Task Estimating Rules section of the task estimating properties page.
Enter or paste a formula directly into the Estimating Rule field to bypass the Operator and Value fields. Then, click Evaluate to evaluate the expression.
Follow these steps:
The list page appears.
The task estimating properties page appears.
The create page appears.
Displays the operator for the formula.
Values: addition, subtraction, multiplication, division, exponential, or modulus
Defines the value for the estimating rule.
Values:
Default: Estimate for Another Task
The expression is evaluated and, if successful, the new rule appears in the Estimating Rule field. If the expression does not evaluate successfully, an error message displays in the field.
The rule is created.
Create a task estimating rule execution condition if an existing estimating rule is not the default rule. Execution conditions determine when the rule is required to run. An executing condition is not required for the default rule.
Verify that a task estimating rule exists before completing this procedure. The [Define execution conditions] link appears only if a rule is established.
Follow these steps:
The list page appears.
The task estimating properties page appears.
The execution condition page appears.
Defines the object.
Values: Project or Task
The field that appears or becomes available next depends upon the type of object selected. If Project is selected as the object, then select the Field or Operation field and select a value. If Task is the object, then select the field and select a value.
Displays the operator to use in the formula.
Values: = or !=
Defines the Constant or an Object.
If successful, the new rule displays in the Task Estimating Rules section. If the expression does not evaluate successfully, an error message displays in the field.
Note: Enter or paste a formula directly into the Estimated Rule field to bypass the Operator and Value fields. Then, click Evaluate to evaluate the expression.
Use this procedure to compare the ETC generated by the task estimating rule with the current ETC (the one in place before running the rules).
Follow these steps:
The list page appears.
The task estimating properties page appears.
The run estimating rules page appears.
Displays the total Estimate To Complete (ETC) for the task. The value for this field is derived from the ETC field on the task estimating properties page.
Displays the total Estimate To Complete (ETC) for the task generated from the applied task estimating rule.
You can run an estimating rule at the phase, task, or project level, which applies ETC values to the task based on the rules. Use the following procedure to apply task estimating rules to the phase or summary task and to its detail tasks.
To run a task estimating rule for a phase or summary task, select the required task to apply the rule to all its detail tasks. Or, select one or more of the detail tasks to apply the rule individually.
The order in which tasks are listed on the task estimating page is important. If none of the task estimating rules meets its execution conditions, the default rule is run. If only a default rule exists, then that rule is run. The process of applying ETC is executed automatically after verifying all the rules in the list in the order in which they are listed.
You can either run the task estimating rule on all listed tasks or select which tasks to run the rule. In the absence of a rule to run, all the rules are evaluated in the order in which they appear. Also, the first rule that meets the execution conditions is run.
Follow these steps:
The list page appears.
The task estimating properties page appears.
The run estimating rules page appears.
Create and apply estimating rules to distribute ETC values in a specific way. For example, you can create an estimating rule for a specific group of tasks that considers the planned cost of the tasks in the estimate.
Create the estimating rules at the task level, and you can only run them for the tasks for which you created them. Though you can apply estimating rules at the project level, you cannot create them at the project level.
The names of the phases or groupings for which the rule is run are highlighted in a different color. Use the ETC From Rules column to compare the ETC previously generated for the phase with the ETC generated from the applied rules.
Follow these steps:
The list page appears.
The task estimating properties page appears.
Task estimating rules displays in the list on the task estimating properties page.
Follow these steps:
The list page appears.
The estimating rule page appears.
Displays the operator for the formula.
Values: addition, subtraction, multiplication, division, exponential, or modulus
Defines the value for the estimating rule.
Values:
Default: Estimate for Another Task
The expression is evaluated and, if successful, the new rule appears in the Estimated Rule field. If unsuccessful, an error message displays in the field.
Follow these steps:
The list page appears.
The task estimating properties page appears.
The executing conditions page appears.
Update costs when you create or update a baseline, and when you change the task information - an input for earned value calculations. When earned value is used, update the total costs to view costs tied to ACWP, EAC (Cost), and ETC (T).
Use the following process to update the costs totals for your project:
Contact your CA Clarity PPM administrator or see the Administration Guide for more information.
Contact your CA Clarity PPM administrator or see the Administration Guide for more information.
Use the following procedure to recalculate the cost metrics and earned value information for the project as of the project As Of Date. The date is a field on the scheduling properties page.
Follow these steps:
The list page appears.
The Gantt view appears.
|
Copyright © 2013 CA.
All rights reserved.
|
|
