

As a project manager you use CA Clarity PPM to manage your projects. Non-resource users, such as project stakeholders and senior management, require access to your project to track its progress and to access the project documentation.
CA Clarity PPM enables you to add non-resource users to projects as participants and then to organize them into participant groups. Control access to the project documentation by participant and participant group.
Note: The default behavior of CA Clarity PPM automatically adds project employee resources as project participants when you add them as team staff. Your CA Clarity PPM system administrator can change the Automatically Add Staff Members As Investment Participant project management setting to change this behavior.
Prerequisites:
The following process describes how a project manager adds participants to projects and organizes them into project groups:
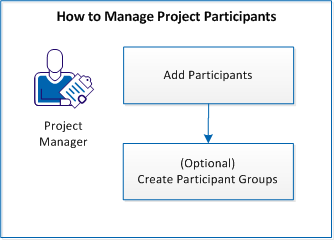
To manage participants, follow these steps:
The product enables you to add users to your project as participants to provide them with view access to project information and documentation.
Follow these steps:
The product adds that user to the participant list.
The product adds the selected users to the participant list.
The product adds existing Team Staff resources to the participant list.
Note: The default behavior of CA Clarity PPM automatically adds project employee resources as project participants when you add them as team staff. Your CA Clarity PPM system administrator can change the Automatically Add Staff Members As Investment Participant project management setting to change this behavior.
The product gives the selected participants additional rights in the Collaboration tab to manage documents and discussions.
Note: The creator of the project is the default collaboration manager.
The product adds the selected system group to the participant list.
Participants in projects can view project details, monitor its progress, and access project documentation. To manage project participants, use the Team menu Participants option.
You can organize project participants into participant groups. Participant groups enable you to manage documentation access rights collectively.
Follow these steps:
The Resource Participants window opens.
The product adds the selected participants to the participant group.
The product adds the selected system groups to the participant group.
The product creates the participant group. To manage participant groups, use the Team menu Participant Groups option.
Allocation is the period during which a resource is staffed, or booked, to a project. Multiply the total number of working days between and including the project start and finish dates by the number of hours the resource is available to work each day. The result displays the allocation amount for each resource. All resources are automatically allocated at 100 percent of their available working days.
Allocation differs from ETC in that the ETC amount is based on the number of hours a resource is assigned to tasks. Staff members can be assigned to tasks for all the hours they are allocated to the project.
If it helps to create a more accurate schedule, allow project resources one or two hours each working day, or each week, for alternative work or non-project meetings.
Allocation information can be changed in the following ways:
For more information about managing resources, see the Resource Management User Guide.
The Planned Allocation curve represents the default, or total allocation amount requested by the project manager. The Hard Allocation curve represents the allocation amount committed by the resource manager. The booking status for a resource changes according to the allocation amounts in the planned and hard allocation curves.
For more information about managing resources, see the Resource Management User Guide.
When editing the default allocation segment for a resource, if there are segment gaps, a segment is automatically created. The new segment displays the default percent allocation amount.
You book a resource to a project with availability less than 100 percent. An allocation segment is added such that the allocation start date is greater than the previous allocation segment end date:
A gap is created between two segments from 10/10/13 to 03/12/13 as unallocated.
To create a gap, you create two allocation rows in the Planned Allocation and Hard Allocation sections of the staff member properties page. By default, the resource is allocated at 100 percent. One allocation covers the period where the resource works at 50 percent. The other allocation covers the period where the resource works at 0 percent. When you save your changes, a default segment is created for the gap period and populated with the allocation amount of 100 percent.
When staffing resources to your project, the resource manager can over-allocate the resource, or accept any remaining availability. During team staff member replacement, you can also over-allocate the resource who is replacing the previous resource.
Note: Avoid over-allocating resources, which can cause scheduling delays and less effective performance.
You can you shift or scale all or a portion of the resource allocations in one project. You can move resource allocations back and forth in time. Any segmented allocation dates are kept intact as the information is moved, though the percent allocated for each segment can change. Shifting allocation for a resource is useful for project allocations beyond the allowable timescale, which can only extend for six months.
For more information about managing resources, see the Resource Management User Guide.
Follow these steps:
The project team staff page appears.
The shift allocation page appears.
Displays the start date for the project. The value for this field is based on the Start Date field on the scheduling properties page.
Displays the finish date for the project. The value for this field is based on the Finish Date field on the scheduling properties page.
Defines the start date for the resource on the project. The date marks the starting of the date range to shift.
Defines the end date for the resource on the project. The date marks the ending of the date range to shift.
Defines the beginning date for the data being shifted.
Note: If you leave the field blank, no shifts occur.
Defines the last date for shifting allocations. Allocations cannot shift beyond the last date.
Defines the percentage change in the allocation required for the shift.
Note: If you leave the field empty, no scaling occurs.
Required: No
Use the following procedure to indicate any deviations from the Default % Allocation field. You can unbook a hard-booked resource or extend a resource to do additional project planning.
For more information about managing resources, see the Resource Management User Guide.
Follow these steps:
The project team staff page appears.
The staff member properties page appears.
Defines the percentage of time you want to allocate the resource to this project (you can enter 0 percent). This amount is reflected in the Allocation and Allocation % columns on the project team staff page.
Default: 100 percent
Required: No
Defines the start date for the allocation period.
Defines the finish date for the allocation period.
Defines the expected percentage of time for the resource to work (as tentative or committed) on the investment.
You can edit the team allocation for your project using the time-varying cells on the project team staff page. The time-varying cells contain planned allocation, hard allocation ETC, and actuals. You can edit the planned and hard allocation information in these cells to create allocation segments. You can create allocation segments between the start and finish dates for the staff team member.
You can define explicit start and finish dates for staff team members. Or, the dates can be inherited from the start and finish dates for the investment. When editing the allocation information in the time-varying cells, the following editing rules are used when you save your changes:
To give resource managers the ability to manage team allocations while you have the project locked, verify the Allow Edit of Allocations when Investment is Locked default project management setting is selected. This setting allows resource managers to modify the team while you are working on the project schedule, either in tentative schedule mode or when working offline in a desktop scheduler.
For more information about managing resources, see the Resource Management User Guide.
You can reset resource allocations using one of the following methods:
Use the Allocate From Estimates option when you have changed your resource original ETC. Also, to calculate the planned allocation based on the new estimates. This calculation only impacts the portion of the allocation that is after the resource actuals through date. The resulting allocation segments are rounded based on the value set for the Round Allocations to the Nearest % field. The value is a default project management setting.
Follow these steps:
The project team staff page appears.
Use the following procedure to generate estimates based on allocation.
The Estimate from Allocation option is available only for resources that are assigned to effort tasks.
Follow these steps:
The project team staff page appears.
The number in the ETC column refreshes to match the Allocation number.
Use this procedure to set the allocation for one or more team staff members. You can accommodate projects, which are staffed outside an OBS.
The changes you make on this page override the settings on the staff member properties page.
Follow these steps:
The project team staff page appears.
The set allocation page appears.
Defines the start date for the resource on the project.
Defines the end date for the resource on the project.
Defines the percentage of time to allocate the resource to the project (you can enter 0 percent). If you change the amount in this field, the value replaces the value in the Default % Allocation field on the staff member properties page.
Defines the booking status for the resource.
Values:
Default: Soft
Select the requisition status of the resource on the project.
Specifies whether the resource can track time spent on assigned tasks using timesheets.
Values: Yes or No
Default: No Change
Defines the OBS Unit affiliation for the resource assigned to the project.
Default: Default Staff OBS Unit (if this value is defined for the project)
Defines the investment role for the resource. If you specify a role, this value replaces the value in the Investment Role field on the staff member properties page.
Specifies removing all allocation segments for the selected team staff member.
Defines the start date for the allocation segment.
Defines the finish date for the allocation segment.
Defines the expected percentage of time for the resource to work (as tentative or committed) on the investment.
Use this procedure to reset the planned allocation to be equal to the hard-booked, or committed, allocation. Soft-booked planned segments in the Planned Allocation section are removed and all segments are reset to equal the hard-booked segment.
Accordingly, the % Allocation and the Weekly Summary column values on the project team staff page change. When you accept the hard allocation, the resource booking status displays as "Hard" because all the allocation is fully committed.
Note: The option to accept hard allocation is dependent on the default Allow Mixed Booking project management setting.
Follow these steps:
The project team staff page appears by default.
The confirmation page appears.
You can reset the hard allocation to be equal to the planned allocation.
When a resource has a hard booking status, that resource is fully committed. Committing planned allocation does not reset the default allocation percentage. The planned allocation is copied into the Hard Allocation field in the Weekly Summary column on the project team staff page.
Note: The Hard Allocation section of the page displays on the page depending on the Allow Mixed Booking default project management setting.
Follow these steps:
The project team staff page appears.
The confirmation page appears.
|
Copyright © 2013 CA.
All rights reserved.
|
|