

Prerequisites: Using DevTest with this application requires that you make one or more files available to DevTest. For more information, see Third-Party File Requirements in Administering.
Follow these steps:
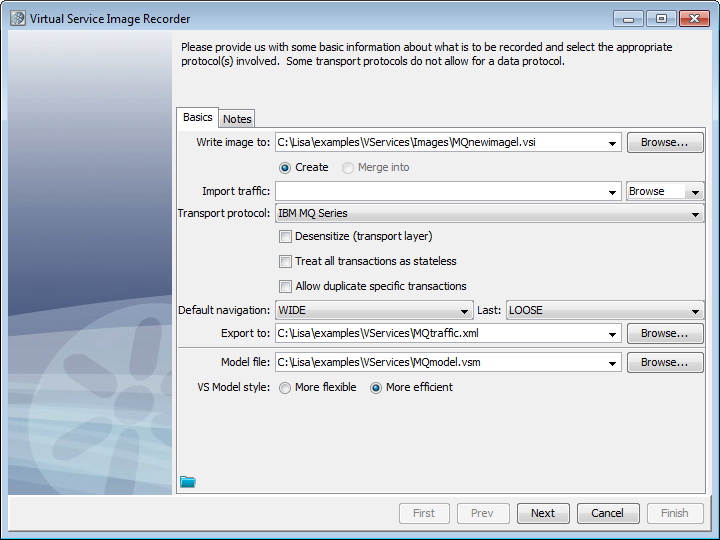
The Virtual Service Image Recorder opens.
The recording mode selection step opens, with one of the following options selected:
Proxy mode is the only true recording mode that VSE supports. Proxy mode provides the following options:
Proxy mode allows the use of proxy destinations to be set up on the message bus. The client application is configured to put messages on those proxy destinations and DevTest records them and forwards to the real destination. The same thing happens on the response side. DevTest is configured to listen on the real response destination, get the message, and forward it to the response proxy destination. This mode can behave differently if you enable temporary destinations, making the response side automated.
This mode for recording virtual services is available if you specify a raw traffic file in the Import traffic field on the initial recording window. In import mode, you can specify extra information about which request and response queues were detected in the raw traffic file. You can also select to skip the request response steps.
Specifies whether to use the live queues or the proxy queues when generating the final virtual service model and image.
Defines the maximum number of running response listeners on each response queue. These response listeners run as long as a transaction is pending. When the number of pending transactions exceeds the maximum, the oldest transaction closes automatically. If you enter 0 in this field, there is no maximum.
Specifies whether to support multiple responses in each transaction. By default, a transaction stays pending after the first response, waiting for more responses to arrive for the same transaction. When you select this option, the transaction automatically closes after the first response. If there are many transactions coming in quickly, this option can boost performance, especially for MQ.
Contains the possible schemes for correlating the request and response sides of individual transactions. JMS is asynchronous, which means the requests and responses are received separately. This drop-down list lets you define to the VSE Recorder which request to associate with which response. The Correlation field has the following options:
When you specify a correlation scheme, such as Correlation ID or Message ID to Correlation ID, the VSE MQ recorder can assume that any other listener on the live response queue will also use a correlation scheme. If all listeners on the live response queue use correlation schemes, the VSE MQ recorder can keep its responses separate without resorting to an exclusive read lock, so it opens the queue with the shared input flag.
Specifies how to interact with the WebSphere MQ server.
Values:
Specifies whether to skip the request and response steps. If the raw traffic file comes from CAI, this option is cleared. CAI autodetects queues and transactions. If the raw traffic file does not come from CAI, this option is selected by default to let you review destination and tracking settings.
Contains the possible schemes for correlating the request and response sides of individual transactions. JMS is asynchronous, which means the requests and responses are received separately. This drop-down list lets you define to the VSE Recorder which request to associate with which response. The Correlation field has the following options:
When you specify a correlation scheme, such as Correlation ID or Message ID to Correlation ID, the VSE MQ recorder can assume that any other listener on the live response queue will also use a correlation scheme. If all listeners on the live response queue use correlation schemes, the VSE MQ recorder can keep its responses separate without resorting to an exclusive read lock, so it opens the queue with the shared input flag.
The Destination Info tab opens.
The Create Proxy Queue check box lets you create a temporary queue on the fly to be used as a proxy queue. Select this option if you did not manually create the proxy queue on WebSphere MQ.
These connection parameters are internally saved.
The Advanced tab at the bottom of the Connection setUp tab includes the following subtabs:
Lets you add, delete, and specify values for more MQ environment settings.
Lets you point to MQ exits for Security, Send, and Receive.
A "temporary" destination in messaging is a destination that is created on demand for a messaging client. A temporary destination is typically used in request/response scenarios. DevTest supports using a temporary queue for the responses, but only supports one concurrent transaction with a temporary queue at a time.
The Destination List tab opens.
The names of the queues to which VSE is listening display, and the status is Waiting.
If you connect to WebSphere MQ and you chose to create the proxy queues on the fly, those proxy queues are created.
VSE copies the messages to the real request queue. The server acquires those messages from there and sends responses to the response queue or queues. Again, VSE acquires those messages and copies them to the response proxy queue, where the client is listening.
As the transactions are recorded, the message count increases and the Total sessions and Total transactions counts increase on the Virtual Service Image Recorder window. At the end of recording, all the requests have gone through the same request queue. About half of the responses have returned through temporary queues, and the other half have returned through the nontemporary response queue.
When the run is complete, you may see the count of messages on the response queues one fewer than you would expect. Because a single request can have multiple responses, VSE will not yet have recognized the last transactions complete. The messages corresponding to the last transaction are therefore not counted.
A Request Data Manager data protocol has been added on the request side. For more information about configuring this protocol, see "Request Data Manager". You can change or add more data protocols.
Note: To save the settings on this recording to load into another service image recording, click Save ![]() above the Finish button.
above the Finish button.
|
Copyright © 2014 CA Technologies.
All rights reserved.
|
|