

Follow these steps:
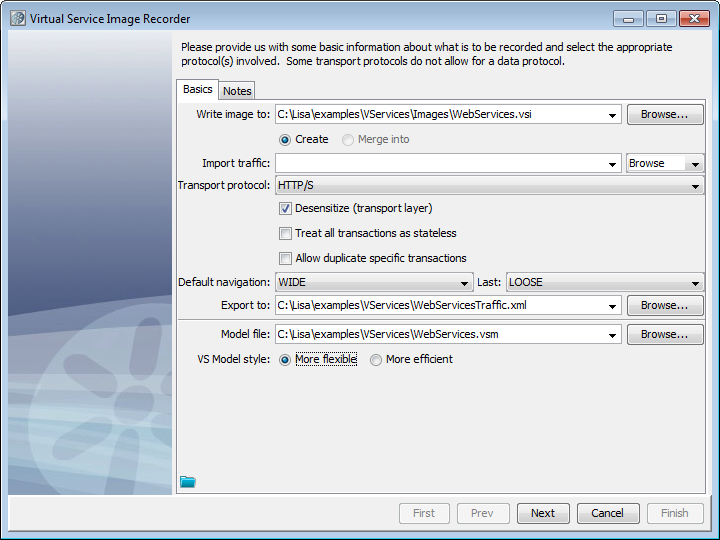
The Virtual Service Image Recorder opens.
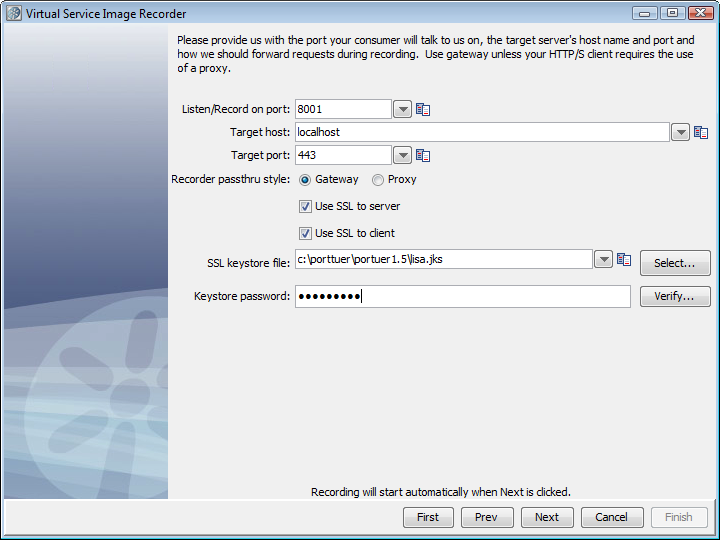
The next wizard window opens.
Defines the port on which the client communicates to DevTest. It is typical to select 8001, but you can use another port number.
Defines the name or IP address of the target host where the server runs. Leave blank if you are going to select a Proxy pass through style.
Defines the target port number listened to by the server. Leave this field blank if you will select a Proxy passthrough style.
Defaults: 80 (HTTP) and 443 (HTTPS)
Specifies how the VS Image Recorder acts during recording. The choices are Gateway and Proxy. If you select Proxy, the contents in Target host and Target port fields are cleared and the fields become disabled. This choice affects how the client connects in the recording mode.
Specifies whether to pass through the value of the Host parameter. This option is only available when recording in Gateway mode. The pass-through option instructs the recorder not to rewrite the Host header parameter when resending traffic to the target endpoint.
Specifies whether DevTest uses HTTPS to send the request to the server.
If you select Use SSL to server, but you do not select Use SSL to client, DevTest uses an HTTP connection for recording. DevTest then sends those requests to the server using HTTPS.
Cleared: DevTest sends an HTTP request to the server.
Specifies whether to use a custom keystore to play back an SSL request from a client. This option is only enabled when Use SSL to server is selected.
Values:
Cleared: You cannot specify a custom client keystore and a passphrase.
Specifies the name of the keystore file.
Specifies the password associated with the specified keystore file.
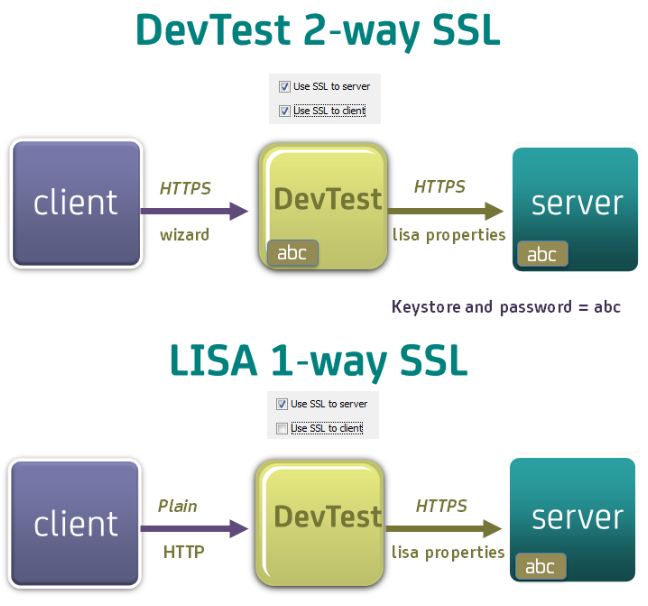
Note: For more information about configuring VSE in a two-way SSL environment, see Virtualizing Two-way SSL Connections.
The VS Image Recorder starts recording the traffic. The assigned port and service target display on this window.
As the VS Image Recorder records transactions, the dynamic display statistics on the lower portion of the window increase. The options and dynamic display statistics include:
Displays the number of conversations recorded.
Displays the number of transactions recorded.
Clears the list of currently recorded transactions.
If you click Next and no transactions were recorded, an error message appears. Click OK to continue recording.
Note: If the transactions are not recorded, you could have a port conflict. The client sends transactions to the application instead of the Virtual Service Recorder. If another service is using that port, either stop that service or change the port setting so there is no longer a conflict.
The Transactions tab displays a list of the most recent transactions recorded. On this list of transactions, you can double-click a transaction and can see a dialog showing the content of the transaction.
The step components include:
Lists the transactions that you have selected as conversation starters. To move the transaction to the Remaining Transactions list (if you do not want it to be a conversation starter), select a transaction and click the arrow.
Lists the recorded transactions. To move the transaction to the Conversation Starter Transactions list, select a transaction and click the arrow.
Selects all transactions (either Conversation Starters or Remaining) in the list that are like a selected transaction. To move all the selected transactions, use the appropriate arrow button.
Displays the number of conversations in the recording. As you build conversations, the number increases.
From the Remaining Transactions list, select any transactions that should stay stateless and select the check box. For example, you could decide that a transaction that includes an image should stay stateless even though it contains a conversation starter token.
Click to see a list of all transactions that remain stateless, assuming the identified conversations on this panel. You can use the list to verify that you have identified all the conversation starter transactions.
Click to save the raw recorded transactions. Click Browse to navigate to the location in which to save the file. You can import the raw traffic recording in the Basics tab before beginning a new recording.
For the currently selected transaction, this field identifies which of its responses to look in. In general, 1 is the only option.
This field identifies the piece of the response you want to see when looking for conversation tokens. The drop-down list contains an entry for each of Meta data entries in the response, plus one for the body of the response.
Based on the selected transaction and response, the content of the selected Look in section of the response is displayed here.
During postprocessing, the VS Image Recorder displays the processing status. As part of the preparation for writing the .vsi file, the recorder verifies request and response bodies to ensure that, if they are marked as text, that they are text. If they are not, the type is switched to binary.
The recorder completes postprocessing the recording.
Note: To save the settings on this recording to load into another service image recording, click Save ![]() above the Finish button.
above the Finish button.
Virtualize Two-way SSL Connections
To virtualize a two-way SSL connection, DevTest must have one of the following:
Both cases result in two keystores: one client keystore and one server keystore (or DevTest keystore).
Configure the SSL properties in the local.properties file, (in the installation directory) to use the client keystore as follows:
Defines the path to your keystore; for example:
c:/mykeystore.jks.
Defines your keystore password.
Defines your certificate password.
Start the VSE recorder and configure it to use two-way SSL. If you use a client and a server keystore, your recorder resembles the following graphic:
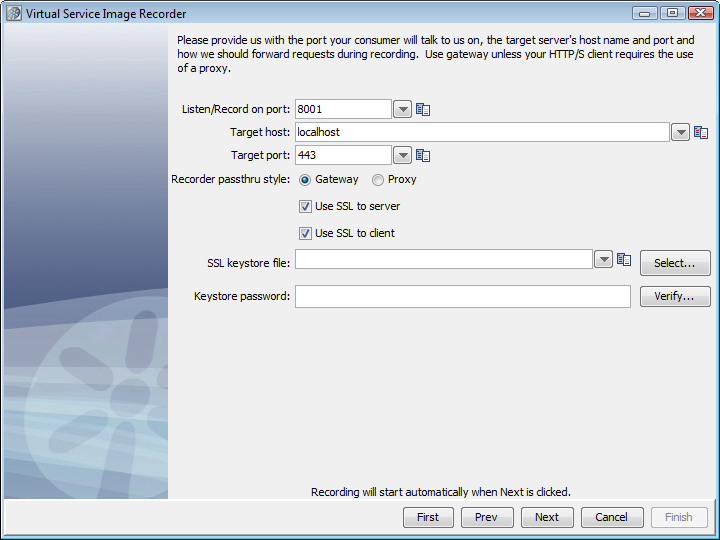
If you use a DevTest keystore instead of the actual server keystore, you do not need to provide the path to it. The DevTest keystore is used by default and you must configure your recorder similar to the following graphic:
The following diagrams illustrate one-way and two-way SSL virtualization.
|
Copyright © 2014 CA Technologies.
All rights reserved.
|
|