

This section contains the following topics:
Enable and Disable Scheduled Report Jobs
Example: Schedule Reports with a Common Tag
Example: Email Daily PCI Reports as PDFs
Enable and Disable Scheduled Report Jobs
You can view a generated report, or save a copy to a location of your choice. Generated reports are stored on the soft appliance with CA User Activity Reporting Module under the following path:
/opt/CA/LogManager/data/reports
To view a generated report
The tab opens, displaying the local CA User Activity Reporting Module host by default.
The server you select is displayed in the details pane.
The Generated Reports List appears.
The Save dialog appears.
You can set filters to refine the display of available generated reports and scheduled report jobs.
To filter generated or scheduled reports
The generated reports or scheduled reports list appears.
The list shows the reports that meet your filter qualifications.
You can add annotations to a generated report, for purposes including report tracking or reviews.
To annotate a generated report
The generated reports list appears
The Report Annotations dialog appears, displaying any previous annotations with the name of their creator, and the time and date of their creation.
The annotation appears in the dialog, which remains open to allow further annotations.
The Report Annotations dialog closes.
You can disable one or more scheduled report jobs when you no longer want the queries associated with that report to run. You can also enable scheduled report jobs that were previously disabled, so that they run according to the saved schedule.
To disable or enable scheduled report jobs
The Scheduled Jobs list appears, showing the status of each job in the Enabled column. If the job is enabled, the Enabled value is true. If it is disabled, the Enabled value is false.
The Scheduled Jobs list displays the new status of all the jobs you enable or disable.
Note: The ability to disable report jobs is designed for use with recurring reports. If you disable a report job with a single occurrence ("Once") it is removed from the Scheduled Jobs list.
The process of creating a report job, using the report scheduling wizard, has the following main steps:
Note: You can schedule a report targeted to an external ODBC database. To do so, first configure connections to any ODBC databases you want, and create queries and reports that target those databases. No ODBC queries or reports are provided with installation.
Note: We recommend that you set the maximum number of rows size in scheduled reports to 75,000. If you want to increase the maximum number of rows size to 500,000 or more, schedule the reports in the CSV format and configure the heap size parameters in JVMSettings. For information about configuring the heap size parameters, contact CA Support.
To create a new report job for one or more recurring reports, you must use the schedule report wizard.
To open the schedule report wizard
The Report Servers list appears.
The Report Server Details pane shows the selected server, displaying the Generated Reports tab by default.
The Schedule Report wizard appears.
When using the wizard:
The first step in creating a report job is the selection of the report template. To schedule multiple report jobs that share the same filters, scheduling, and destination settings, select multiple reports or tags as templates.
If you select multiple reports, the jobs display separately by report. For example, if you select two different reports, they share the same scheduling and filter options, but are displayed separately, titled by the report name, in the Generated Reports list.
Users with the Administrator role can create report jobs in a disabled state for later use. User with the Administrator and Analyst roles can enable and disable jobs at a later time. Disabled reports display the value false in the Enabled column when viewing the Scheduled Reports tab.
To select a report template
Targets your report to the internal event and incident databases.
Targets your report to an external ODBC table you select. The Table drop-down list appears, populated with the tables available in your chosen database.
Note: Scheduling reports by tag lets you add reports without altering the job itself. If you select the "Identity Management" Tag, any report with that tag is added to the job at the scheduled run time. This feature also applies to custom tags.
Note: The ability to create a disabled report job is designed for use with recurring reports. If you create a disabled job with a single occurrence ("Now" or "Once") it is removed from the Scheduled Report list.
Note: After the report is generated, you can edit the report template and reschedule the report.
If you click Save and Close the report is scheduled, otherwise the step you select appears.
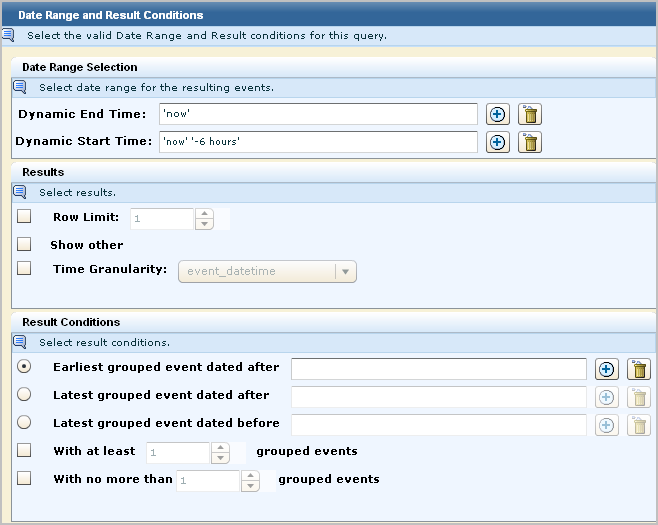
You can control when scheduled reports run, whether you want them to recur, and the recurrence interval.
To set scheduling parameters
Note: If you use daylight savings time in your environment, do not schedule a report during the changeover time, since it will not be generated. For example, if daylight savings time begins at 2 a.m. March 8, you cannot schedule a report between 2:00:00 and 2:59:59.
If you click Save and Close the report is scheduled, otherwise the step you choose appears.
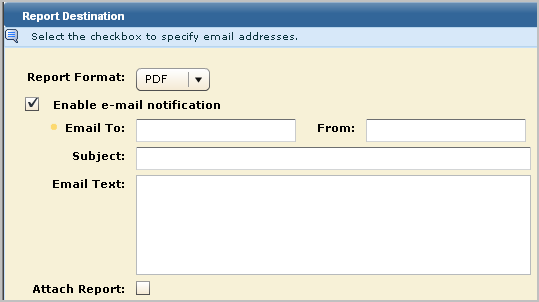
You can select whether reports are generated in PDF, XML, Excel, or CSV format. You can also set up automatic email notification.
To set format and notification
Note: In PDF format, charts are limited to 100 data points, which keeps the chart axis labels clearly legible. If the chart you want to display contains more than 100 points, CA User Activity Reporting Module includes only the first 100 in the published PDF output.
The email specification fields appear.
If you click Save and Close the report is scheduled, otherwise the step you select appears.
You can choose which federated event log stores the report query searches.
To choose report destinations
If you click Save and Close the report is scheduled, otherwise the step you choose appears.
You can schedule one or more reports to be generated at the specified frequency with the specified end date.
Auditors, Analysts, and Administrators can schedule reports.
To schedule a report
The Schedule Report wizard appears with Step 1, Report Selection, selected.

In the following example, selecting the Resource Access tags is an easy way to select the six reports with this tag.

Note: The Administrator can configure reports to be deleted after a specified retention period. Retaining an email copy may be used a backup alternative to manual archiving.
The selected reports are scheduled for generation.

You can automate the delivery of specified reports in the format you choose to the person you specify at the required frequency.
Before you can specify that scheduled reports be formatted as PDFs and attached to emails, you must configure the following on the Global Service Configuration for the Report Server under the Administration tab and Services subtab.
Example: Deliver all daily PCI reports, as PDFs, to the auditor's inbox each weekday
The toolbar appears with a Scheduling a Report button.
The Report Selection step appears.
You can edit a scheduled report job.
To edit a scheduled report job
The Report Servers list appears.
The selected server appears in the Report Server Details pane.
The Schedule Report wizard appears.
The edited report appears in the Scheduled Jobs list within 5 minutes, as soon as the list refreshes. Click Refresh to display it immediately.
You can disable one or more scheduled report jobs when you no longer want the queries associated with that report to run. You can also enable scheduled report jobs that were previously disabled, so that they run according to the saved schedule.
To disable or enable scheduled report jobs
The Scheduled Jobs list appears, showing the status of each job in the Enabled column. If the job is enabled, the Enabled value is true. If it is disabled, the Enabled value is false.
The Scheduled Jobs list displays the new status of all the jobs you enable or disable.
Note: The ability to disable report jobs is designed for use with recurring reports. If you disable a report job with a single occurrence ("Once") it is removed from the Scheduled Jobs list.
You can stop a scheduled report job if it takes a longer time to run.
Follow these steps:
You can delete a scheduled report job.
To delete a scheduled report job
The Report Servers list appears.
The selected server appears in the Report Server Details pane.
Note: The check boxes beside each report job are used for enabling or disabling report jobs.
A confirmation dialog appears.
The report job is removed from the Scheduled Jobs list.
Most user actions generate self-monitoring events. These events allow you to track which actions have been taken on or involving the server, and their success or failure. Self-monitoring events are displayed in Event Viewer format for each server on the Scheduled Reports and Alert Management tabs. They can also be accessed as normal or scheduled reports using the Self Monitoring Events report.
You can view relevant self-monitoring events for each server from the Alert Management and Scheduled Reports tabs. The views in each tab are filtered to display relevant alert or report monitoring events. You can remove the filter to display all self-monitoring events.
To view self-monitoring events
The Report or Alert servers list appears.
The server you select is displayed in the details pane.
The Self-Monitoring Events viewer pane appears, showing report or alert-related self-monitoring events. You can perform any of the normal reports tasks from the Self-Monitoring Events pane, including:
|
Copyright © 2014 CA Technologies.
All rights reserved.
|
|