

This section contains the following topics:
Mapping and Parsing Rules Tasks
How to Create a Message Parsing File
How to Create a Data Mapping File
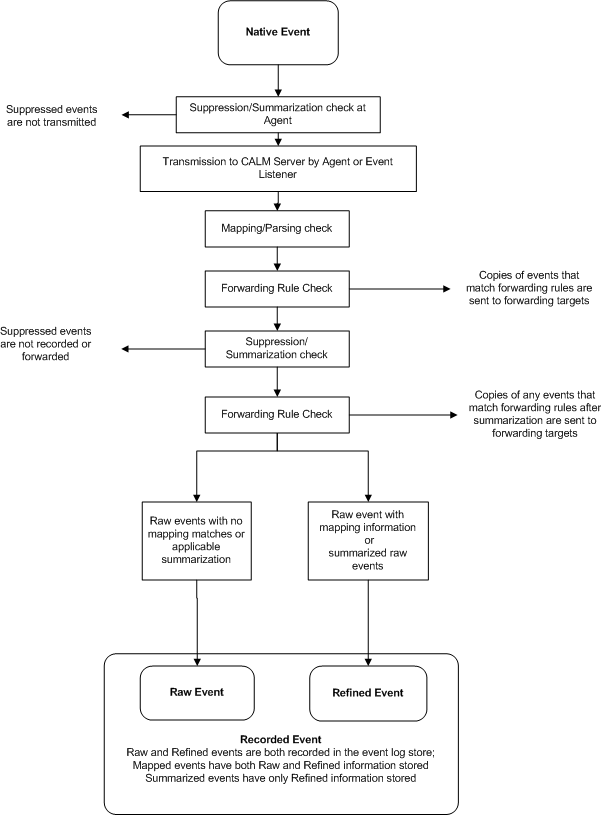
Information about events in your environment passes through a number of stages, from initial occurrence to possible final display by CA User Activity Reporting Module. Because the term "event" can refer to any one of these stages, we use the following terminology for the possible event states in your environment:
Refers to the original occurrence of the state or action that triggers the event, a failed authentication, or firewall violation for example. The appropriate connector or listener service sends native events, parsed and mapped as appropriate, then inserted into the event log store, where it is available for display as raw or refined events.
Refers to the communication sent by the appropriate monitoring agent. Raw events contain information about the native event, often in the form of a syslog string or a name-value pair. This information is stored and searchable unless altered by suppression or summarization rules. Suppressed events are not recorded in the event log store; a set of summarized events is recorded as a single event expressing the outcome of the summarization.
Refers to the event information as mapped and summarized by CA User Activity Reporting Module. This information is stored and searchable.
Refers to the raw or refined event information in the event log store. Raw events and refined events are always recorded unless suppressed or summarized. Mapped events have both raw and refined information available. This information is stored and searchable.
Consult the following diagram for information about event states:
Message Parsing (XMP) and Data Mapping (DM) file pairs collect and normalize data from specific types of event sources. Most incoming native events pass through the parsing and then the mapping processes to create a reportable event that is inserted into the event log store. Events transmitted through SAPI or iTechnology do not require parsing, and proceed directly to the data mapping stage.
Note: To take full advantage of these advanced features, you need a thorough understanding of the raw and collected events in your environment, the target fields you want to parse, the regular expression syntax, the CEG, and DM and XMP files and how they parse events.
The XML-based XMP files read incoming raw event data and create name-value pairs, according to your specifications. DM files then map the events' name-value pairs assigned by message parsing into the common event grammar. When creating new parsing and mapping files, consider them as part of a process. For example, efficient and complete parsing allows quick and process-effective mapping.
You can use the parsing file wizard to create, edit, or analyze a Message Parsing (XMP) file. Parsing files read incoming raw event data and create name-value pairs, allowing you to establish mappings even before the data mapping process. This improves overall mapping efficiency.
Note: The Common Event Grammar (CEG) names are not enforced for event parsing, allowing additional flexibility in creating name/value pairs. The CEG fields are available for selection, but the field names and values are not limited to CEG values.
Creating or editing an XMP file has the following steps:
To create a message parsing rule, or edit an existing one, you must open the parsing file wizard.
To open the parsing file wizard
The product integration buttons appear in the details pane.
The Parsing File Wizard opens.
When using the wizard:
You can add new parsing file details, including name, source, and reference information. Newly created or edited files are displayed in the User folder in the Mapping and Parsing area.
To add new parsing file details
A new support information row appears.
If you click Save and Close, the new file appears in the Parsing File User folder, otherwise the step you choose appears.
You can provide sample events to use in testing the new XMP file by searching through the event log store or by accessing a log file. Sample events provide a template against which you can test the parsing file as you construct it in the other wizard steps. You can also use sample events to test the parsing output in the final step of the wizard.
To provide sample events
The Load Events screen appears.
The query appears, displaying sample events you can use to test parsing as you advance through the wizard.
Note: You can use any available or custom query to locate sample events. If you plan to use a custom query, we recommend that you create and test it before beginning the message parsing file design process. We recommend using a sample event file with less than 1500 events for ease of analysis.
Events from the log file appear in the Sample Events pane. You can use the events to test parsing as you advance through the wizard.
Note: The wizard assumes that each line in the file is an event. Multiple line events are not supported.
If you click Save and Close, the new file appears in the Parsing File User folder, otherwise the step you choose appears.
You can add global fields, which are static pairs that match a field name with a specific value. The parsing process adds the global fields to all parsed events, so they are best used for default values such as the ideal model.
To add global fields
The Global Fields screen appears.
A new global field row appears in the fields table, displaying New Global Field and New Value entries.
If you click Save and Close, the new file appears in the Parsing File User folder, otherwise the step you select appears.
You can create a prematch filter to help the XMP file narrow its search for event information you want to parse. The prematch filter identifies a selected text string to narrow the event selection process, which is then completed by parsing filters. If you consider the parsing file as a funnel, the prematch filter forms the mouth and the parsing filter is the spout.
The more complete your prematch filtering is, the more efficient your parsing process is. This is because narrow prematch categories held reduce the processing effort required to parse events.
For example, if you wanted to parse access attempt events, you might create a prematch filter that searches for the text "login", and add appropriate parsing filters to that prematch filter.
Note: Deleting a prematch filter also removes its associated parsing filter or filters.
To create a prematch filter
The wizard displays any existing prematch filters in the Prematch Filters list. Each one displays the number of prematches to any sample events in parentheses beside it.
Note: To select a prematch filter, type the first few characters of the prematch string in the Search field. All the prematch strings matching the entered characters are displayed. Within the resulting matching prematch strings, you cannot use the up-down arrows to move a prematch string.
Any sample events that match the text you enter immediately appear, along with the number of matched events found and parsed.
Any sample events that are currently unmatched appear in the Events area for easy reference in creating a new prematch filter.
If you click Save and Close, the new file appears in the Parsing File User folder, otherwise the step you choose appears.
You can create a parsing filter to define how the XMP file parses event data. Each parsing filter is attached to a prematch filter. After the parsing process locates a prematch string, it uses each parsing filter attached to that prematch in turn to locate its specified information. The parsing process returns the first positive match it makes.
When you click the Add a Parsing Filter button in the Match and Parse step of the Message Parsing wizard you start the Parsing File Filter wizard. To create effective parsing filters you need a good understanding of the regular expression syntax.
To create a parsing filter
A static field row appears, displaying New Field and New Value cells.
The Parsing Expression Testing window opens, displaying any current regular expression. Immediately below the regular expression is the Event pane. This area shows one or more sample events, if you previously loaded sample events. The wizard can test these events against the regular expression as you build it.
Note: When you create a new datetime token, select the 'Treat as a datetime value' check box to enter a format for parsing the time value. This value does not affect the display format.
Note: Selecting a token in the Parsing Tokens list displays its regular expression syntax in the Token Details pane. You can view the parsing token mapping in a given rule to repeat it in other parsing rules.
(_PAIR_KEY_)=(_PAIR_VALUE_);
Any pairs separated by an equal sign and spaced by a semicolon appear. You can enter more expressions to find pairs displayed in other formats.
The Parsing File Filter wizard closes, returning you to the Match and Parse step of the Parsing File wizard.
You can use dynamic parsing, which allows the display of multiple, unaltered name-value pairs that already exist in the raw event. Unlike normal parsing where each parsed token can be allotted to a CEG field or a user-defined field, the name part of the name/value pair becomes the field and cannot be assigned to any CEG field or user defined field. Dynamic parsing is useful where applications or formats record event data in key pairs that you wish to protect from change, not parsed into CEG names or other values. It also improves parsing performance in the cases where it is applicable.
The regular expression which allows dynamic parsing contains four elements:
The separators you use must match the structure of the event source you are parsing. If your event source uses a comma as a separator, your regular expression must do as well.
Example
(dest_objectclass)=(ServerE);
In this example the key-value separator is "=" and the pair separator is ";"
Using this expression after other regular expressions allows the XMP file to locate and display any key pairs that appear in parsed events.
A parsing token is a regular expression template that you can use to build parsing filters. CA User Activity Reporting Module includes a parsing token library that contains predefined parsing tokens. For example, the _IP_ token sets the regular expression that parses the typical IP address format. When you want a parsing filter to extract an IP address you can insert the _IP_ token into the filter rather than constructing the full regular expression language each time.
You can also create your own custom parsing tokens, and add them to the local library, or export them for use in another CA User Activity Reporting Module environment. If you want to export a custom token, add it to the library first. You can also import custom tokens from another CA User Activity Reporting Module environment to create parsing tokens in a test environment and move them to a live environment.
CA User Activity Reporting Module supports various syntax options for datetime parsing tokens. You can use these options, in the parsing file datetime format, to customize your datetime stamp appearance.
Each datetime token is composed of one of the following:
or
CA User Activity Reporting Module supports the following conversion specifications:
Displays the local weekday name, in full or abbreviated form. On Windows, this specification is available in US English only.
Displays the local month name, in full or abbreviated form. On Windows, this specification is available in US English only.
Displays the local date and time.
Displays the century number (0-99).
Displays the day of the month (1-31).
Displays the American style date: Month/Day/Year - the equivalent of entering %m/%d/%y.
Note: The syntax %d/%m/%y is used in Europe. The ISO 8601 standard format is %Y-%m-%d.
Displays the hour on a 24-hour clock (0-23).
Displays the hour on a 12-hour clock (1-12).
Displays the day number of the year (1-366).
Displays the month number (1-12).
Displays the minute (0-59).
Inserts an arbitrary whitespace.
Displays the local equivalent of AM or PM, if any.
Displays the 12-hour clock time: Hour:Minute:Second AM/PM - the equivalent of entering %I:%M:%S %p. If t_fmt_ampm is empty in the local LC_TIME section then the behavior is undefined.
Displays the 24-hour clock time: Hour:Minute - the equivalent of entering %H:%M.
Displays the second (0-60 - 60 can occur for leap seconds).
Displays an arbitrary whitespace.
Displays the 24-hour clock time: Hour:Minute:Second - the equivalent of entering %H:%M:%S.
Displays the week number. Sunday is the first day of the week (0-53). The first Sunday of January is the first day of week 1.
Displays the weekday number (0-6) with Sunday = 0.
Displays the week number with Monday the first day of the week (0-53). The first Monday of January is the first day of week 1.
Displays the date, using the local date format.
Displays the time, using the local time format.
Displays the year in the current century (0-99). When a century is not specified, values in the range 69-99 refer to years in the twentieth century (1969-1999); values in the range 00-68 refer to years in the twenty-first century (2000-2068).
Displays the year, including century (for example, 1991).
Displays an RFC-822/ISO 8601 standard time zone specification. This specification is not available on Windows.
The default CA User Activity Reporting Module datetime token format is:
%d/%b/%Y:%H:%M:%S %z
You can add custom parsing tokens to the token library, making them available for other users. For example, if you create a custom token during the message parsing file creation process, and it would be useful for other parsing, you can add it to the library for re-use.
The following procedure assumes that you add tokens during the creation of parsing files or filters.
To add a custom parsing token to the library
A confirmation dialog appears
The parsing tokens library dialog appears, showing custom tokens in black and predefined tokens in green.
You can remove unneeded or obsolete custom tokens from the token library. Predefined tokens cannot be removed.
To remove custom tokens from the library
The Log Collection folder list appears.
The product integration buttons appear in the details pane.
The Parsing File Wizard opens.
The Parsing File Filter wizard appears.
The parsing tokens library dialog appears, showing custom tokens in black and predefined tokens in green.
A confirmation dialog appears.
You can import parsing tokens to add custom parsing tokens created on another management server to your current server, from a test environment to your live environment, for example.
To import parsing tokens
The Log Collection folder list appears.
The product integration buttons appear in the details pane.
The Parsing File Wizard opens.
The Parsing File Filter wizard appears.
The Import File dialog appears.
A confirmation dialog appears.
You can export parsing tokens that you have added to the token library to move custom parsing tokens created on the current management server to another server. For example, you could move your custom tokens from a test environment to your live environment.
To export parsing tokens
The Log Collection folder list appears.
The product integration buttons appear in the details pane.
The Parsing File Wizard opens.
The Parsing File Filter wizard appears.
A download location dialog appears.
The exported file is saved in your chosen location.
You can use the Message Parsing utility to analyze your new or edited file and determine how effective the parsing file is against the sample events. Analysis lets you make modifications to improve the efficacy of the file before saving it.
The utility analyzes an XMP file against your selected sample event set using the following process:
To analyze the XMP file
Open the parsing wizard and advance to the Parsing Analysis step. The wizard displays the number of matches for the prematch strings and filters. The more matches you have, the more efficient the new or edited XMP file will be. This also allows you to determine if there is any significant information that remains unparsed.
The XMP analysis can take some time to process if the XMP file and the number of sample events are both large. It should not usually take over a minute. You can cancel this process if it is taking too long and then re-analyze using a smaller number of events.
When you create a new rule, it is saved as version 1.0. If you later rule edit the rule, a separate copy of the rule is stored as a new version. You can view earlier versions, and apply or copy them as needed.
You can use the mapping file wizard to create and edit Data Mapping files, which convert native events into refined events by mapping the parsed text string or field/value pairs to CEG-compatible fields. The mapping file wizard allows you to create and edit various types of mapping to accomplish this.
The process of creating or editing a DM file contains the following steps:
Note: You can set direct or function mappings using block mappings. They are an alternative to setting mappings with steps 4 and 5.
When creating a DM file, you should consider the data mapping priorities of the file itself, as well as the individual mapping types within the file. The completed DM file checks event information in the order of the mapping type screens (steps 4-7 in the wizard). If duplicate mapping types exist, the last value the DM file finds is the one assigned.
For example, if a DM file finds a Direct mapping for a given native event value, and then a different Conditional mapping for the same value, the refined event uses the Conditional mapping result.
Duplicate mappings within a given mapping type are handled differently, depending on the type:
More information on the design implications of the mapping order is included in the individual mapping type procedures.
To create a new DM file, or edit an existing one, you must open the mapping file wizard.
To open the mapping file wizard
The product integration buttons appear in the details pane.
The Mapping File Wizard appears.
When using the wizard:
Provide file details for a new DM file. You can save a subscription file as a custom file under a different name.
To provide mapping file details
The log name field is automatically populated with the name of the parsing file you enter.
If you click Save and Close, the new file appears in the Mapping File User folder, otherwise the step you select appears.
You can use the Mapping File wizard to search for sample events to use in analyzing the DM file. You can search through the event log store or provide sample events directly from a log file. Sample events provide a template against which to test the mapping output in the final step of the wizard.
To provide sample events
The Sample Events screen appears.
The query appears, displaying the sample events.
Note: You can use any available or custom query to locate sample events. If you plan to use a custom query, we recommend that you create and test it before beginning the data mapping file design process.
Events from the log file appear in the Sample Events pane.
Note: The wizard assumes that each line in the file is an event. Multiple line events are not supported.
If you click Save and Close, the new file appears in the Mapping File User folder, otherwise the step you select appears.
Direct mappings set 1-1 correspondences between a native event and a single refined event value. Thus, it is best to use direct mappings only for default values, or common values that rarely change, such as the ideal_model field.
A mapping can be set to derive a refined event value in the following ways:
Sets specific text for a specific CEG field. This value appears each time an appropriate event is mapped. For example, setting the CEG ideal_model field to "Firewall" results in the ideal_model field displaying "Firewall" for all rules that contain that mapping.
Sets a raw event field whose content is included for a specific CEG or parsed field. A field value is distinguished from a text value by prefacing the value with a dollar sign, $. For example, setting the CEG event_logname field to "$Log" results in any event mapped displaying whatever text appears in the native event Log field.
To set direct mappings
The Direct Mappings screen appears, displaying current or default mappings. The Name column shows the CEG or parsed field name. The Value column shows either a text value or a field value.
Note: Select a parsing file in the Provide Sample Events step for parsed field values to appear.
The direct mappings for the field, if any, appear in the Mapping Details area.
The value appears in the Selected Fields area.
Note: Adding multiple values decreases performance of the mapping, so you use this feature conservatively.
If you click Save and Close, the new file appears in the Mapping File User folder, otherwise the step you select appears.
Function mappings link a CEG field to a value using a function to retrieve or define the refined event information that appears in the refined event. All function mappings consist of a CEG field name, a predefined or class field value, and the function.
For example, a function mapping can concatenate a series of native event values to a single CEG field using the concat function.
If there are duplicate function mappings, the DM file uses the last one it finds. You could set a duplicate mapping to call a second function if the first was not found or did not function as expected.
To set function mappings
The Function Mappings screen appears, displaying current or default mappings. The Name column shows a CEG or parsed field, the Function column the current linking function, and the Value column a text or field value.
Note: Select a parsing file in the Provide File Details step for parsed field values to appear.
The mapping entry appears in the Mapping Details pane.
The value appears in the Selected Fields area.
Note: Adding multiple values decreases performance of the mapping, so use stand-alone function mappings only if necessary.
If you click Save and Close, the new file appears in the Mapping File User folder, otherwise the step you select appears.
A Concat function mapping is a type of function mapping. Unlike other function mappings, which specify one target field or value, the concat function specifies multiple mapping targets, which it concatenates into one CEG field.
You can use the Data Mapping wizard to create concat function mappings. Because concat mappings are different from other function mappings, the procedure for creating them is somewhat different.
To set a concat function mapping
The Function Mappings screen appears, displaying current or default mappings. The Name column shows a CEG field, the Function column the current linking function, and the Value column a text or field value.
The mapping entry appears in the Mapping Details pane.
The Format and Value fields appear.
Note: The value for the concat function is displayed as {…} in the Function Mappings pane. This means that there is a set of values instead of one value.
The value appears in the Selected Fields area.
If you click Save and Close, the new file appears in the Mapping File User folder, otherwise the step you choose appears.
Conditional mappings link a CEG field to different possible results, allowing you to set default and conditional values for a given field. For example, you could use conditional mappings to map success or failure values, or to identify event sources by name or group.
Conditional mappings assign a default value and one or more conditional values to a given CEG field. You can set qualifications for each conditional value. If an event matches those qualifications, the appropriate conditional value is assigned to the chosen field. Otherwise the refined event field displays the default value.
If there are duplicate conditional mappings, the DM file uses the first one it finds, and considers no further mappings. To improve performance, place more common conditions first.
Note: Stand-alone conditional mapping is slower than block mapping. We recommend that you used it only when necessary.
To set conditional mappings
The Conditional Mappings screen appears, displaying any current default mappings. The Field column shows the CEG or parsed field name, and the Value column shows the current default value.
Note: Select a parsing file in the Provide File Details step for parsed field values to appear.
The Mapping Details pane appears, displaying the Field drop-down list and Value shuttle control.
A new value appears.
The new name appears in the list, and the filters dialog appears in the details pane.
If you click Save and Close, the new file appears in the Mapping File User folder, otherwise the step you select appears.
Block mappings link a selected condition to a defined series of mappings, allowing you to create a cascade of mappings triggered by that condition. A given block mapping can use any combination of direct or function mappings. Both types of internal block mapping work exactly as they would for stand-alone mappings.
You can create as many blocks as you need for a single mapping file. Each one includes a name and a condition.
If there are duplicate mappings in a given block, the DM file will use the first one it finds, and consider no further mappings. To improve performance, you should place more common conditions first.
To set block mappings
The Block Mappings screen appears, displaying any current block mappings.
A new block appears in the Block Mappings list.
The Block Definition pane opens, displaying Step 1. Define a Condition
If you click Save and Close, the new file appears in the Mapping File User folder, otherwise the step you choose appears.
You can use the mapping wizard to analyze a data mapping file, allowing you to test and make changes to increase the efficiency of your mapping file. The sample events are tested against the DM file and the results are then validated against the CEG.
To perform mapping analysis, click the Mapping Analysis step of the Mapping File Wizard. The wizard displays a table, showing the parsing result of the sample events you entered in the Sample Event step.
The completed DM file saves your mappings and considers event information in the order of the mapping type screens (wizard steps 4-7). If duplicate mappings exist, the last value the DM file finds is the one assigned. For example, if a DM file finds a direct mapping for a given native event value, and then a different conditional mapping for the same value, the refined event displays the conditional mapping result. More information on the design implications of the mapping order is included in the individual mapping type procedures.
When you create a new rule, it is saved as version 1.0. If you later rule edit the rule, a separate copy of the rule is stored as a new version. You can view earlier versions, and apply or copy them as needed.
Event forwarding rules allow you to select CA User Activity Reporting Module events to forward to remote listeners in outside applications or systems. You can use forwarding rules to identify the events you want to forward, set when they are transmitted, and control how they are received. When an incoming event matches a forwarding rule filter, CA User Activity Reporting Module creates a copy of the event and forwards it. The event is still recorded in the event log store.
Event forwarding rules tasks are carried out from the Log Collection area of the CA User Activity Reporting Module interface. You can create, edit, and delete event forwarding rules. You can also import or export event forwarding rules.
You can use event forwarding rules to send CA User Activity Reporting Module events to outside applications. For example, you could send events to CA NSM using syslog. Event forwarding rules allow you to set criteria for the events you want to forward, and set one or more receivers.
The process of creating event forwarding rules, using the forwarding rule wizard, has the following steps:
To create a forwarding rule, or edit an existing one, open the forwarding rule wizard.
To open the forwarding rule wizard
The forwarding rule buttons appear in the details pane.
The Forwarding Rule Wizard opens.
When using the wizard:
You must name a forwarding rule. You can also enter description information for reference.
To name a forwarding rule
You can create simple filters to set search parameters for common CEG fields. For example, you could set the Ideal Model field to "Content Management" to identify all events with that value in the Ideal Model CEG field. Simple filters are used by many features, including queries, suppression and summarization rules, and event forwarding rules.
To create a simple filter
You can use SQL-based advanced filters to qualify any function that queries the event log store, including narrowing queries, or adding additional qualifications to simple filters. The Advanced Filters interface helps you create the appropriate filter syntax by providing a form for entering logic columns, operators and values according to your filtering requirements.
Note: This section contains a brief overview of the SQL terms used in advanced filters. To use advanced filters to their full potential you need a thorough understanding of SQL and the Common Event Grammar.
The following SQL terms join multiple filter statements:
Displays the event information if all the joined terms are true.
Displays the event information if any of the joined terms are true.
Refines the terms of the main SQL statement by adding a qualifying statement. For example, you could set an advanced filter for events from specified hosts, and add a "having" statement to return only events of a specified severity level from those hosts.
The following SQL operators are used by advanced filters to create the basic conditions:
Include the event information if the column bears the appropriate relation to the value you enter. The following relational operators are available:
For example, using Greater than would include the event information from your chosen column if its value is greater than the value you set.
Includes the event information if the column contains a pattern you enter, using % to set the pattern you want. For example, L% would return any values beginning with L, %L% would return any values with L included as neither first nor last letter.
Includes the event information if the column does not contain the pattern you specify.
Includes the event information if the column contains one or more of the values in the quote-delineated set you enter. Multiple values in the set must be comma-separated.
Includes the event information if the column does not contain one or more of the values in the quote-delineated set you enter. Multiple values in the set must be comma-separated.
Includes any event information that matches one or more of the characters that you enter, allowing you to search for key words.
Includes any event information that is set as a key value during Report Server configuration. You can use key values to set business relevance or other organizational groups.
Includes any event information that is not set as a key value during Report Server configuration. You can use key values to set business relevance or other organizational groups.
Advanced filters are used by many features, including query creation, report scheduling, and local and global filters.
To create an advanced filter
The first row of the event filter table becomes active, and its Logic and Operator columns are populated with the default values "And" and "Equal to" respectively.
Set required attributes for a forwarding rule, including forwarding exit points, CEG fields included in the forwarded event, and destination settings.
To set rule attributes
Note: Choosing before has a larger effect on system performance, because the events are unrefined.
The new rule appears in the User subfolder of the Forwarding Rules folder.
The maximum syslog packet size (including PRI, Header, Tag and Content fields) is 1024 bytes, so the forwarded event may not be able to include all of the CEG name-value pairs the user has specified.
When necessary,CA User Activity Reporting Module truncates the message value to keep the length under 1024 bytes. If the forwarding rule specifies CEG fields to include in the generated syslog event, then the generated syslog event's Content field contains the specified CEG name-value pairs.
The name-value pairs have the format CEG_field_name:field_value from the event that matched the simple filter rule. The string “null” designates a null CEG field value. These CEG fields are in the order specified in the forwarding rule.
The CEG field order specified in the forwarding rule is significant. CA User Activity Reporting Module may truncate the value portion specified, but it will not truncate any CEG field names. If CA User Activity Reporting Module cannot fit the next full CEG field name and the colon and at least one byte of the associated value, then it terminates the syslog content field with the prior CEG name-value pair.
You can edit a forwarding rule.
To edit a forwarding rule
The forwarding rule wizard appears, displaying your selected rule.
The rule appears in the appropriate list as a new version of the edited rule.
You can delete an unneeded forwarding rule.
To delete a forwarding rule
A confirmation dialog appears.
The deleted rule is removed from the appropriate list.
You can import a forwarding rule, allowing you to move rules from one environment to another. For example, import rules created in a test environment to your live environment.
To import a forwarding rule
The forwarding rule buttons appear in the details pane.
The import file dialog appears.
The Forwarding Rule Wizard appears, displaying the details of the rule you selected.
The imported rule appears in the Event Forwarding Rules user folder.
You can export a forwarding rule, allowing you to move rules from one environment to another. For example, export rules created in a test environment to your live environment.
To export a forwarding rule
An export location dialog appears.
An export successful confirmation dialog appears.
The rule is exported.
Note: If you examine the exported rule, the values for Facility and Severity are shown only numerically. You can use the wizard interface to determine the text descriptions associated with these values.
|
Copyright © 2014 CA Technologies.
All rights reserved.
|
|