

This section contains the following topics:
Upgrading to CA User Activity Reporting Module Version 12.5 through Subscription
View Global Subscription Status
View a Server's Subscription Status
Edit the Global Subscription Configuration
Edit a Server's Local Subscription Configuration
Download & Select Modules for Offline Subscription
About Subscription Public Keys
Self-Monitoring Events for Subscription
Apply Subscription Updates to Agents and Connectors
To upgrade CA User Activity Reporting Module to version 12.5, first upgrade to version 12.5 of the Log Manager product, then update all other CA User Activity Reporting Module modules, such as Content, Integration and Agent modules. You perform all upgrade tasks through Subscription.
Important! Upgrade the management CA User Activity Reporting Module server before you install any new CA User Activity Reporting Module servers in your network. Doing so allows the new servers to register properly.
To upgrade to CA User Activity Reporting Module version 12.5
Note: The upgraded CA User Activity Reporting Module 12.5 user interface lists both Subscription Module and Subscription Service under the Administration tab, Services subtab. Subscription Module reflects the interface and functionality previous to the 12.5 update, and is present to help ensure proper communication between all CA User Activity Reporting Module servers during the upgrade to 12.5. Once you have upgraded the Log Manager product on a given CA User Activity Reporting Module server to version 12.5, use only Subscription Service to perform all further subscription tasks and configuration changes.
Important! After you have performed Step 1, the upgraded CA User Activity Reporting Module 12.5 user interface lists both Subscription Module and Subscription Service. Use only Subscription Service, and not Subscription Module, to perform all further subscriptions tasks, including this step. Subscription Module is present only to help ensure proper communication between all CA User Activity Reporting Module servers during the upgrade to 12.5; do not use it to perform subscription functions post-upgrade.
Completing this step updates the certificates that changed in this release.
The Subscription Service downloads and distributes selected subscription modules to your CA User Activity Reporting Module servers, either according to a schedule you configure or upon an on demand update. You can view the current subscription status of your CA User Activity Reporting Module servers through the Subscription Dashboard.
The Subscription Dashboard displays the progress of any updates a CA User Activity Reporting Module server is current downloading or installing. You can also see the state of any content updates currently in progress, and a list of all content updates previously installed.
To view the global status of subscriptions
The Global Service Configuration for the Subscription Service appears, with the Subscription Dashboard tab selected.
If a content update is currently in progress, a progress bar and status messages indicate the status of the update. Click the Refresh button to display the most recent progress of the update.
The Content window appears. Click on a content type to display the name, date and version of all associated updates installed to date.
If an update is in progress on any CA User Activity Reporting Module server, a progress bar appears in the Progress column for that server. Click the Refresh button to display the most recent progress of the update.
The Servers window also displays information for each CA User Activity Reporting Module server, including the following:
Displays the subscription state of a given CA User Activity Reporting Module server. Subscription states are Idle, Waiting, Downloading, Installing, Completed, and Failed.
Displays any message relating to the subscription status of a given CA User Activity Reporting Module server.
Displays the date of the last update action taken by a given CA User Activity Reporting Module server.
The Subscription Service downloads and distributes selected subscription modules to your CA User Activity Reporting Module servers, either according to a schedule you configure or upon an on demand update. You can view the current subscription status of a specific CA User Activity Reporting Module server through the global Subscription Dashboard, or through the local State window of that server.
To view the subscription status of a CA User Activity Reporting Module server
The Global Service Configuration for the Subscription Service appears, with the Subscription Dashboard tab selected.
or
Displays the subscription state of a given CA User Activity Reporting Module server. Subscription states are Idle, Waiting, Downloading, Installing, Completed, and Failed.
Displays any message relating to the subscription status of a given CA User Activity Reporting Module server.
Displays the date of the last update action taken by a given CA User Activity Reporting Module server.
During the implementation phase, you can configure global subscription settings for your environment. All CA User Activity Reporting Module servers inherit and use these global settings, unless you override a global setting by configuring local settings for an individual server.
By default, the first server installed is the Default Subscription Proxy and all servers installed after the first are configured as subscription clients. If no other proxy is configured or available, the default proxy downloads updates to subscription clients.
You can change the global settings at any time. All servers inherit any changes you make, unless a specific server is configured locally to override those settings.
Settings that can only be made and edited at the global level include:
To edit the global subscription configuration
The Global Service Configuration for the Subscription Service appears.
Note: See online help for field-level details.
During subscription implementation, you can configure global subscription settings, such as a subscription schedule and proxy list, for your environment. Individual CA User Activity Reporting Module servers inherit these global settings.
At any time, you can override global settings by configuring local settings for an individual server. Consider the subscription role of a server when planning to override global settings.
To edit a server's subscription configuration
The Subscription Service Configuration for the selected CA User Activity Reporting Module server appears.
Note: Before changing a server's role from subscription proxy to subscription client, consider the configurations of the subscription clients that use this proxy. If you change a server from proxy to client, immediately remove the server from global and local Subscription Proxy(s) for Client Updates lists.
Important! Before changing a server's role to offline subscription proxy, consider whether it is included in any proxy lists. In a mixed subscription environment, where you have configured both online and offline subscription proxies, do not include offline proxies in the proxy list for any online subscription client.
Note: To restore the global setting, click the button again. The global setting is restored at the next update start time.
Note: Be sure that the modules selected for a subscription proxy include at minimum all modules selected in the download lists of any clients that receive updates from this proxy.
This server contacts the specified proxy servers to download subscription updates, creating a tiered proxy structure.
Offline subscription update files are available at the CA Technologies offline subscription FTP site, packaged in .zip files. As new modules become available, they appear on the FTP site. Periodically monitor the list of available modules to be sure that you have downloaded the most recent updates. You can also check the CA Support Site at http://ca.com/support to learn when new Log Manager service packs and versions are available.
Before you can select modules to download for offline subscription proxies, download the offline update file package from the CA Technologies FTP site and manually copy it to your offline proxies. You can then select which modules to download and install. Offline subscription clients, by contrast, automatically receive all updates that are manually installed on their offline proxy, regardless of any modules selected for the client at the local level.
To download and select offline subscription modules
ftp://ftp.ca.com/pub/elm/connectors/ftp/outgoing/pub/elm/ELM_Offline_Subscription
The directory index displays a folder for each major CA User Activity Reporting Module release.
Note: The folder for the CA User Activity Reporting Module r12.5 release contains a subfolder as well as a .zip file. The subfolder contains modules for upgrading from any previous version to version r12.5. The .zip file contains the modules for performing routine, periodic updates to version r12.5. If you are performing a routine update, select the .zip file.
/opt/CA/LogManager/data/subscription/offline.
The Subscription Service Configuration for the selected CA User Activity Reporting Module server appears.
Note: Offline subscription clients automatically receive all modules that are manually installed on their offline proxy. The contents of the proxy server control which updates the subscription client receives. Modules selected at the local level for an offline client have no effect.
The Modules Available for Download dialog appears.
The Modules Available for Download dialog closes, and the modules you selected appear in the Modules Selected for Download list.
Offline subscription clients can now download these modules automatically according to the subscription schedule you set, or on demand when you begin a manual update.
The offline proxy server updates itself with the selected modules.
Note: Though you can allow the offline proxy to update itself according to the subscription schedule you set, it is good practice to perform a manual update whenever you transfer new files. This practice ensures that the updates are available when offline subscription clients request them.
An on-demand update is different from a scheduled update in that it is performed immediately and updates only the selected server. You can invoke an on-demand update for only one CA User Activity Reporting Module server at a time. Before you perform an on demand update on a subscription client, first update its proxy server.
Typically, scheduled updates keep all of your servers updated with the latest binary files and your management server updated with the latest configuration and content files. However, it is sometimes appropriate to invoke an off-schedule update to a single server.
Consider using on-demand updates in the following cases:
Failed to connect to EEMServer
Error installing content in EEM
Select the management server and click Update Now. If the management server is configured as the proxy for content updates, the server downloads new updates from the CA Subscription Server. Then the server pushes the content updates to the content repository. If this server is configured as a proxy for clients, it makes available the binary updates to its clients on a first-come-first-serve basis.
Note: Alternatively, you can wait until the next scheduled update session, when any incomplete processing resumes and completes.
You can update servers on demand using the Update Now function. When you update two or more servers in a series, be sure to verify that processing completes on one before beginning processing on the next. Review self-monitoring events for confirmation.
If you recently changed any subscription configurations, be sure to wait for the update interval (300 seconds by default) to elapse before running an on-demand update. CA User Activity Reporting Module generates a self-monitoring event after the update completes.
Note: If a scheduled update is currently in progress, clicking Update Now has no effect. If the start time for a scheduled update occurs while update now processing is in progress, the scheduled process does not run. When the on-demand processing completes, the scheduled update cycle resumes.
Important! If the modules to download contain Content updates, update the content proxy before performing any other on-demand update.
To update a server on demand
The server retrieves updates from the CA Technologies Subscription Server. As proxy for content updates, it pushes content updates to the content repository. As an online proxy, it downloads binary updates as well.
The server is updated with the modules selected for download.
The server is updated with the modules selected for download.
.../data/subscription/offline
The server is updated with the modules selected for download.
The server is updated with all modules installed to its offline proxy.
Note: Offline subscription clients automatically receive all modules that are manually installed on their offline proxy. Modules selected at the local level for an offline client have no effect.
You can help ensure successful subscription updates on CA User Activity Reporting Module servers by regularly cleaning up the disk. If available disk space is less than 5 GB when the subscription update process begins, the Subscription Service issues a self-monitoring event and suspends the download process.
To ensure sufficient disk space for subscription updates
The subscription proxy maintains a set of public keys corresponding to the private keys used by the CA Subscription server. The subscription proxy downloads subscription updates as a zip file that is digitally signed using a private key. The update identifies the public key to be used to check the signature of the update. Verifying the signature is how the subscription proxy ensures the update is from the CA Subscription server. There is only one public-private key pair used for a given subscription operation. A private key is used in signing the update; a public key is used for verifying the signature. The public key is stored at each CA User Activity Reporting Module server and can be updated.
CA User Activity Reporting Module stores the initial version of the public key in the Subscription Config file during installation. If a new private key is required, the associated public key is downloaded with the subscription update prior to the update cycle where the new key is needed.
Important! Do not manually update the Public Key field for subscription without explicit directions from CA Technical Support.
You can monitor the successes and failures of the subscription update processes that involve CA User Activity Reporting Module servers configured as the following:
Note: The events described here do not track subscription updates for agents.
Successes are reported for the following:
Failures and errors are reported for the following:
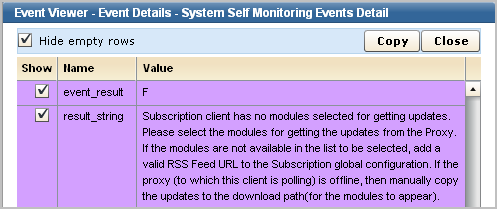
You can monitor the successes and failures of the subscription update processes by viewing self-monitoring events for subscription.
To monitor subscription processing events
Some of the fields displayed for self monitoring events reflect the CEG standard way of referring to common actions across vendors. The Ideal Model is based on this hierarchy: event_category, event_class (within the category), event_action (within the class), event_result, and event_severity. The CA Severity shown in this report is the CA interpretation of the severity.
The severity of the event, where
When the event occurred.
The component that failed to successfully complete the current process. This could be either a subscription proxy or a subscription client. If it is a subscription proxy, it could be the default proxy, an online proxy, or an offline proxy.
The host name of the CA User Activity Reporting Module server that is the Receiver.
The category of the event. Configuration Management is the event_category for subscription service events.
The username or identity that initiated the action expressed in the event information. This is the source_username field in CEG.
The action that caused the event to be generated. This is the event_action field in CEG.
S for Success; F for Failure. The result of the event action is the event_result field in CEG. Other actions are Accept, Reject, Drop, and Unknown.
The message text. If the Result column displays Failure, view the Result Description text.

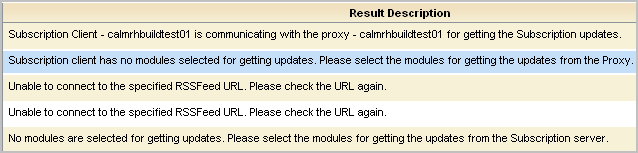
After you configure subscription, you can view the self-monitoring events. After a subscription update, you can verify that the update to each server completed successfully. As upgrades complete, look for the following self-monitoring event messages on each affected server:
You can also view subscription self-monitoring events for troubleshooting purposes.
To view subscription event details in the event viewer
The event viewer opens.
Periodic updates, service packs, and point releases are all delivered by subscription. Often the modules to download include Agents and Integrations. When these modules are downloaded to a subscription client that manages agents, you must apply these updates to the agents after verifying that the subscription client that manages the agents has been successfully updated. Updates to agents must be applied before updates to connectors.
To upgrade CA User Activity Reporting Module agents with subscription updates
The Subscription Wizard appears.
|
Copyright © 2014 CA Technologies.
All rights reserved.
|
|