

User Views › Object Menu Bar › Options Menu › View and Output Definition Wizard › Web Publishing to a Web Server
Web Publishing to a Web Server
Reports can be published to a web server location within your domain.
To publish reports on your domain web server
- Create a “Network Place” for the web server directory so you can instruct the Windows Client to publish web reports there. The Microsoft “Add a network place” wizard will guide you through the steps for creating a “Network Place”.
- Open Explorer on the web server and create a subdirectory where you want the Windows Client to publish the CA Vantage SRM reports. For example: “\Vantage\Webpublishing”.
Note: The reason for creating a clean subdirectory for Windows Client generated web pages is that the Windows Client is going to send icon graphics, scripts, and web pages to that sub directory and you do not want those files and file names to clash with existing files on your web server.
- In the Windows Client open the User View you want published on your web server.
- Select View & Output Destinations from the object view toolbar, as shown in the following example:
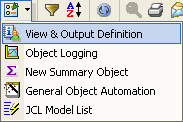
The View and Output Definition wizard is displayed.
- Select Destinations and click “Web Publishing”. The link Define the Web destination is highlighted.
- Click the link Define the Web destination, the Web Publishing page is displayed.
- Click the first row in the Directory box and the Browse for Folder window is displayed.
Note: You must not select a mapped letter drive under “My Computer” to your web server; if you select a mapped letter drive under “My Computer” to your web server then you cannot use the Scheduler to schedule output to the web server now or at a later date.
- Double-click My Network Places, a list of your network places is displayed. Select the network place for your web server.
- Click OK, the full address of the web server will appear in the Directory box.
- Create a link to the Windows Client produced report on your web server. Once a web page has been generated (either by clicking Perform from the User View, or generated by the Scheduler) you will need to create a link to the web page produced by the Windows Client from somewhere on your intranet. Using your web page editor insert a link on one of your existing web pages (for example your “Home page”), to the web page “WebPublishing.htm” which should be located in the subdirectory of your web server where you instructed the Windows Client to produce the web reports, for example in the directory: \\Webserver\Vantage\WebPublishing.
Note: In order to view the web pages created by the Windows Client, you need a Scalable Vector Graphics (SVG) Viewer. Such viewers are available in the market place. When you open WebPublishing.htm for the first time and if you do not have you a SVG Viewer installed then you will be prompted to install one.
Observe the following:
- You can use the Scheduler to schedule when web reports are to be generated and published by the Windows Client in the View and Output Destination wizard. If you are using the Scheduler service, then you must also set up a user ID and password in the Scheduler service to ensure that the Scheduler has write authority for the Web Server, see the section Giving the Scheduler Write Access for Publishing.
- For scheduled activities to obtain information from a host, a valid host user ID and password must be defined in the Host Definition dialog, see the section Define Hosts. Therefore, the system needs a valid host user ID defined in the Host Definition dialog and a valid server user ID and password, with write authority, defined in the Scheduler service.
More Informaiton
Deleting Web Publishing Files
Outputting Reports to a File Server
Copyright © 2013 CA.
All rights reserved.
|
|