

Configure all the settings in the FederationSample.conf file.
The settings are as follows:
Specifies the name of an existing user directory object in the FSS Administrative UI. This directory must contain at least one user entry. If no value is specified for this setting, the sample application script reads the user directory information from the policy store, provided only one user directory is listed. If more than one user directory is listed, the sample application script asks the user to enter the user directory name in this file. The default value does not exist.
Indicates that the value of this attribute becomes the Name ID value in the SAML assertion. If no value is specified for this setting, the sample application script chooses a value based on the user directory type. Example of attribute values can include:
If no value is specified, the following defaults are used:
Defines the name of the DefaultAgentName configuration setting for the Web Agent. This setting is specified in the Agent Configuration Object of the Policy Serve User Interface. If no value is specified for this setting, the sample application script reads the DefaultAgentName from the policy store, provided only one Agent configuration object found in the policy store. If more than one Agent configuration object exists, the sample application prompts the user to enter the DefaultAgentName value in this file.
Specifies the full path to the document root directory of the web server. The default value is C:\Inetpub\wwwroot, the root directory for an IIS web server. For example, if you are using a Sun Java System web server, the path would be server_root/docs .
Specifies the listening port of the web server. The default port is 80.
Specifies the listening port of the web server on the opposite side of the federation connection. For example, if your site is the IdP, then this site is the SP web server port. The default port is 80.
The SetupFederationSample.pl script executes the sample application. This script resides in the directory policy_server_home/samples/federation.
The SetupFederationSample.pl script deploys the sample application. The script accomplishes these tasks:
Important! If you install the Policy Server and the Web Agent Option Pack on different machines, comment out the call to CheckPreRequisites() in the SetupFederationSample.pl file.
To comment out the CheckPreRequisites() call
if ($CURRENT_COMP == $COMP_FSS)
{
#   CheckPreRequisites();
}
The SetupFederationSample.pl script uses the following command options:
Specifies the user name of the SiteMinder Administrator.
Specifies the password of the SiteMinder Administrator in clear text.
Removes all objects that the sample application creates.
Creates only the Identity Provider objects in the policy store. You cannot use this option and the -sp option together. If you do not specify a value for this option or the -sp option, the sample application assumes a default of SiteMinder-to-SiteMinder communication.
Options: FSS, SMFE
Creates only Service Provider policy objects in the policy store. You cannot use this option and the -idp option together.
Options: FSS, SMFE
(optional) Indicates which application is installed at the partner site. The default is FSS.
Options: FSS, SMFE
Important! All the command line options are case-sensitive.
Deploy the sample application on the Policy Server system.
You must have read/write permissions to the document root directory of the web server to run the sample application script.
Note: Run the SetupFederationSample.pl script once. If you run it again, the script deletes the sample policy objects that the previous execution of the script created.
Before you run the sample application:
To run the sample application
perl SetupFederationSample.pl -admin siteminder_administrator
-password administrator_password
Example:
perl SetupFederationSample.pl -admin siteminder -password mypassword
Important! All the command line options are case-sensitive.
You can review the list of script command options.
To establish a physically distinct Identity Provider and a Service Provider, you can set up a four-system environment.
The Identity Provider site uses a Policy Server and a Web Agent with the Web Agent Option Pack. The Service Provider site uses a second Policy Server and a Web Agent with the Web Agent Option. The Policy Servers and Web Agents with Option Packs are on separate systems.
If you set up a four-system environment, run the SetupFederationSample.pl script on both Policy Server systems. Use one of the following commands:
perl SetupFederationSample.pl -admin siteminder_administrator
-password administrator_password -idp FSS
perl SetupFederationSample.pl -admin siteminder_administrator
-password administrator_password -sp FSS
You can review the list of script command options.
Set up the Web Agent system to use the sample application.
Follow these steps:
web_agent_home/affwebservices/idpsample
web_agent_home/affwebservices/spsample
The host file is typically in WINDOWS\system32\drivers\etc\hosts.
The host file is commonly in /etc/hosts.
Note: You can access the sample application through a browser on any system; however, the system must have the correct host mappings for www.idp.demo and www.sp.demo.
To establish a physically distinct Identity Provider and a Service Provider, you can set up a four-system environment.
The Identity Provider site uses a Policy Server and a Web Agent with the Web Agent Option Pack. The Service Provider site uses a second Policy Server and a Web Agent with the Web Agent Option. The Policy Servers and Web Agents with Option Packs are on separate systems.
If you set up a four-system environment, modify the host file of each Web Agent system. The Web Agent must be able to recognize the other system with which it is communicating.
After you run the sample application, test single sign-on.
To test federated single sign-on
http://www.idp.demo:server_port/idpsample/index.jsp
http://www.sp.demo:server_port/spsample/index.jsp
The following illustration is the IdP.demo home page:

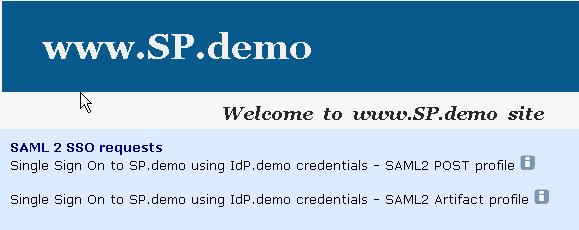
The following illustration is the SP.demo home page:
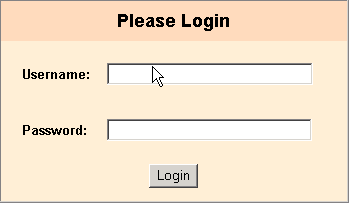
A login challenge like the following dialog is presented:
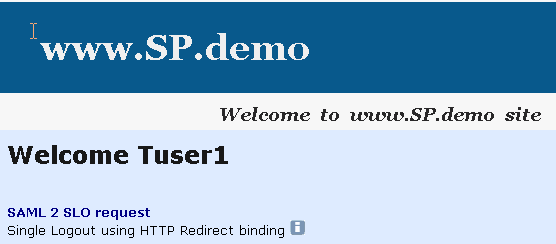
If single sign-on is successful, the following welcome page appears:
After you have successfully tested single sign-on, you can test single logout from the SP.demo welcome page.
To test single logout
On the SP Welcome page, click the link labeled Single Logout using HTTP Redirect binding.
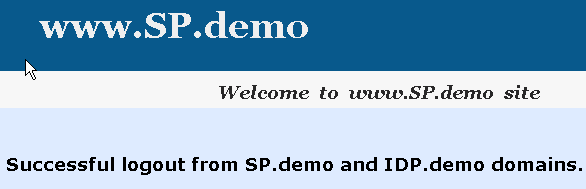
If single logout is successful, the following page appears:
|
Copyright © 2012 CA.
All rights reserved.
|
|