

Agent for SharePoint Guide › Configure SharePoint
Configure SharePoint
Configure SharePoint
Configuring your SharePoint servers for the CA SiteMinder® Agent for SharePoint involves several separate procedures.
Follow these steps:
- Configure Alternate Access Mappings.
- Configure the Trusted Identity Provider.
- Configure Authentication Providers.
- Disable Client Loopback.
- Add SiteMinder Users to SharePoint.
- Manage User Profiles.
Permissions Required for Trusted Identity Provider and Claims Provider
Users who create the trusted identity provider and install or configure the SharePoint claims provider need the following permissions:
- User account permissions
-
User accounts require the following privileges:
- Domain user account.
- Member of Local administrator group on each SharePoint server in the farm (except for the SQL Server and SMTP server)
- Access to the SharePoint 2010 server databases.
- Setup User Account
-
The setup user account requires the following permissions:
- Member of the WSS_ADMIN_WPG Windows security group.
- Member of the IIS_WPG role group.
- Database permissions
-
The following database permissions are required:
- db_owner on the SharePoint Server 2010 server farm configuration database.
- db_owner on the SharePoint Server 2010 Central Administration content database.
- PowerShell scripts for Claims Provider
-
Running the PowerShell scripts for the Claims Provider requires the following permissions:
- Local administrator on all SharePoint web front end (WFE) servers.
- Access (read/write) to the configuration database.
Note: The preceding permissions apply when the user is not an Administrator or not part of an Administrator group.
Create Alternate Access Mappings
Alternate access mappings can direct users who request an external URL to a specific web application on your SharePoint servers. Create alternate access mappings between your external URLs and the web applications on your SharePoint servers.
The CA SiteMinder® Agent for SharePoint uses proxy rules in a similar fashion. Users who authenticate through the CA SiteMinder® Agent for SharePoint are redirected to the internal web application hosted in SharePoint.
Important! The proxy rules in the CA SiteMinder® Agent for SharePoint must match the alternate access mappings for your SharePoint web application.
The following graphic describes how to create alternate access mappings:
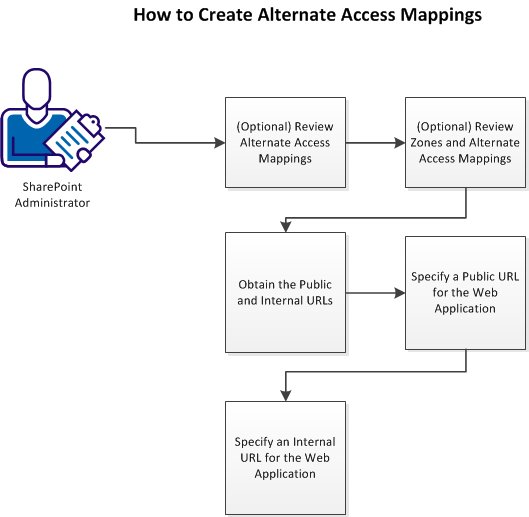
Follow these steps:
- (Optional) Review the following topics that are related to SharePoint administration:
- Obtain the public and internal URLs.
- Specify a public URL for the web application
- Specify an internal URL for the web application.
Alternate Access Mappings
SharePoint central administration servers let you create alternate access mappings between external and internal URLs.
- External URLs are those URLs that your customers, partners, or people outside of your organization access. For example, your customers and partners could log in to your network using www.sales.example.com.
- Internal URLs correspond to the location of the web application in your SharePoint environment. For example, the login server that processes those requests could be named example.com.
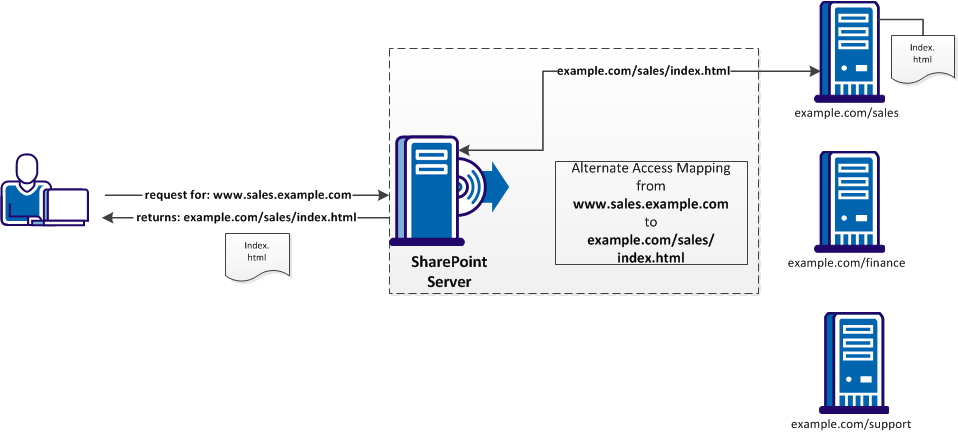
An alternate access mapping creates an association in SharePoint between your external login URL and the login server in the back end. For example, the SharePoint server directs all the requests for www.sales.example.com to the example.com server and displays the sales/index.html page as shown in the following graphic:
Zones and Alternate Access Mappings
Alternate access mappings also support zones. Zones let you configure different access paths to a single web application on your SharePoint server. Creating alternate access mappings across different zones can accomplish the following goals:
- Create different URLs for the same web application. For example, you could have one URL for external users and a different URL for internal users that both point to the same web application.
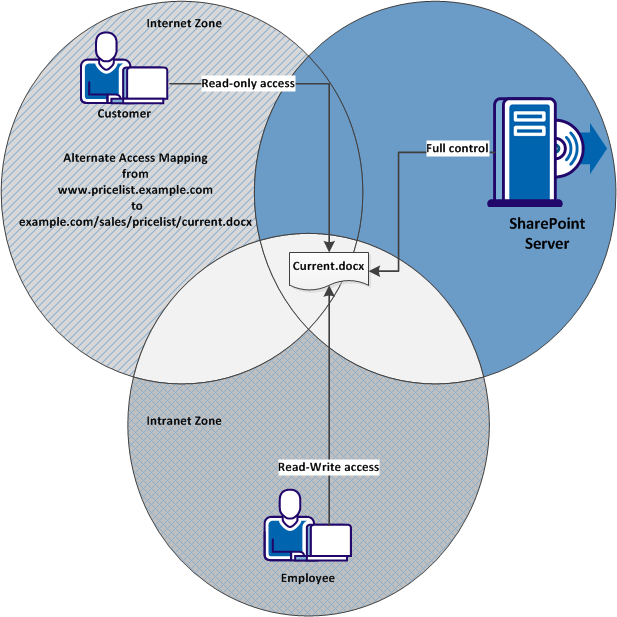
- Allow customers read-only access to documents that are hosted on your SharePoint server, while granting full access to your employees.
- Require secure (HTTPS) connections to a web application for external visitors, while allowing employee access to the web application using HTTP.
- Index the content of your web application using the SharePoint search index (which requires NTLM access), while requiring another authentication method for users.
The following graphic describes how different zones permit different levels of access to the same document for external customers and internal employees:
The following graphic describes how multiple authentication methods apply to the same document by extending the associated web application to multiple zones:
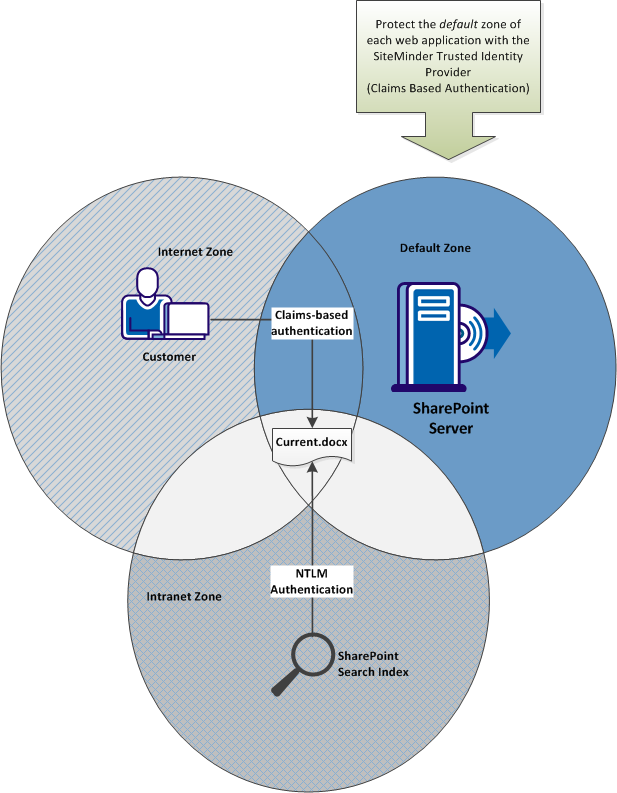
To accommodate the SharePoint search index, the web application must be extended into one zone that uses NTLM authentication.
Obtain the Public and Internal URLs
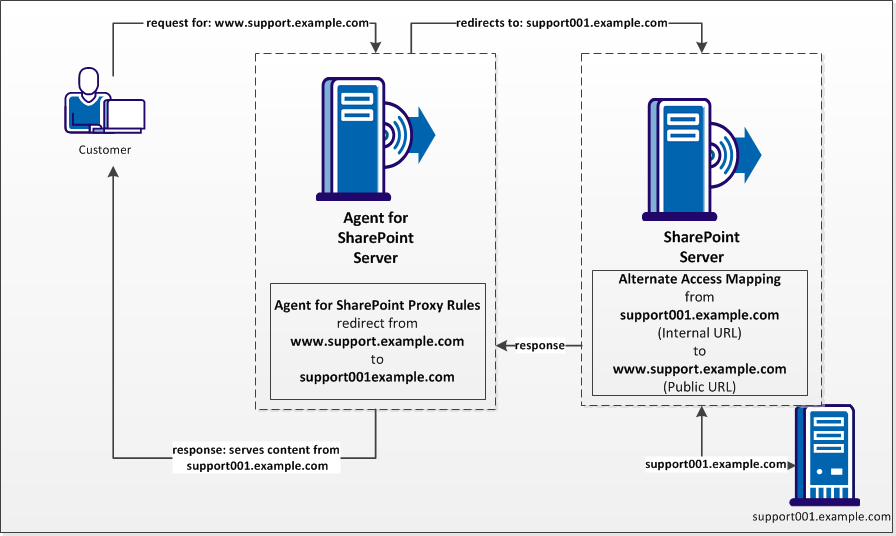
The CA SiteMinder® Agent for SharePoint runs on a proxy-server. The CA SiteMinder® Agent for SharePoint forwards requests to the web applications in your SharePoint environment using proxy rules. These proxy rules direct traffic from the public URL (the server hosting CA SiteMinder® Agent for SharePoint) to your SharePoint web applications (the internal URLs).
For example, customers who access support.example.com are authenticated by the CA SiteMinder® Agent for SharePoint. Next the user is redirected to a SharePoint web application hosted on a server named support001.example.com. The web application serves the content from support001.example.com back to the user who requested the support.example.com page.
The following graphic describes the relationship between proxy rules and alternate access mappings from the previous example:
Follow these steps:
- Obtain the external URLs that are hosted on your CA SiteMinder® Agent for SharePoint server from your network administrator. In this scenario, the URL www.support.example.com is hosted on the CA SiteMinder® Agent for SharePoint server.
- Log in to the server hosting the CA SiteMinder® Agent for SharePoint.
- Create a copy of the following file:
Agent-for-SharePoint_home\proxy-engine\conf\proxyrules.xml
- Open the copy that you created in Step 3 with a text editor.
- Locate the line containing the nete:forward tags, as shown in the following example:
<nete:forward>http://server2.company.com$1</nete:forward>
Note: In a typical environment, the URL in the Step 5 matches the Internal URL for your SharePoint web application.
- Record the public and internal URLs for future reference. You need these public and internal URLs to create your alternate access mappings.
- Repeat Steps 4 through 6 for to obtain any additional Internal URLs for other web applications.
Specify a Public URL for the Web Application
The public URL is an external URL through which your customers or external users connect to your organization. The public URL appears in the web browsers of your users.
When you use the CA SiteMinder® Agent for SharePoint in front of your SharePoint server farm, use the URL of the server hosting your CA SiteMinder® Agent for SharePoint as the public URL.
Important! The proxy rule settings of the CA SiteMinder® Agent for SharePoint must match your alternate access mappings.
This procedure describes creating alternate access mappings for the default zone. Adding another type of authentication to a single internal URL with an alternate access mapping is described in a separate scenario.
Follow these steps:
- Click Start, Programs, Microsoft SharePoint 2010 Products, SharePoint 2010 Central Administration.
The Central Administration home page appears.
- Click Application Management.
The Application Management page appears.
- Click Configure alternate access mappings.
The Alternate Access Mappings page appears with a list of available web applications.
Note: If the web application that you want is not listed, click the Alternate Access Mapping Collection drop-down list. Pick the web application that you want.
- Click Edit Public URLs.
The Edit Public URLs page appears.
- Locate the field for the zone that contains the internal URL for your web application. For example, if you created a web application named http://support001:27975 in the default zone, then locate the Default (zone) field with that URL.
- Replace the internal URL in Step 5 with the public URL that you want. For example, if you are mapping from the internal URL http://supportp001:2975 to support.example.com, then replace the internal URL in the field with support.example.com.
- Click Save.
Specify an Internal URL for the Web Application
This procedure allows the SharePoint Administrator to map the public URL (http://support.example.com) to the SharePoint internal URL (http://support001.example.com).
Follow these steps:
- Click Start, Programs, Microsoft SharePoint 2010 Products, SharePoint 2010 Central Administration.
The Central Administration home page appears.
- Click Application Management.
The Application Management page appears
- Click Configure alternate access mappings.
The Alternate Access Mappings page appears with a list of available web applications.
- Click Add Internal URLs.
The Add Internal URLs page appears.
Note: If the mapping collection that you want edit does not appear, then select one from the Alternate Access Mapping Collection list.
- Enter the internal URL as http://support001.example.com in the Add Internal URL section, in the URL protocol, host, and port field.
- Click Save.
The Alternate Access Mappings page appears with the saved settings. The following table describes how the alternate access mappings appear in SharePoint using the examples in this procedure:
|
Internal URL
|
Zone
|
Public URL for the Zone
|
|
http://support001.example.com
|
Default
|
http://support.example.com
|
|
http://support.example.com
|
Default
|
http://support.example.com
|
Configure the Trusted Identity Provider
The Windows Identity Framework in SharePoint 2010 supports multiple authentication providers. Create a Trusted Identity Provider in SharePoint to establish runtime integration with CA SiteMinder® Agent for SharePoint. To configure the trusted identity provider follow these steps:
- Verify the following prerequisites before continuing:
- Copy the Policy Server signing certificate to the SharePoint central administration server.
- Copy the PowerShell script to the SharePoint central administration server.
- Modify the PowerShell script.
- (Optional) Add additional certificate authority certificates to the PowerShell script.
- Run the modified PowerShell Script on your
SharePoint Central Administration Server.
- (Optional) Verify that the Trusted Identity Provider is registered.
More information:
SharePoint 2010 Federation Worksheet
Copy the Policy Server Signing certificate to the SharePoint Central Administration Server
The Policy Server signing certificate that you exported from your key store on a Policy Server is required to create a trusted identity provider. This certificate lets the SharePoint claims provider verify the authentication claims (tokens) that the Policy Server sends.
Follow these steps:
- Navigate to the directory on your Policy Server to which you exported your certificate from the central key store.
- Locate the Policy Server signing certificate file that you exported, and then copy it to a directory on your SharePoint central administration server.
Copy the Powershell Script to the SharePoint Central Administration Server
The PowerShell script created by the SharePoint connection wizard on your Agent for SharePoint host is required to create a trusted identity provider. Copy it from your Agent for SharePoint host to your SharePoint central administration server.
Follow these steps:
- Navigate to the following directory on your CA SiteMinder® Agent for SharePoint server:
Agent-for-SharePoint_home\sharepoint_connection_wizard\
- Locate the PowerShell script created by the SharePoint connection wizard. The script uses the connection name you chose while running the wizard as the file name. For example, if your connection name was my_connection, the name of the script is my_connection.ps1.
- Copy the PowerShell script to a directory on your SharePoint central administration server.
Modify the PowerShell Script
To create a trusted identity provider on your SharePoint central administration server, edit the PowerShell script to include the following information about your SharePoint environment:
The specific modifications to the PowerShell script vary according to the type of certificates you want to use with your CA SiteMinder® trusted identity provider. The following scenarios exist:
- You are using a certificate that is signed by an external certificate authority, and the certificate authority is not trusted by your SharePoint server.
- You are using a self-signed certificate and the certificate authority is not trusted by your SharePoint server.
- You are using a certificate, and the certificate authority is trusted by your SharePoint server. Check with your SharePoint administrator to confirm that the proper certificate authority is trusted.
Follow these steps:
- Use the previous list to determine which scenario applies to your situation.
- Perform the appropriate procedure from the following list:
Modify the PowerShell Script for Certificates Signed by an Un–Trusted External Certificate Authority
If your signing certificate is signed by an external certificate authority, modify the PowerShell script to do the following tasks:
- Import the certificate authority certificate (root certificate) into SharePoint.
- Create a SharePoint trusted root authority that is based on the certificate authority certificate.
- Import the signing certificate.
Follow these steps:
- Open the PowerShell script with any text editor.
- Locate the following text:
"<full path to Root certificate file>"
- Replace the previous text with the full path to your root certificate. For example, if the full path to your certificate is C:\certificates\sharepoint\certificate_authority_certificate.cer, the updated line matches the following example:
"C:\certificates\sharepoint\certificate_authority_certificate.cer"
- Locate the first occurrence of the following text:
<Trusted root authority name>
- Replace the previous text with a friendly name for the new trusted root authority in SharePoint. For example, if the name you want is SPCAAuth, the updated line matches the following example:
"SPCAAuth"
- Locate the following text:
"<full path to Signing certificate file>"
- Replace the previous text with the full path to your Signing certificate. For example, if the full path to your certificate is C:\certificates\sharepoint\signing_certificate.cer, the updated line matches the following example:
"C:\certificates\sharepoint\signing_certificate.cer"
- Locate the second occurrence of the following text:
<Trusted root authority name>
- Replace the previous text with a friendly name for the new trusted root authority in SharePoint. For example, if the name you want is SPSigningAuth, the updated line matches the following example:
"SPSigningAuth"
- Locate the following text:
"<Name of the trusted identity provider>"
- Replace the previous text with the name of your SharePoint realm (the realm name follows $realm = in the PowerShell script). For example, if the name of your SharePoint realm is $realm="urn:moss2O1O-wsfed1-casm", the updated line could match the following example:
"moss2O1O-wsfed1-casm"
- Locate the following text:
"<Description for the Trusted Identity Provider>"
- Replace the previous text with a description for your trusted identity provider. For example, if you want to describe the trusted identity provider as "SiteMinder Provider," the updated line could match the following example:
"SiteMinder Provider"
Note: The LDAP directory and Active Directory charts contain additional examples of possible names.
- If your certificate chain contains more than one certificate authority certificate, add the other certificate authority certificates to the script. If your script contains one certificate authority certificate, go to the next step.
- Save your changes and close your text editor.
The PowerShell script is modified.
- Create a trusted identity provider.
Modify the PowerShell Script for Un–Trusted Self-Signed Certificates
If you are using a self-signed certificate that is issued by a certificate authority which is not explicitly trusted by your SharePoint server, modify the PowerShell script to do the following tasks:
- Import the certificate authority certificate (root certificate) into SharePoint.
- Create a SharePoint trusted root authority that is based on the certificate authority certificate.
- Import the signing certificate.
Follow these steps:
- Open the PowerShell script with any text editor.
- Locate the following text:
"<full path to Root certificate file>"
- Replace the previous text with the full path to your root certificate. For example, if the full path to your certificate is C:\certificates\sharepoint\certificate_authority_certificate.cer, the updated line matches the following example:
"C:\certificates\sharepoint\certificate_authority_certificate.cer"
- Locate the first occurrence of the following text:
<Trusted root authority name>
- Replace the previous text with a friendly name for the new trusted root authority in SharePoint. For example, if the name you want is SPCAAuth, the updated line matches the following example:
"SPCAAuth"
- Locate the following text:
"<full path to Signing certificate file>"
- Replace the previous text with the full path to your Signing certificate. For example, if the full path to your certificate is C:\certificates\sharepoint\signing_certificate.cer, the updated line matches the following example:
"C:\certificates\sharepoint\signing_certificate.cer"
- Locate the second occurrence of the following text:
<Trusted root authority name>
- Replace the previous text with a friendly name for the new trusted root authority in SharePoint. For example, if the name you want is SPSigningAuth, the updated line matches the following example:
"SPSigningAuth"
- Locate the following text:
"<Name of the trusted identity provider>"
- Replace the previous text with the name of your SharePoint realm (the realm name follows $realm = in the PowerShell script). For example, if the name of your SharePoint realm is $realm="urn:moss2O1O-wsfed1-casm", the updated line could match the following example:
"moss2O1O-wsfed1-casm"
- Locate the following text:
"<Description for the Trusted Identity Provider>"
- Replace the previous text with a description for your trusted identity provider. For example, if you want to describe the trusted identity provider as "SiteMinder Provider," the updated line could match the following example:
"SiteMinder Provider"
Note: The LDAP directory and Active Directory charts contain additional examples of possible names.
- If your certificate chain contains more than one certificate authority certificate, add the other certificate authority certificates to the script. If your script contains one certificate authority certificate, go to the next step.
- Save your changes and close your text editor.
The PowerShell script is modified.
- Create a trusted identity provider.
Modify the PowerShell Script for Certificates Issued by a Trusted Certificate Authority
If you are using a certificate signed by a certificate authority that is trusted by the SharePoint server, modify the PowerShell script to do the following tasks:
- Skip the step to import the certificate authority certificate.
- Skip the stop to create a new SharePoint trusted root authority.
- Import only the signing certificate.
Follow these steps:
- Open the PowerShell script with any text editor.
- Comment the first two lines in the PowerShell script, as shown in the following example:
#$rootcert = New-Object System.Security.Cryptography.X509Certificates.X509Certificate2("<full path to Root certificate file>")
#New-SPTrustedRootAuthority -Name "<Trusted root authority name>" -Certificate $rootcert
- Locate the following text:
"<full path to Signing certificate file>"
- Replace the previous text with the full path to your Signing certificate. For example, if the full path to your certificate is C:\certificates\sharepoint\signing_certificate.cer, the updated line matches the following example:
"C:\certificates\sharepoint\signing_certificate.cer"
- Locate the second occurrence of the following text:
<Trusted root authority name>
- Replace the previous text with a friendly name for the new trusted root authority in SharePoint. For example, if the name you want is SPSigningAuth, the updated line matches the following example:
"SPSigningAuth"
- Locate the following text:
"<Name of the trusted identity provider>"
- Replace the previous text with the name of your SharePoint realm (the realm name follows $realm = in the PowerShell script). For example, if the name of your SharePoint realm is $realm="urn:moss2O1O-wsfed1-casm", the updated line could match the following example:
"moss2O1O-wsfed1-casm"
- Locate the following text:
"<Description for the Trusted Identity Provider>"
- Replace the previous text with a description for your trusted identity provider. For example, if you want to describe the trusted identity provider as "SiteMinder Provider," the updated line could match the following example:
"SiteMinder Provider"
Note: The LDAP directory and Active Directory charts contain additional examples of possible names.
- Save your changes and close your text editor.
The PowerShell script is modified.
- Create a trusted identity provider.
Add Additional Certificate Authority Certificates to the PowerShell Script
The PowerShell script created by the SharePoint connection wizard accommodates the following certificates:
- A certificate authority certificate (also named a root certificate)
- One SSL certificate.
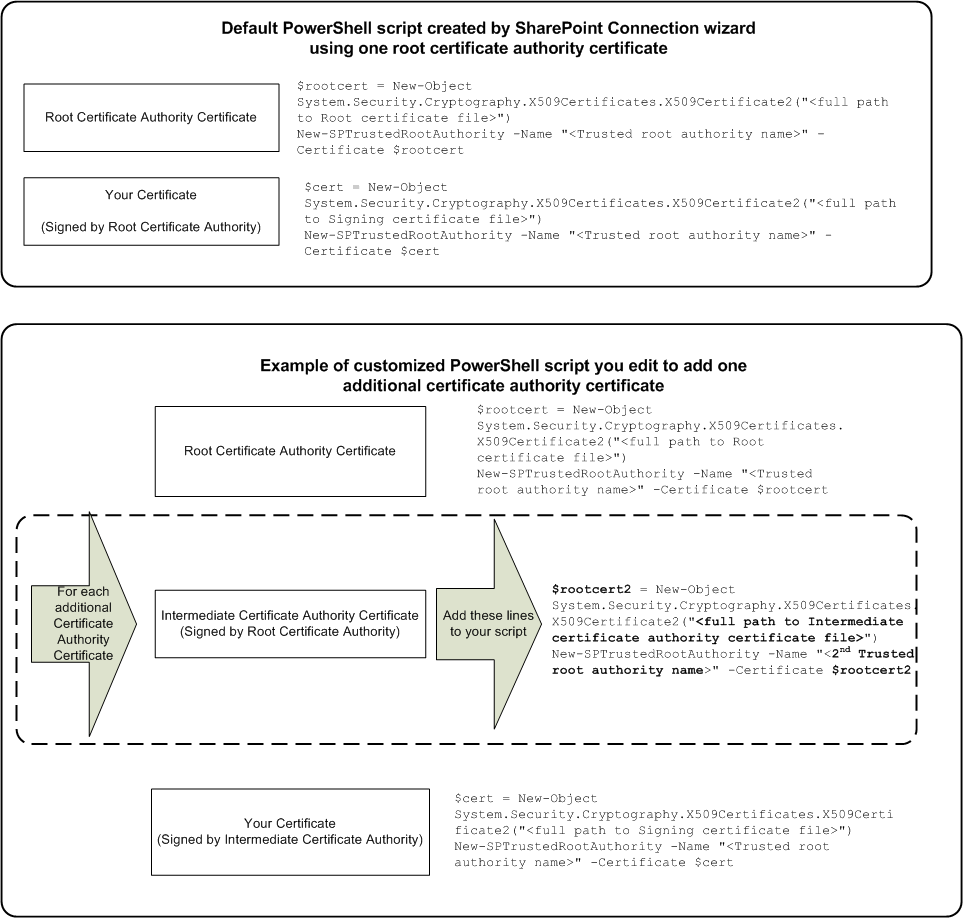
The trusted identity provider requires that all certificates in the certificate chain are included. If an intermediate certificate authority signed your certificate instead, modify the PowerShell script to include both certificate authority certificates.
The following illustration describes the differences between the default PowerShell script, and a PowerShell script that accommodates multiple certificate-authority certificates:
Follow these steps:
- Copy the following section from your PowerShell script:
$rootcert = New-Object System.Security.Cryptography.X509Certificates.X509Certificate2("<full path to Root certificate file>")
New-SPTrustedRootAuthority -Name "<Trusted root authority name>" -Certificate $rootcert
- Copy the following section from your PowerShell script:
- Add a new line after the section you copied, and then paste the copied into the new line.
- Edit the pasted section using the changes shown in the following table as a guide:
|
Change this value:
|
To this value:
|
|
$rootcert
|
$rootcert2
|
|
<full path to Root certificate file>
|
<full path to additional certificate authority certificate file>
|
|
<Trusted root authority name>
|
Name of the additional trusted root authority
|
- To add additional certificate authority certificates, repeat Steps 1 through 4.
- Save your changes and close your text editor.
The PowerShell script is modified.
- Create a trusted identity provider.
Run the modified PowerShell Script on your SharePoint Central Administration Server
Run the modified PowerShell script to create a trusted identity provider on your SharePoint central administration server.
Follow these steps:
- Click Start, All Programs, Microsoft SharePoint 2010 Products, SharePoint 2010 Management Shell
- Navigate to the directory containing your edited PowerShell script.
- Run the script with the following command:
.\your_connection_name.ps1
For example, if you named your connection "my_sharepoint" when you ran the connection wizard, the command would be .\my_sharepoint.ps1.
The trusted identity provider is created.
Verify That the Trusted Identity Provider Is Registered
After running the PowerShell script to create your trusted identity provider, verify that it is registered in your SharePoint central administration server.
Follow these steps:
- From your SharePoint central administration server, click Start, All Programs, Microsoft SharePoint 2010 Products, SharePoint 2010 Management Shell.
The Microsoft PowerShell command prompt appears.
- Enter the following command:
Get-SPTrustedIdentityTokenIssuer
A list of the trusted identity providers that are configured on the SharePoint central administration server appears.
Copyright © 2014 CA.
All rights reserved.
 
|
|


