
The Policy Server requires an SSL certificate to sign the WS-Fed token it sends to the SharePoint claims provider. This certificate verifies that the WS-Fed token is from the Policy Server and not an unauthorized third party.
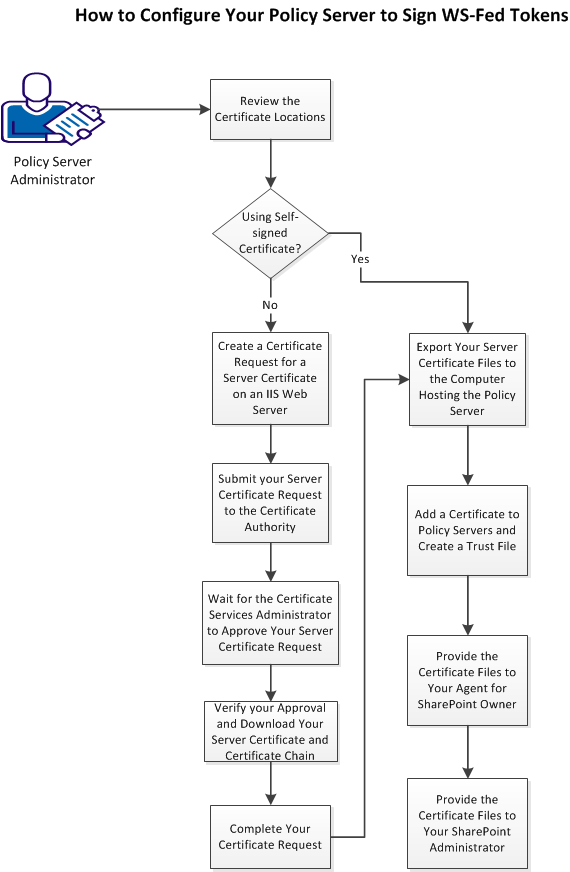
The following graphic describes the process for requesting and installing a Policy Server signing certificate:

Follow these steps:
Note: This procedure provides one possible example of how to configure this feature using third-party tools. CA Technologies did not develop nor provide these tools. These tools are subject to change at any time by the third party without notice. Use this procedure as a guide for configuring this feature in your specific environment. The actual steps that are required in your situation could be different from the steps that are shown here.
Important! Do not use self-signed certificates in production environments. We recommend using self-signed certificates in test environments only.
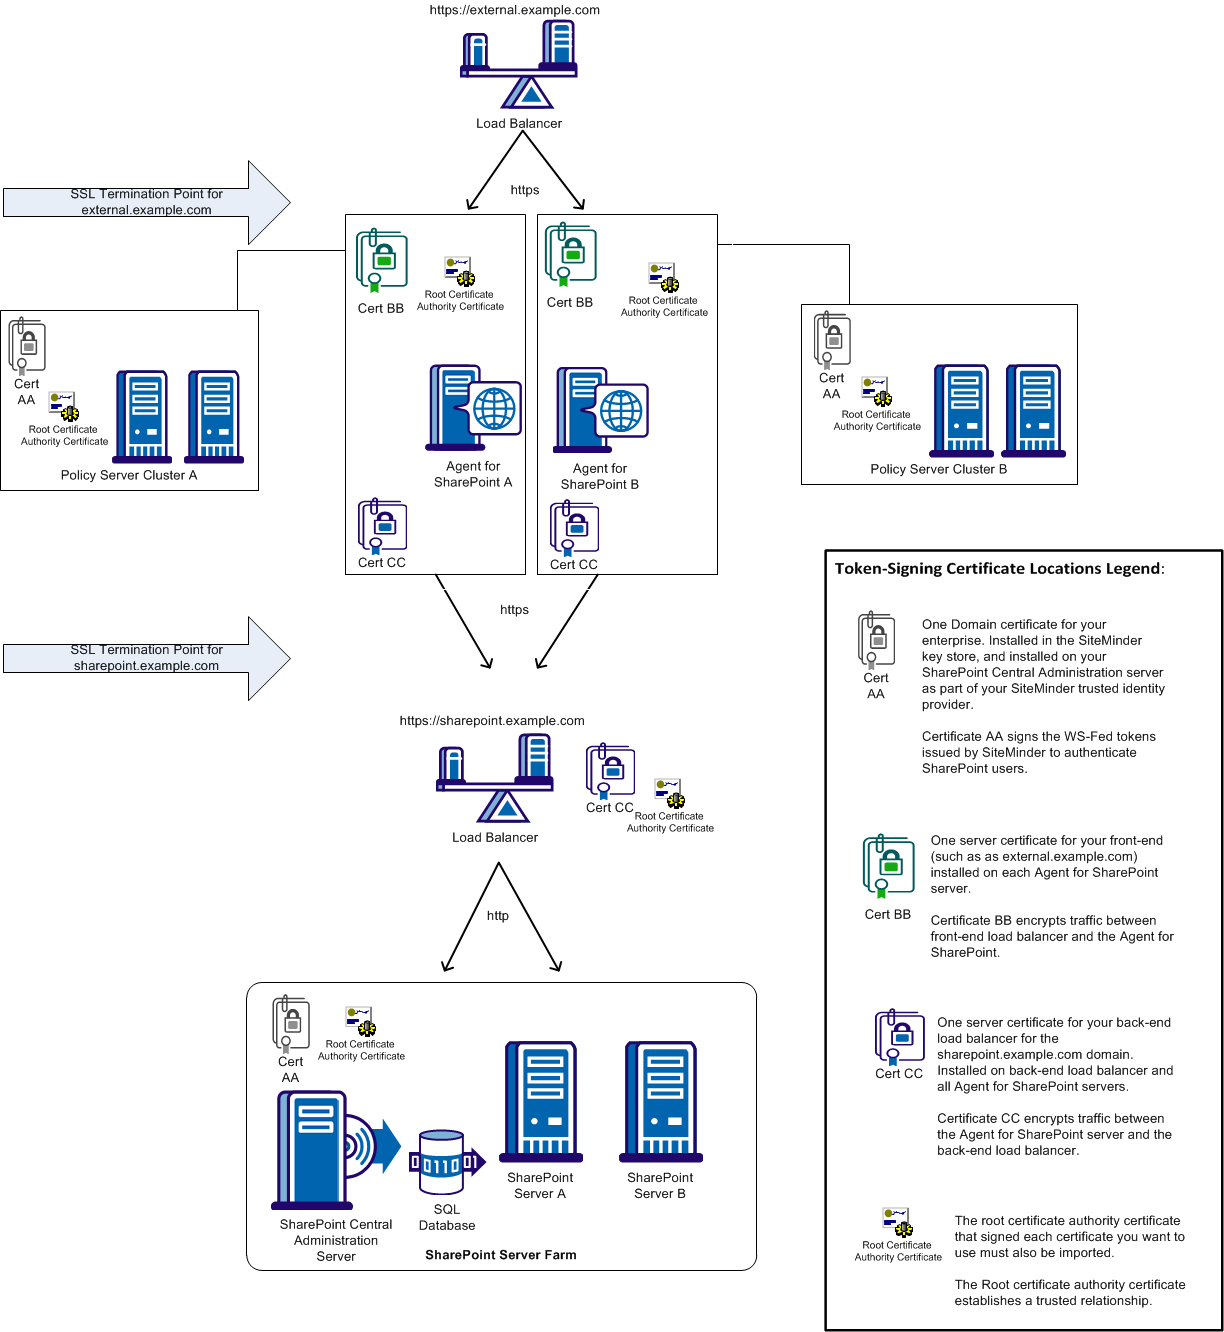
The following illustration shows the typical locations of the certificates that sign your WS-Fed tokens in your SharePoint environment:

Requesting a certificate is the first step in the process of creating a Policy Server signing certificate. Any IIS web server in your organization can request a certificate. Using an IIS web server hosted on your Policy Server is more convenient, because it eliminates exporting the certificates to the Policy Server.
Follow these steps:
Note: This procedure provides one possible example of how to configure this feature using third-party tools. CA Technologies did not develop nor provide these tools. These tools are subject to change at any time by the third party without notice. Use this procedure as a guide for configuring this feature in your specific environment. The actual steps that are required in your situation could be different from the steps that are shown here.
A list of certificates appears.
The Create Certificate wizard appears.
The certificate request is created.
After generating your certificate request on an IIS web server, request a certificate from the web server in your organization hosting Active Directory Certificate Services.
Skip this procedure in any of the following situations:
In any of the previous situations, follow your typical procedures instead.
Follow these steps:
Note: This procedure provides one possible example of how to configure this feature using third-party tools. CA Technologies did not develop nor provide these tools. These tools are subject to change at any time by the third party without notice. Use this procedure as a guide for configuring this feature in your specific environment. The actual steps that are required in your situation could be different from the steps that are shown here.
https://fully_qualilfied_domain_name_of_server_running_active_directory_certificate_services/certsrv
An example of such a URL is http://certificateauthority.example.com/certsrv.
The Request a certificate screen appears.
The Submit a Certificate Request or Renewal Request screen appears.
The certificate pending screen appears.
The request is submitted.
Certificate administrators approve or reject certificate requests. Certificate administrator privileges are separate from Administrator privileges. Not all users who have accounts on the computer hosting Active Directory Certificate services have sufficient privileges to approve or reject certificates.
If you have certificate administrator privileges on the web server to which your certificate was submitted, use this procedure. Otherwise, ask the certificate administrator to do this approval for you.
Follow these steps:
Note: This procedure provides one possible example of how to configure this feature using third-party tools. CA Technologies did not develop nor provide these tools. These tools are subject to change at any time by the third party without notice. Use this procedure as a guide for configuring this feature in your specific environment. The actual steps that are required in your situation could be different from the steps that are shown here.
The certsrv snap-in appears.
A list of pending certificate requests appears.
The certificate is issued.
After downloading your certificate (*.cer) file, complete your certificate request by adding the certificate to your IIS web server. Use the same IIS server from which you originally requested the certificate.
Note: This procedure provides one possible example of how to configure this feature using third-party tools. CA Technologies did not develop nor provide these tools. These tools are subject to change at any time by the third party without notice. Use this procedure as a guide for configuring this feature in your specific environment. The actual steps that are required in your situation could be different from the steps that are shown here.
Follow these steps:
The Start page appears.
A list of certificates appears.
The Complete Certificate Request wizard appears.
The new certificate appears in the list of certificates.
Use the same IIS web server and web browser from which you submitted the request to verify the status of your certificate request. If your certificate is approved, download both the certificate and the certificate chain to your IIS web server.
Follow these steps:
Note: This procedure provides one possible example of how to configure this feature using third-party tools. CA Technologies did not develop nor provide these tools. These tools are subject to change at any time by the third party without notice. Use this procedure as a guide for configuring this feature in your specific environment. The actual steps that are required in your situation could be different from the steps that are shown here.
https://fully_qualilfied_domain_name_of_server_running_active_directory_certificate_services/certsrv
An example of such a URL is http://certificateauthority.example.com/certsrv.
A list of your certificate requests appears.
The Certificate Issued screen appears. If it does not, contact the certificate administrator in your organization for more information.
Your certificate is downloaded.
Export your Policy Server Signing certificate with IIS manager. This export process creates a certificate file that you add to your Policy Server.
Note: This procedure provides one possible example of how to configure this feature using third-party tools. CA Technologies did not develop nor provide these tools. These tools are subject to change at any time by the third party without notice. Use this procedure as a guide for configuring this feature in your specific environment. The actual steps that are required in your situation could be different from the steps that are shown here.
Follow these steps:
The Start page appears.
A list of certificates appears.
Your Policy Server signing certificate is selected.
The Export Certificate dialog appears.
A browse dialog appears.
The browse dialog closes.
Note: You need this password to import this certificate into the central key store shared by the Policy Servers.
The Export Certificate dialog closes and the certificate is exported.
CA CA SiteMinder® requires a certificate to complete signing the WS-Token. CA CA SiteMinder® signs the WS-Token and sends it to SharePoint. To create a certificate for the WS-Token, import an existing certificate that contains both a private and a public key. After the certificate has been imported to the key store and been assigned an alias, export the certificate to your SharePoint Central Administration server to create a trust certificate.
This certificate often uses the Public-Key Cryptography Standards #12 (PKCS) format. In the following example, the password protects the PKCS#12 file.
Note: On Windows operating environments, a .pfx file is equivalent to a .p12 file.
Follow these steps:
The trusted certificates and private keys screen appears.
The Import Certificate/Private key wizard starts.
The Policy Server signing certificate is added the central key store on the Policy Servers. The Policy Server signing certificate appears in the list that is shown on the Administrative UI.
The Export Key Store Entry screen appears.
X509-DER
The trust certificate for your SharePoint central administration server is created.
Note: The Powershell script (which the SharePoint connection wizard creates) requires the paths to the following certificates on your SharePoint central administration server:
The system hosting the CA SiteMinder® Agent for SharePoint needs a copy of Policy Server signing certificate. This copy helps the CA SiteMinder® Agent for SharePoint validate the WS-Fed tokens that the Policy Server sends. The certificate chain validates the Policy Server signing certificate.
Provide the following files to the administrator of the system that hosts the CA SiteMinder® Agent for SharePoint:
The SharePoint central administration server needs a copy of Policy Server signing certificate. This copy helps the central administration server validate the WS-Fed tokens that the CA SiteMinder® Agent for SharePoint forwards from the Policy Server. The certificate chain validates the Policy Server signing certificate.
The SharePoint administrator must edit the PowerShell script that the SharePoint connection wizard generates to include references to these certificate files.
Provide the following files to the SharePoint administrator:
|
Copyright © 2014 CA.
All rights reserved.
|
|