
SharePoint 2010 supports third-party identity providers. These identity providers authenticate and authorize users who request SharePoint resources. A SharePoint administrator configures a trusted identity provider for a SharePoint environment.
Claims are a form of attribute or role, that a user has. Each claim has a name to identify it, and a value that the trusted identity provider verifies by connecting to a user directory.
For example, you can configure claims that correspond to the SamAccountName attribute of an Active Directory server or a uid of an LDAP directory server.
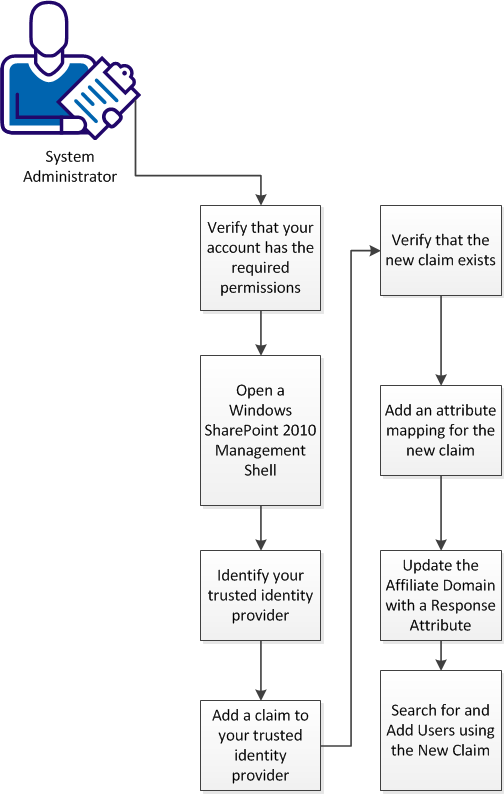
You can add a claim to a CA SiteMinder® trusted identity provider at any time. The following illustration describes the process:

To add a claim to a CA SiteMinder® trusted identity provider, follow these steps:
The user account with which you want to modify the CA SiteMinder® trusted identity provider requires certain permissions. Modify the permissions of your user account if it does not meet the following conditions:
Add the following privileges to your account:
Add claims to your CA SiteMinder® trusted identity provider using the SharePoint 2010 Management shell.
Follow these steps:
A SharePoint 2010 management shell command-line window appears.
A SharePoint 2010 environment can have multiple trusted identity providers. Identify your CA SiteMinder® trusted identity provider before modifying any claims that are associated with it.
Follow these steps:
Get-SPTrustedIdentityTokenIssuer
A list of trusted identity providers appears.
Your CA SiteMinder® trusted identity provider is identified.
Adding a claim to your CA SiteMinder® trusted identity provider involves several steps using the SharePoint 2010 Management Console. This example adds a claim for the last name of a user to the CA SiteMinder® trusted identity provider. Use this example as a guide to add any claim you want to your CA SiteMinder® trusted identity provider.
Follow these steps:
$trutsed_identity_provider_variable_name = Get-SPTrustedIdentityTokenIssuer -Identity "name_of_siteminder_trusted_identity_provider"
$map2 = New-SPClaimTypeMapping -IncomingClaimType "http://schemas.xmlsoap.org/claims/lastname" -IncomingClaimTypeDisplayName "role" -LocalClaimType "http://schemas.xmlsoap.org/claims/lastname"
$map2 | Add-SPClaimTypeMapping -TrustedIdentityTokenIssuer $trutsed_identity_provider_variable_name
The new claim is added to your trusted identity provider.
You can verify the addition of the new claim to your CA SiteMinder® trusted identity provider. This example verifies the addition of a claim for the last name of a user.
Follow these steps:
Get-SPTrustedIdentityTokenIssuer
A list of trusted identity providers appears.
Add an attribute mapping for the new claim using the CA SiteMinder® Administrative UI. For this example, an attribute mapping links the claim, such as last name, to a specific attribute in your user directory. For both Active Directory servers and LDAP directories, map the Last Name claim to the sn attribute in your directory.
Follow these steps:
A list of user directory connections appears.
The Modify User directory page appears.
The create attribute mapping page appears.
Last Name
sn
The Modify User directory page appears.
The attribute mapping for the new claim is created.
Update the affiliate domain with a response attribute for your new claim. This update requires running the SharePoint connection wizard on the computer hosting your CA SiteMinder® Agent for SharePoint.
This procedure adds the mapping of the new claim to your Policy Server.
Follow these steps:
Agent-for-SharePoint_home/sharepoint_connection_wizard
Solaris: sh ./ca-spconnect-version-sol.bin
Linux: sh ./ca-spconnect-version-rhel30.bin
The wizard starts.
The Login Details screen appears.
Specifies the Policy Server name or IP address.
Specifies the Policy Server administrator username.
Specifies the Policy Server administrator password.
Specifies the Agent-4x. The connection with the Policy Server is established using the details given in the Agent Name.
Specifies the shared secret key that is associated with the Agent.
The Select Action screen appears.
The SharePoint Connection Properties screen appears.
Specifies an attribute name for one of the following claim types:
For multivalued attributes, prefix FMATTR, as shown in the following example:
Example: (multivalued attributes) FMATTR:LastName
Specifies an attribute value in your directory that is associated with the specified attribute name.
Example: (Active Directory attribute value for LastName) sn.
Example: (LDAP Directory role-based claim) sn.
The attribute details are saved and the Commit Details screen appears.
The Save Complete screen appears.
The partnership details are saved, the SharePoint Connection is modified, and the wizard closes.
You can search for users to add to your SharePoint Policy for web application using the new claim. For example, if you added a claim for the Last Name attribute, you can search for users by entering their last names in the SharePoint people picker.
Follow these steps:
The Central Administration home page appears.
The Web Applications Management page appears with a list of available web applications.
The buttons on the ribbon become available.
The Policy for Web Application dialog appears.
The Select Zone dialog appears.
The Add Users dialog appears.
The Select People and Groups – Webpage Dialog appears.
The right pane displays the search results with a list of users whose attributes match the value on which you searched.
The selected user is added.
The Add Users dialog appears and displays the selected user.
The selected users and permissions are added.
|
Copyright © 2014 CA.
All rights reserved.
|
|