

You can use this process to configure a non-assertion response to the Service Provider on authentication failure. When a SAML 2.0 authentication request is successful, the response to the Service Provider carries with it the authentication assertion. A rejected authentication request previously only resulted in the end user getting an error message. The Service Provider got no notification of the failed status. Because control returns to the Service Provider, the Service Provider can determine whether to redirect the user, or take any other appropriate action.
Important! For this feature to work, the Policy Server, the Web Agent, and the Web Agent Option Pack are all required to be at SM r12.52.
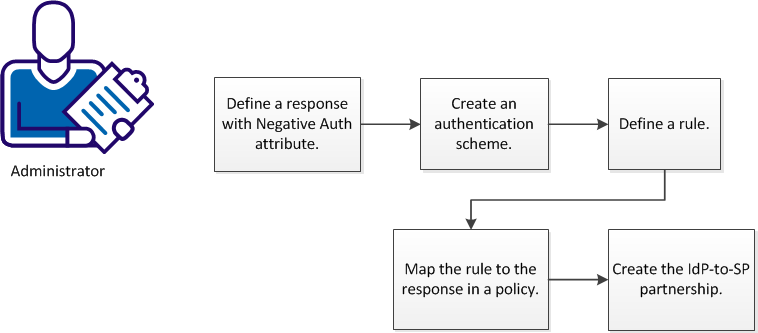
The following diagram depicts the steps required to configure this functionality:
The process of configuring a response to the Service Provider on authentication failure includes the following procedures:
Begin by defining a response using the WebAgent-OnReject-eGovNegResponse attribute type. Defining a response presupposes a defined domain.
Follow these steps:
Note: The selections that you make in this section are the basis for the script that is displayed in the pane in the Advanced section. See the online help for more information.
You have defined a response with the appropriate attribute to generate a response to the SP when an authentication fails.
You can configure a Basic or Forms scheme to generate a response on authentication failure to the SP.
Note: The following procedure assumes that you are creating an object. You can also copy the properties of an existing object to create an object.
Follow these steps:
The Authentication Schemes page appears.
Verify that the Create a new object of type Authentication Scheme is selected.
The Create Authentication Scheme page appears.
Note: Click Help for descriptions of settings and controls, including their respective requirements and limits.
The authentication scheme is saved and can now be assigned to a realm.
You can configure a rule to control actions that occur when users attempt to gain access to a resource. For a full SAML 2.0 response on authentication failure, select the OnAuthReject action.
The realm must be able to process authentication events. Verify that the Process Authentication Events option is selected. For information about how to create a realm, see the next topic.
To create a rule
The Rules page appears.
The Create Rule: Select Domain page appears.
The Create Rule: Select Realm page appears.
The Create Rule: Define Rule page appears.
Note: If a realm does not exist for the resources that you want to protect, a rule cannot be created to protect those resources.
Note: Click Help for descriptions of settings and controls, including their respective requirements and limits.
The Action List populates with authentication events.
Note: The Resource field is disabled because an authentication event applies to the entire realm. The Allow Access and Deny Access options are also disabled as they do not apply to authentication events.
The rule is saved and applied to the specified realm and resource.
Associate the rule you created using the OnAuthReject action with the eGovNegResponse attribute in a policy.
Follow these steps:
You have associated your rule with the appropriate response.
You enable a negative authentication response in the SSO configuration step of the IdP-to-SP partnership configuration.Select the Enable Negative Authentication Response check box.
See Single-Sign-on Configuration for further information.
|
Copyright © 2013 CA.
All rights reserved.
|
|