

The SAML 2.0 Name Identifier profile lets you de-provision an individual user from a federated partnership. You can remove a user from a partnership for any number of reasons. For example, an employee can have left the company, or no longer requires SSO capability with a Service Provider. You make the de-provisioning request through a client application program.
The following diagram illustrates the process of implementing the SAML 2.0 Name Identifier profile:
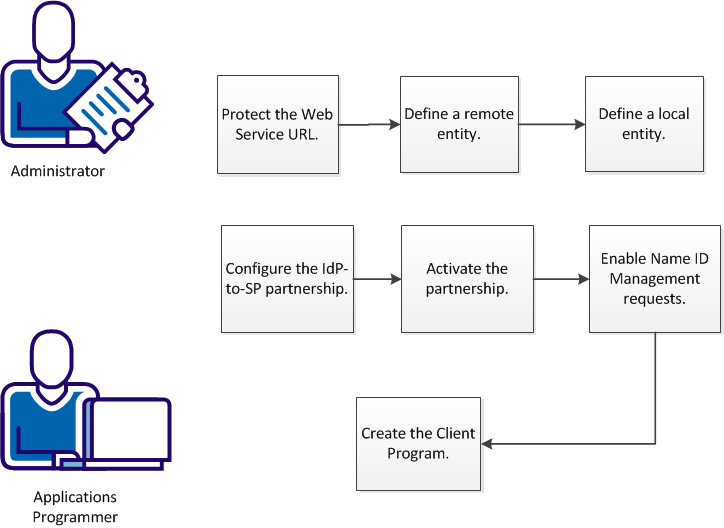
To use the Name ID Management profile to de-provision a user requires these steps:
Customer applications can use the Name Identifier Management Administration Web Service to request the de-provisioning of a user from a partnership. This web service implements the REST interface.
The URL for this service is /affwebservices/saml2nidws. You protect this URL using CA SiteMinder® Basic credentials. Include any users of this service in the user directories that are associated with the domain. CA SiteMinder® policy administrators are not included by default. You can add them manually to an associated directory.
The first step in creating a partnership that supports Name ID management is to define the remote and local partners, or entities. You can configure the entity manually, or you can import the XML metadata. These following steps are for manual configuration.
Follow these steps:
http://sp_server:port/affwebservices/public/saml2nidsoap
The first step in creating a partnership that supports Name Id Management is to define the remote and local partners, or entities. You can configure the entity manually, or you can import the XML metadata. See Federation Entity Configuration for information if you are unfamiliar with creating an entity in a partnership.
Important! You can select any Name ID format for user de-provisioning or de-linking. Dynamic account linking supports only Persistent Identifier format. In cases where you are implementing account linking and de-linking, select the Persistent Identifier Name ID format.
Enabling the Name ID Management feature requires some configuration for a new partnership or existing partnership. Either the local or the remote entity can initiate a request to de-provision a user from the partnership.
Follow these steps:
This selection enables Name ID Management in your partnership. See the online help for descriptions of these options.
Default: 60 seconds.
Default 60 seconds.
Note: Select Delete Name ID or the Enable Notification option or both in the MNI section for the feature to function properly.
These steps complete the Manage Name ID configuration.
See Partnership Activation for details.
A Web Agent Option Pack internal component named the Asynchronous Requesting Processor handles all requests to the Name ID Management Service. Only one Web Agent Option Pack can have this service running at one time. In addition to settings in the Administrative UI, you enable Name ID Management processing by specifying settings in the AffWebServices.properties file in the following locations:
The AffWebServices.properties file contains the following settings that are related to Name ID Management:
Specifies whether this system processes Name ID operations.
Default: False
Important! Set this value to True to enable Name ID Management for the Option Pack or SPS.
Specifies the number of seconds between times the asynchronous processor check for a Name ID request. You can modify this value.
Default: 60 seconds
If you upgrade your Option Pack or SPS, the installer adds these settings with their default values to the new properties file.
The content of the client application is implementation-dependent. To request the removal of a user, use the Name Identifier Management Administration Web Service. The web service implements the following two HTTP methods:
The methods adhere to the OData protocol. Details about these methods follow.
Terminate Federation Membership
An administrator can terminate the federated membership for a user by using the following URL:
POST http://<server+port>/affwebservices/saml2nidws/terminate
This asynchronous request creates a ManageNameID event in XPS.
The POST body includes the following values:
Disambiguates the user, because there is no SMSession. An example DN for LDAP is uid=user0001,ou=Engineering,o=security.com.
Indicates a particular use case. The valid values are:
Determines which providers are part of the operation. For the sp and idp values, the ProviderID identifies a remote provider. If the OperationType is ‘sp’, the ProviderID represents a remote Service Provider object. If the OperationType is ‘idp’, the ProviderID represents a remote Identity Provider object.
The information in the POST body of the request is in JSON or AtomPub format. The following example is in JSON format:
{
"UserDN":"uid=user0001,ou=Engineering,o=security.com",
"OperationType":"sp",
"ProviderID":"http://company.example.com/SPID"
}
This request returns the resource that represents this persisted object, for example:
http://<server+port>/affwebservices/saml2nidws/terminate(<XID>)
<XID> is the XPS XID of the created object. The client can use this URL to poll for changes to this object.
The request can also be in full AtomPub format as follows:
<?xml version="1.0" encoding="utf-8"?>
<entry xmlns="http://www.w3.org/2005/Atom" xmlns:d="http://schemas.microsoft.com/ado/2007/08/dataservices" xmlns:m="http://schemas.microsoft.com/ado/2007/08/dataservices/metadata">
<title type="text"></title><author><name></name></author>
<category term="NameidProducer.terminate" scheme="http://schemas.microsoft.com/ado/2007/08/dataservices/scheme"></category>
<content type="application/xml">
<m:properties>
<d:UserDN>uid=user0001,ou=Engineering,o=security.com</d:UserDN><d:ProviderID>http://company.example.com/SPID</d:ProviderID>
<d:OperationType>SP</d:OperationType>
</m:properties>
</content>
</entry>
The POST service sets the following HTTP return codes:
|
HTTP Status |
Description |
|
201 |
Resource created |
|
400 |
Bad request |
|
415 |
Unsupported media type |
|
500 |
Internal server error |
Poll for Status
An administrator can use this service to request status of the asynchronous request using the following URL:
GET http://<server+port>/affwebservices/saml2nidws/terminate(<XID>)
The URL used to poll for the resource status.
The response returns the status of the request, either PENDING, COMPLETED, or FAILED.
Important! Before you make this request, be sure that the CssChecking parameter in the Agent Configuration Object is set to NO. This setting avoids a potential conflict in syntax between OData and a cross-site scripting attack.
The GET service sets the following HTTP return codes:
|
HTTP Status |
Description |
|
200 |
OK |
|
400 |
Bad request |
|
403 |
Forbidden (when CSS checking is on for the web agent) |
|
415 |
Unsupported media type |
|
500 |
Internal server error |
|
Copyright © 2013 CA.
All rights reserved.
|
|