

Federation Guides › Partnership Federation Guide › Configure Social Sign-on
Configure Social Sign-on
You can configure CA SiteMinder® Federation (the federation system) to let users sign-on to a federated resource with their social networking credentials instead of the federation system credentials.
The social sign-on feature consists of the following features:
- Authentication of users using an OAuth authorization server such as Facebook so that users can sign-on to a federated resource using their OAuth authorization server credentials.
- Configuration of a credential selector page that provides users with various identity providers such as SAML 2.0 or Facebook as authentication choices. Users can choose an identity provider for authorization to sign-on to a federated resource.
The features are independent of each other and you can configure the federation system to implement either or both the features.
Authenticate Users Using an OAuth Authorization Server
To authenticate users using an OAuth authorization server, configure single sign-on between the federation system and the OAuth authorization server.
The federation system provides default support for the following OAuth authorization servers:
- OAuth 1.0a
-
- OAuth 2.0
-
- Facebook
- Google
- LinkedIn
- Windows Live
The following process describes how the federation system processes a user request to access a federated resource:
- The federation system redirects the user request to the OAuth authorization server specified in the user request.
- The OAuth authorization server authenticates the user and sends an authentication response with claims about the user to the federation system.
- The federation system verifies the authentication response, completes the authentication process, and authorizes the user to access the federated resource.
The following flowchart describes how you can authenticate users using an OAuth authorization server:
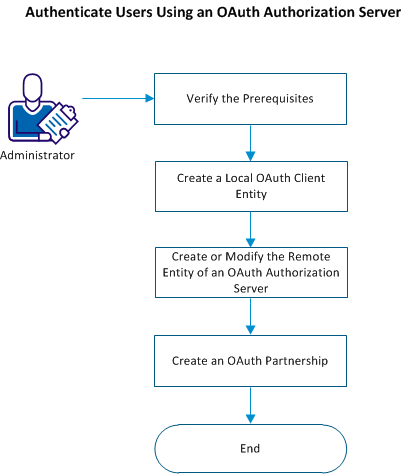
Follow these steps:
- Verify the prerequisites.
- Create a local OAuth client entity.
- (Optional) Create or modify the remote entity of the OAuth authorization server.
- Create an OAuth partnership between the federation system and the OAuth authorization server.
Verify the Prerequisites
Perform the following steps before you configure a partnership to configure single sign-on between the federation system and an OAuth authorization server:
- Enable SSL on the federation system.
- To use an OAuth authorization server that the federation system support by default, perform the following steps before you invoke the partnership:
- On a standalone deployment, verify that the default CA certificate of the OAuth authorization server was imported.
- On an integrated deployment, import the default CA certificate of the OAuth authorization server using smkeytool.
- To use an OAuth authorization server that the federation system does not support by default, obtain and import the SSL CA certificate of the OAuth authorization server before you invoke the partnership.
Create a Local OAuth Client Entity
Create a local OAuth client entity for the partnership between the federation system and an OAuth authorization server.
Follow these steps:
- Navigate to Federation, Entities, and click Create Entity.
- Choose Local in Entity Location.
- Select OAuth Client from New Entity Type.
- Select the OAuth version, and click Next.
- Enter the required values, and click Next.
- Confirm the entered values and click Finish.
The Redirect URL is constructed. Use this URL for initiating an OAuth transaction.
Create or Modify the Remote Entity of an Authorization Server
The system provides remote entities for each of the following OAuth authorization servers that are supported by default:
- OAuth 1.0a
- OAuth 2.0
- Facebook
- Google
- LinkedIn
- Windows Live
The values of each remote entity are pre-configured with known values of the entity. You can modify the values to suit your federation environment or create a remote entity for any OAuth authorization server.
Follow these steps:
- Perform one of the following tasks:
- To create a new remote entity, perform the following steps:
- Navigate to Federation, Entities, Create Entity.
- Select Remote as Entity Location, and select OAuth Authz Server as the New Entity Type.
- Click Next.
- Enter the values and click Next.
- To modify the pre-populated values of a remote entity, perform the following steps:
- Navigate to Federation, Entities, and search for the entity that you want to modify.
- Click the Actions option of the entity, and click Modify.
- Click Next to go to the Configure Entity tab.
- Modify the values and click Next.
- Confirm the changes and click Finish.
Create a Partnership to Configure Single Sign-On
To let the federation system retrieve user information from the authorization server, create an OAuth partnership between the OAuth authorization server as the asserting party and the federation system as the relying party.
Follow these steps:
- Navigate to Federation, Partnerships and click Create Partnership.
- Select the OAuth Client - Authz Server partnership type.
- Configure the partnership information.
- Confirm the values and click Finish.
An OAuth partnership is configured to let users sign-on to a federated resource using the OAuth authorization server credentials.
When the federation system receives a user request in the following format, the request is processed per the partnership configuration:
https://<baseURL_of_the_partnership>/affwebservices/public/oauthtokenconsumer?AuthzServerID=<authorization_server_id>
Or
https://<baseURL_of_the_partnership>/affwebservices/public/ oauthtokenconsumer/<disambiguation id>?AuthzServerID=<authorization_server_id>
The federation system is configured to implement the social sign-on feature.
Migrate an OAuth Authentication Scheme Set-up to OAuth Partnership
If you configured an OAuth authentication scheme in your environment to authenticate users using an OAuth provider, you can migrate your authentication scheme set-up to a federation partnership.
Follow these steps:
- Perform one of the following steps:
- If you want to use both the OAuth authentication scheme and an OAuth partnership simultaneously, register the application with an OAuth authorization server and add the new redirect URL of the following format to the existing OAuth authentication scheme redirect URL:
https://server:port/affwebservices/public/oauthtokenconsumer
- If you want to use an OAuth partnership instead of the OAuth authentication scheme, update the existing redirect URL at the OAuth authorization server to the appropriate partnership redirect URL of the following format:
https://server:port/affwebservices/public/oauthtokenconsumer
Note: The OAuth authentication scheme does not work after you update the authentication scheme redirect URL with the partnership redirect URL.
- Create a partnership between the OAuth client and the OAuth authorization server.
- Inform the application users that the following URL must be used to initiate the OAuth partnership:
https://server:port/affwebservices/public/oauthtokenconsumer?AuthzServerID=AuthorizationServerID
Configure a Credential Selector Page
You can configure a partnership to let users select an identity provider such as Facebook or Twitter for authentication. The credential handling service that is installed on CA SiteMinder® SPS lets you configure a partnership to display a credential selector page with multiple identity providers as user authentication choices.
To configure a credential selector page, create the following partnerships:
- Partnership to configure single sign-on between the federation system and an identity provider. The identity provider acts as the asserting party and the federation system acts as the relying party.
- Partnership between the federation system and the enterprise where the federated resource exists. The federation system acts as the asserting party and the enterprise acts as the relying party.
The following process describes how the federation system processes a user request:
- The enterprise (relying party) redirects the user request to the federation system (asserting party).
- The federation system (asserting party) verifies if the partnership is configured to display a credential selector page. If yes, displays the credential selector page with multiple identity providers as user authentication choices.
- The federation system performs one of the following tasks based on the user registration with the federation system:
- If the user is registered in the federation system, the following steps are performed:
- The user selects an identity provider and signs-on with the identity provider.
- The identity provider generates an access token and redirects the user to the federation system (relying party).
- The federation system (relying party) verifies the access token and tries to disambiguate the user in the user store.
- The federation system (relying party) generates a session and redirects the user to the federation system (asserting party).
- The federation system (asserting party) generates an assertion and redirects the user to the enterprise (relying party).
- The enterprise (relying party) verifies the assertion and gives the user access to the federated resource.
- If the user is not registered in the federation system, the following steps are performed:
- The user clicks the Register link.
- The federation system displays the list of identity providers whose partnerships are configured with a provisioning server.
- The user selects an identity provider and signs-on with the identity provider.
- The identity provider generates an access token and redirects the user to the federation system (relying party).
- The federation system (relying party) verifies the access token and tries to disambiguate the user in the user store.
- The federation system (relying party) redirects the user to the provisioning server configured in the partnership.
- The provisioning server creates the user and redirects the user to the federation system (relying party).
- The federation system (relying party) generates a session and redirects the user to the federation system (asserting party).
- The federation system (asserting party) generates an assertion and redirects the user to the enterprise (relying party).
- The enterprise (relying party) verifies the assertion and gives the user access to the federated resource.
Thus, the user request is processed.
The following flowchart describes how to configure a credential selector page:
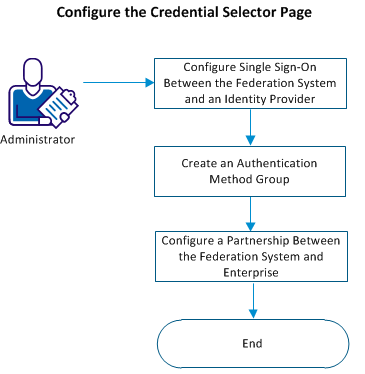
Follow these steps:
- Configure single sign-on between the federation system and an identity provider.
- Create an authentication method group.
- Configure a partnership between the federation system and enterprise to display a credential selector page.
Configure Single Sign-On Between the Federation System and an Identity Provider
For each identity provider that you want to display on the credential selector page, create a partnership to configure single sign-on between the identity provider and the federation system. The identity provider acts as the asserting party and the federation system acts as the relying party.
The identity provider that acts as an authentication choice must be based on the following authentication protocols:
- SAML 1.1
- SAML 2.0
- WS-Federation
- OAuth
To let the federation system act as an identity provider, create a partnership with the system acting as both the asserting party and the relying party.
Follow these steps:
- Navigate to Federation, Partnership.
- Create a partnership for each identity provider that you want to display on the credential selector page.
Create an Authentication Method Group
An authentication method group defines the list of identity providers that must be displayed on the credential selector page. Each identity provider such as SAML or Facebook that you want to display on a credential selector page must be part of an authentication method group. When you create an authentication method group, you can select identity providers from a list of all the partnerships with identity providers acting as the asserting party.
Follow these steps:
- Navigate to Federation, Authn Method Groups.
- Click Create Authn Method Group.
- Add the partnerships of the identity providers that you want to display as authentication choices, and enter the required values.
- Save the changes.
Configure a Partnership Between the Federation System and Enterprise
Configure a partnership between the federation system and your enterprise to display the credential selector page when a user tries to access a federated resource. The federation system acts as the asserting party and the enterprise acts as the relying party. You can create a partnership or modify an existing partnership.
The partnership must be based on one of the following authentication protocols:
- SAML 1.1
- SAML 2.0
- WS-Federation
Follow these steps:
- Navigate to Federation, Partnership.
- Enter the values in each step.
- Perform the following steps in the Single Sign-On, or SSO and SLO, or Single Sign-On and Sign-Out step:
- Select the Authentication Mode as Credential Selector.
- Define the Authentication Base URL.
- Select an Authentication Method Group.
- Select the following field in the Target Application Configuration step:
- SAML 1.1: Target
- SAML 2.0 and WS-Federation: Relay State Overrides Target
- Save the changes.
The partnership is configured to display the credential selector page when a user tries to access a federated resource.
The federation system is configured to implement the social sign-on feature.
Customize the Header and Footer on the Credential Selector Page
You can customize the header and footer that are displayed on the credential selector page to suit your enterprise requirements.
Follow these steps:
- Navigate to the following location on your federation system:
<install_path>\CA\secure-proxy\Tomcat\webapps\chs\jsps
- Make a copy of the header.jsp file and name the new file as header-custom.jsp.
- Make a copy of the footer.jsp file and name the new file as footer-custom.jsp.
Note: If the header-custom.jsp and footer-custom.jsp files exist, the federation system is configured to use the files for displaying the header and footer.
- Modify the files to customize the header and footer that must be displayed on the credential selector page.
- Save the changes.
- Restart CA SiteMinder® SPS.
The customized header and footer are displayed on the credential selector page when the partnership is active.
Copyright © 2013 CA.
All rights reserved.
|
|