

This section contains the following topics:
Identify a Resource by Agent, Realm, and Rule
Flush a Single Realm from the Resource Cache
Complex sets of resources must be logically grouped so that security policies can be created. The basic CA SiteMinder® groupings for resources are realms.
A realm is a cluster of resources within a policy domain grouped according to security requirements. A realm is usually defined for resources that reside in a common location on your network. For example, marketing information that resides in a /marketing directory on your network might be configured as a realm in a policy domain controlled by an administrator in your company’s marketing organization.
The contents of a realm are protected by Agents. When users request resources within a realm, the associated Agent handles authentication and authorization of the user. The realm determines the method of authentication.
The following diagram shows the contents of two realms.
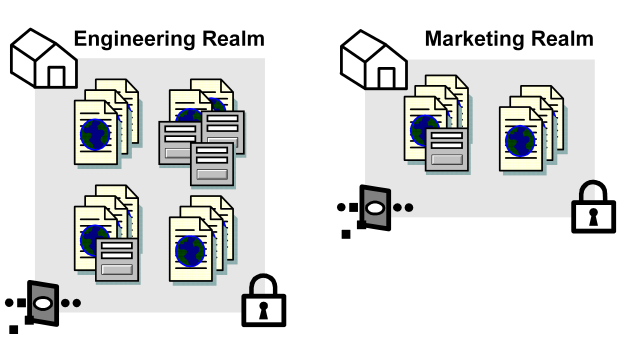
Each of the realms contains resources, such as HTML files, forms, or applications. In addition, each realm is associated with an Agent and an authentication scheme.
If CA SiteMinder® is integrated with a supported risk analysis engine, you can configure a realm with a confidence level. A confidence level represents credential assurance, which is the likelihood that the user requesting the protected resource is legitimate.
Consider the following items:
Note: CA SiteMinder® supports an integration with an on–premise implementation of CA Arcot WebFort and CA Arcot Risk, and a hosted implementation of CA Arcot A–OK. For more information, see the CA SiteMinder® Implementation Guide.
The resources protected by CA SiteMinder® are identified by the following:
[Agent] [Realm Resource Filter] [Rule Resource]
An Agent monitors a server that contains one or more realms of protected resources.
A string, such as a relative path to a directory, that specifies the resources covered by the realm. If the realm is a top-level realm, specify the resources relative to the server that serves up the files or application. If the realm is nested, specify the resources relative to the parent realm.
For example, the realm might cover the contents of a directory that is immediately below the document root of a Web server, such as:
<document_root>/HR
Here, you could specify the realm resource filter as:
/HR
A string or regular expression that specifies the resources to which the rule applies. Specify the resources relative to the realm containing the resource. For example, if the realm resource filter ends with a directory name, the rule resource might include a subdirectory of the realm directory and even the name of a file in that subdirectory, such as:
/Managers/PayRanges.html
You can use wildcards to broaden the specification of a rule. For example:
/Managers/*
Combining the three elements, suppose that:
<document_root>/HR
For the Policy Server, the following figure shows the effective resource.

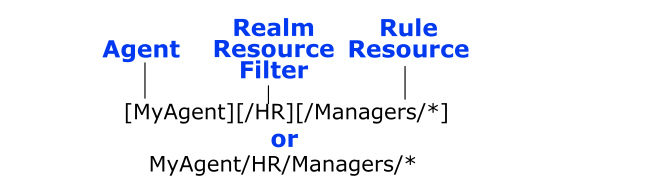
You could configure the directory called Managers as a nested realm under the /HR realm.
To access the protected page PayRanges.html, under the Managers subdirectory, a user would need to:
http://MyHost.myorg.org/HR/Managers/PayRanges.html
By default a realm is created in a Protected state. In most cases, you should use protected realms instead of changing a realm to an Unprotected state. In a protected realm, all resources are protected against access. To allow access, a rule must be defined, then included in a policy.
When you create a realm in an Unprotected state, you must configure rules before CA SiteMinder® protects the resources in the realm. If you create a rule for resources in the unprotected realm, only the specified resources are protected. Once the resource is protected, the rule must be added to a policy to allow users to access the resource. You may want to use an unprotected realm if only a subset of the resources in a realm need to be protected from unauthorized access.
The following is an example of the actions required when setting up an Unprotected realm:
|
Action |
Protection State |
|
Create unprotected realm called Realm1 with the Resource Filter: /dir. |
Resources contained in /dir and subdirectories are not protected. |
|
Create Rule1 in Realm1 for the resource: file.html. |
The file /dir/file.html is protected, but the rest of the contents of /dir are not protected. |
|
Create Policy1 and bind Rule1 and User1 to the Policy. |
User1 can access /dir/file.html. All other users cannot access the protected file. |
Note: If you want to track users for a realm with an Anonymous authentication scheme, the realm must be a protected realm. For information about the Anonymous scheme, see Anonymous Authentication Schemes.
Realms represent groups of resources in much the same way that directories of files and folders represent a file system’s contents. Nested realms allow you to increase the protection level of resources that are lower in a directory tree. Below any existing realm, you can create a nested realm. You can then assign an authentication scheme with a higher protection level to the nested realm.
By default, to access resources in the child realm, a user must be authorized for resources in the parent realm and for resources in the child realm. You can globally change the default behavior of the Policy Server and always allow access to the resources in the child realm for users who are authorized either for the parent realm or the child realm. However, we do not recommend changing from the and logic to the or logic, which is less secure. To change to the or logic, remove the check from the Enable Nested Security check box.
Note: Do not assign the anonymous authentication scheme to any realm in a nested structure, including the top-level realm. You can’t authorize specific users for resources protected by an anonymous authentication scheme, so the and logic will fail.
The following example illustrates how nested realms can be used to provide increasing levels of security.
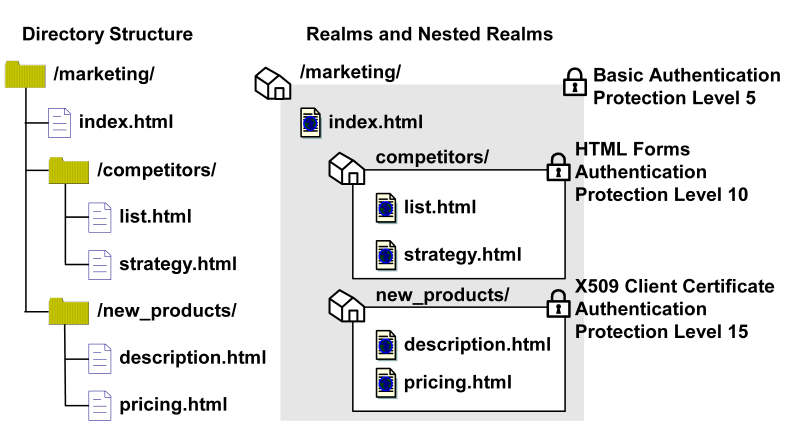
In the realm structure shown in the previous figure, the realms mimic the file structure of the resources. Each of the nested realms has a different authentication scheme than its parent realm. Since the authentication scheme for each child realm has a higher protection level than that of the parent realm, users will need to re-authenticate when they try to access resources at lower levels of the tree. To implement this example, for each realm, you need to create a rule. Then, you need to create corresponding policies so that each policy contains a rule and users that need to access resources in a child realm can also access resources in the parent realm.
Note: Only administrators with the Manage System and Domain Objects privilege may create, edit, and delete realms. However, administrators with the Manage Domain Objects privilege may create, edit, and delete nested realms underneath existing realms in their policy domains.
When a user requests a resource, the Policy Server uses the longest matching realm to determine if a resource is protected, and if so, which authentication scheme must be used to establish the user’s identity. The longest matching realm consists of the resource filter that can be located in the deepest level of any group of nested realms (or a single realm if nested realms are not used) that matches the requested path to a resource.
Using the example from the previous section, a file called list2.html in the location /marketing/competitors/list2.html matches the nested realm /marketing/competitors/. When the Policy Server processes authentication for list2.html, the user authenticates via HTML Forms, since that is the authentication scheme associated with the
/marketing/competitors/ realm.
In the same example, a file called current_budget.html in the location
/marketing/budgets/current_budget.html. Since the /budget directory is not specifically called out in a nested realm, the longest matching realm for this resource is /marketing/. Therefore, the user authenticates via the Basic user name and password authentication scheme.
Realms are groupings of resources in a specific location on your network. The contents of a realm are protected by Agents. When users request resources within a realm, the associated Agent handles authentication and authorization of the user. The realm specifies the method of authentication.
You can configure realms for any type of CA SiteMinder® Agent, including Affiliate Agents.
You can configure a realm to protect a group of resources that users access through a Web Server.
Note: The following procedure assumes that you are creating an object. You can also copy the properties of an existing object to create an object.
To configure the realm
The Realms page appears.
The Create Realm: Select Domain page appears.
The Create Realm: Define Realm page appears.
Note: Click Help for descriptions of settings and controls, including their respective requirements and limits.
The Select an Agent page appears.
Note: Applying a confidence level to a realm requires that you integrate CA SiteMinder® with a supported risk analysis engine and enable confidence level support. For more information, see the Implementation Guide.
The Realm associated with the selected CA SiteMinder® Web Agent or Agent group is created.
You can configure a realm to protect a group of resources that users access through a Web Server.
Note: The Administrative UI lets you configure realms protected by a RADIUS Agent. These realms do not require all of the same information that is required for a CA SiteMinder® Web Agent realm.
Note: The following procedure assumes that you are creating an object. You can also copy the properties of an existing object to create an object.
To configure the realm
The Realms page appears.
The Create Realm: Select Domain page appears.
The Create Realm: Define Realm page appears.
Note: Click Help for descriptions of settings and controls, including their respective requirements and limits.
The Select an Agent page appears.
The Realm associated with the selected RADIUS Agent or Agent group is created.
When you modify an existing realm you cannot make changes to the following:
The Agent that protects a server where an existing realm is located cannot be changed. If you need to change the Agent, you must delete the realm and recreate it with the new Agent.
The resource filter of an existing realm cannot be changed. If you need to change the resource filter, you must delete the realm and recreate it with the new resource filter.
Note: More information about modifying and deleting Policy Server objects exists in Manage Policy Server Objects.
When you delete a realm, all nested realms that are associated with the realm are also deleted. In addition, all rules that are associated with the deleted realm and its nested realms are also deleted. Only delete the parent realm to remove all the associated nested realms. Do not select the individual nested realms for deletion.
Note: More information about modifying and deleting Policy Server objects exists in Manage Policy Server Objects.
Administrators who have privileges to Manage Domain Objects can create a nested realm within a parent realm, as long as the parent realm is associated with a domain within the administrator's scope.
Note: You can only create nested realms under a realm that is protected by CA SiteMinder® Web Agents.
To create a nested realm
The Realms page appears.
A list of realms that match the search criteria appears.
The View Realm page appears.
The settings and controls become active.
The Create Realm page appears.
Note: The resource filter of the nested realm is added to the resource filter of the parent realm. For example, if the parent realm's filter is /marketing, and the nested realm's filter is /data, the entire filter is: <agent_of_the_parent_realm>/marketing/data.
Note: Asterisk (*) and question mark (?) characters are treated as literal characters in resource filters, not wildcards.
The newly created Sub-Realm is added to the parent Realm.
A Realm associated with the newly created sub-realm is created.
CA SiteMinder® caches realm information when users access protected resources. This allows CA SiteMinder® to improve network performance by keeping track of recently used resources. However, if you change the security requirements or contents of a realm, you must flush the realm from the CA SiteMinder® resource cache.
Note: If you have the Manage System and Domain Objects administrative permission, you can flush all realms from the resource cache using the Cache Management dialog. For more information, see the Policy Server Administration Guide.
To flush a single realm from the resource cache
The Realms page appears.
A list of realms that match the search criteria appears.
The View Realm page appears.
The settings and controls become active.
CA SiteMinder® flushes the realm from the resource cache.
|
Copyright © 2013 CA.
All rights reserved.
|
|