

This section contains the following topics:
Partnership Identification and Configuration
The main purpose of partnership federation is to establish a partnership between two organizations so they share user identity information and facilitate single sign-on (SSO). A partnership consists of two entities at different sites—one local and one remote. Either entity can assume the role of the asserting party, the side which produces assertions or the relying party, the side which consumes assertions.
If CA SiteMinder® is installed at both sites, each site must define a partnership. For each local asserting party-to-relying party partnership at one site, there has to be a reciprocal local relying party-to-asserting party partnership at the partner site. For example, for the partnership configuration at Entity A, Entity A is a local Identity Provider (IdP) and Entity B is the remote Service Provider (SP). For the partnership configuration at Entity B, Entity B is the local Service Provider (SP) and Entity A is its remote Identity Provider (IdP). The perspective is based on the local entity.
The following figure shows the entity relationships for a partnership.
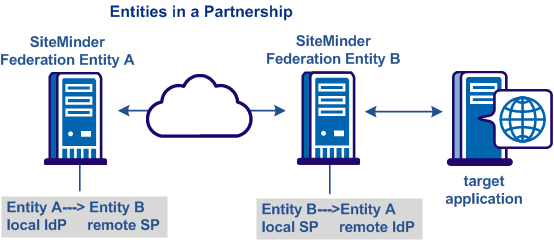
Note: An asserting party can have partnerships with more than one relying party and a relying party can establish partnerships with more than one asserting party.
To create a partnership, a partnership wizard takes you through the required configuration steps.
The federation partnership definition specifies which federation partner is local, and which federation partner is remote.
Follow these steps:
The Federation Partnerships dialog is displayed.
Note: Click Help for a description of fields, controls, and their respective requirements.
The partnership dialog opens at the first step in the partnership wizard.
In the Configure Partnership step of the wizard, identify the partnership by naming the partnership and specifying the local and remote entities.
Note: Click Help for a description of fields, controls, and their respective requirements.
Follow these steps:
Note: This step can be deferred if you are planning to create the remote entity by importing metadata later.
The skew time is the difference between the system time on the local system and the system time on the remote system. Usually, the inaccuracy of system clocks causes this condition. Determine the skew time number by subtracting the number of seconds from the current time.
The system uses the skew time and the SSO validity duration to determine how long an assertion is valid.
If you configure only one user directory, that directory is automatically placed in the Selected Directories list.
Important! To use an ODBC database as a user directory, define an SQL Query scheme and valid SQL queries. These steps are necessary before you can select it as a user directory.
Note: If you are editing a partnership, you can click Get Updates next to this field to update the entity information. The latest information from the entity configuration is propagated to the partnership. However, if you edit the entity information directly from the partnership, the changes do not get propagated back to the individual entity configuration.
You can click Get Updates next to the local and remote entity fields to update information about the entity. When you select Get Updates, the system asks to pull in the latest information from the entity.
After confirmation, the partnership you are editing is refreshed with the latest entity information. Changes are saved when you complete the partnership wizard. If you do not confirm the update, the partnership configuration remains the same.
The Entity Name identifies an entity object for in the policy store. The Entity Name must be the unique identifier because the product uses this value internally to distinguish an entity. This value is not used externally and the remote partner is not aware of this value.
If the Entity ID represents a remote partner, the value must be unique. If the Entity ID represents a local partner, it can be reused on the same system.
Note: The Entity Name can be the same value as the Entity ID, but do not share the value with any other entity.
An entity is a key component of a federation partnership. Changing an entity alters the partnership significantly; therefore, the Administrative UI does not let you replace an entity after it is in a partnership. To replace an entity, create a partnership.
To provide some flexibility within partnership configuration, you can change an entity ID because it does not identify the entity uniquely. Changing the entity ID at the partnership level does not link the partnership to another entity. The original entity in the partnership does not change. Modifications to an entity are a one-way propagation from the entity to the partnership. A change to the entity ID at the partnership does not get propagated back to the original entity.
Regard entity configurations as templates. Partnerships are created based on the entity templates so changing the partnership does not change the original entity template.
Review the partnership configuration before saving it.
Follow these steps:
The partnership configuration is complete.
After you configure all the required settings for a partnership, activate it to use it. You can also deactivate a partnership using the same process.
Follow these steps:
The Partnerships dialog opens.
A confirm dialog displays.
Note: Activate is only available for a partnership in DEFINED or INACTIVE status. Deactivate is only available for a partnership in ACTIVE status.
The status of the partnership is set and the display is refreshed.
Important! Deactivate a partnership before you modify it.
You can use metadata as a basis for creating remote entities and forming a partnership. Metadata makes partnership configuration more efficient because many aspects of an entity are already defined in the metadata file. The file can then be imported to create partnership or remote entity.
You do not have to complete a partnership before exporting it. You can configure a portion of the partnership and then export it.
In the Administrative UI, you can export metadata from an existing partnership entry.
Note: In the Administrative UI, you can export metadata from an existing local asserting or relying entity. When you export SAML 1.1 data, the terms used in the resulting metadata file are SAML 2.0 terms. This convention is part of the SAML specification. When you import the SAML 1.1 data, the terms are imported correctly using SAML 1.1 terminology.
When exporting from the partnership, the selected partnership is used as the basis of the export. You are not allowed to define a new partnership name. CA SiteMinder® uses the name from the selected partnership.
Follow these steps:
The Partnership dialog displays.
The Export Metadata dialog opens.
If you are exporting a partnership in ACTIVE status, most of the fields are read-only. Only the Validity Duration field and the alias drop-down list are modifiable.
Note: Click Help for a description of fields, controls, and their respective requirements.
The metadata is exported to the specified XML file.
|
Copyright © 2013 CA.
All rights reserved.
|
|