

Installation Guide › Upgrade from Previous Versions › Before You Begin
Before You Begin
Important: In 1-tier installations, Windows, Oracle Server, and Oracle client must be 32-bit. Do not use any 64-bit version of the applications. Oracle Server must be version 11.2.0.3.
Important: Verify the following before you begin an upgrade to ensure that it goes smoothly.
- Verify that all CA Technologies folders and files are backed up and a database dump is created before the upgrade, to enable rollback.
Note: The installation process includes database changes. Back up the database before upgrading; reboot the servers after installation.
- Verify that all server software prerequisites and hardware prerequisites for the upgrade version are in place before you start the upgrade procedure.
- Verify that you back up all customized files. The following files can be customized:
- LoginCommon.asp
- RedirectToLogin.asp
- SilentLogin.asp
- AcceptLogin.asp
- Web.config
- Registry.xml
- Index.asp (for single sign-on)
- logo.jpg
- logo.gif
- logobg.gif
- logout1.gif
- logout2.gif
- Reportlogo (and other logo like dash/report export)
- If you made changes in the Language package, backup this data.
- Verify that at least 15 percent of each table space in the database is free. If autoextend is on, verify that the datafile maxsize is set to at least 15 percent more than the current size of the datafile.
- Verify that the free space on each physical device containing database tablespaces is at least 15 percent of the total size of all tablespaces in the device.
- Before installing CA Business Service Insight, check the task manager/processes list for any live JAVA processes (ACE2, Oblisync, and Tomcat) and stop them all before you start the installation
- Stop all "Oblicore" services.
- Stop the web site (the WWW publishih service).
- Set the Distributed Transaction Coordinator service to Start.
Note: This Distributed Transaction Coordinator service is required for upgrading only. If your company policy is to have this service disabled, contact your system administrator for assistance.
- Shut down the COM+ applications - Oblicore engine.
- If your CA Business Service Insight topology DOES NOT include a server designated solely as an Application server:
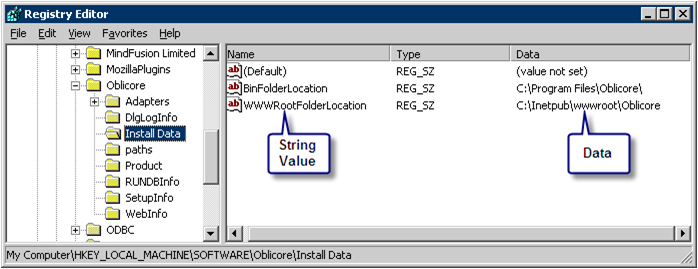
- Open the web or web services server registry to the entry: HKEY_LOCAL_MACHINE\SOFTWARE\Oblicore\Install Data.
- For 64-bit systems the entry is: HKEY_LOCAL_MACHINE\SOFTWARE\WOW6432node\Oblicore\Install Data.
- Verify that the WWWRootFolderLocation exists.
- Verify that the data for this string value contains the folder path for the web folder. For example: "C:\Inetpub\wwwroot\Oblicore" (see capture).
- If your CA Business Service Insight topology DOES include a server designated solely as an Application server:
- Open the application server registry to the entry: HKEY_LOCAL_MACHINE\SOFTWARE\Oblicore\Install Data.
- Verify that the WWWRootFolderLocation string value does NOT exist. If it does exist, delete it.
- Verify that the Oracle OLEDB Provider is installed on the application and web servers.
Note: You need SYSDBA privileges to perform the following steps.
- Run the oblicore_privs.sql. This file is located under the migration root directory (for example: C:\Program Files\Oblicore\Database Installation\Migration). You can get the script from the Installation CD in the Setup\Migration folder.
- When you upgrade from version 7.0SP1 you can also execute the portion of the migration which requires the sys password separately as follows:
- Run the OG8.0MigrationSys.bat file.
- Run OG8.xMigration.bat (no SYSDBA privilege required).
- In the Init.ora file, verify that the job_queue_processes parameter is set to 2. If it has any other value, change it to 2.
Database Job Reorganization
Customers sometimes disable database jobs because they refer to features that are irrelevant for that specific customer.
In some versions (not all) before version 8.2, the designated database login user and designated privileged user were oblidbadmin. In the current version, database jobs are created so that the designated database login user and designated privileged user are Oblicore.
When upgrading to version 8.2, all current jobs (10) created under schema Oblicore or oblidbadmin are automatically removed and are resubmitted under the user Oblicore. As a result, disabled jobs become active.
Therefore, redisable all jobs that were deliberately disabled in the past.
To disable the jobs, we recommend that you set the ‘broken’ attribute and not delete the job altogether. During future migrations, missing jobs can be recreated automatically.
Example:
-- Before upgrade.
-- This searches for broken jobs.
-- Record the results.
select what
  from dba_jobs
where schema_user = 'OBLICORE'
   and broken      = 'Y'

-- After upgrade. This selects the jobs
select job
  from dba_jobs x
where schema_user = 'OBLICORE'
   and what        = 'oblicore.db_mng_forcast_pkg.cre_forcast_new_partition (''PSL'');'

-- This is a possible result.
JOB
---
48

-- This resubmits the job.
begin
   dbms_job.broken (48 , true);
   commit;
end;

-- or:
-- This resubmits the job (SQLplus).

exec dbms_job.broken (48 , true);
commit;
Stop Services
Verify that you have stopped all the services mentioned in the instructions in the section Before You Begin.
Installation and Regional Settings
In some cases, regional language settings other than English sometimes change certain installation commands and disrupts the installation.
When your regional language setting is not English you must temporarily change your regional settings to English (USA) and adhere to the following installation sequence.
- Before installing CA Business Service Insight, change your regional settings to English (USA).
- Install according to the procedures described in this Guide.
- Reboot.
- Revert to your local regional settings.
- Reboot.
- Use CA Business Service Insight
Copyright © 2012 CA.
All rights reserved.
|
|