

How to Install Multi-Port Monitor › Connect the Cables
Connect the Cables
The appliance ships with all required cables, which are labeled.
Important: Connect the cables before connecting power to the appliance.
Follow these steps:
- Connect the management cable to the eth0 Network Interface Card on the back of the appliance.
- Connect the other end of the management cable to a switch that permits network access for the Multi-Port Monitor web interface.
- Connect each monitoring cable to a port on the back of the appliance. For more information, see How to Identify Monitoring Ports.
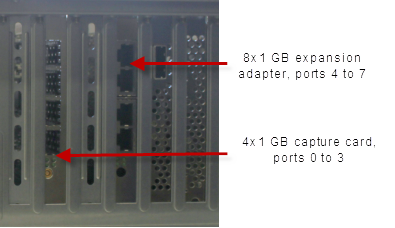
Note: The 2x10 Gbps capture card (not pictured) has two ports: Port 0 and Port 1.
- Connect the other end of each monitoring cable to a mirrored port on the switches that handle the traffic you want to monitor. For more information, see Port Mirroring.
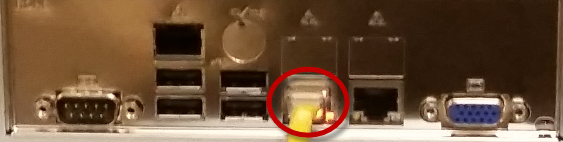
- Connect the cables for the monitor and keyboard to the USB and video ports on the back of the appliance.
You need the monitor and keyboard to install the software.
- (Optional) Connect the IPMI cable to the dedicated IPMI network interface port on the back of the appliance.

Note: Be sure to connect an RJ45 cable to the dedicated IPMI network port before powering on the appliance. If the dedicated IPMI port is not connected to the network at power on, the BMC controller will look for a shared LAN port to use instead. If the wrong port is being used, or you wish to change the configuration later, be sure to power cycle the appliance for the new IPMI port to be detected.
- Connect the power cord and the backup power cord to the outlets on the back of the appliance.
- Connect the other end of each power cord into a separate uninterruptible power supply.
The appliance is ready for (optional) IPMI configuration and MTP software installation.
(Optional) Configure IPMI Support
The CA6300 MTP appliance ships with a Nuvoton WPCM450 Baseboard Management Controller (BMC) for IPMI support. The Intelligent Platform Management Interface (IPMI) allows you to not only remotely control and power cycle the appliance, but also provides support for sending environmental alerts related to power, temperature, fans, and other items affecting the health of the CA6300. The IPMI feature is optional, but highly recommended.
You configure the CA6300 MTP appliance for IPMI by configuring the BIOS.
Enable a COM port for Serial-Over-Lan (SOL):
- Press the Delete key at boot time to enter the BIOS Setup utility.
- Select Advanced. Press Enter to open the Advanced menu.
- Select Remote Access and press Enter.
- Enable the COM port for SOL.
The COM port for SOL is marked with an asterisk (*) when enabled. If no port is enabled, choose COM2 or COM3 and press Enabled.
Enable all USB ports for Keyboard, Video, and Mouse Redirection (KVMR):
- From the Advanced menu, select Advanced Chipset Control and press Enter.
- From the Advanced Chipset Control submenu, select South Bridge Control and press Enter.
- Verify that all on board USB ports are enabled (highlighted). If necessary, enable USB ports by selecting USB Functions and pressing Enabled, or press Enter to enable all on board USB ports.
Set the IP address for IPMI:
- From the Advanced menu, select IPMI Configuration and press Enter.
- In the IPMI Configuration submenu, select Set LAN Configuration and press Enter to set the IP address.
- Follow the instructions in the BIOS Setup Utility to save your changes and exit.
- The CA6300 will boot.
Note: for detailed information on using and configuring the IPMI feature available with the CA6300 MTP appliance, refer to http://www.supermicro.com/products/nfo/IPMI.cfm?pg=list
Copyright © 2014 CA Technologies.
All rights reserved.
|
|