

This section contains the following topics:
Guidelines for Creating Policies
Configuring Custom User Roles and Access Policies
Maintaining User Accounts and Access Policies
Example: Allow a Non-Administrator to Manage Archives
Restricting Data Access for a User: Win-Admin Scenario
Restricting Access for a Role: PCI-Analyst Scenario
Sample Policies for Custom Integrations
Sample Policies for Suppression and Summarization Rules
All CALM access policies and scoping policies state the actions that are granted or denied to specific identities on specific resources. Policies for the CALM resource class grant or deny specified identities the ability to perform actions on application resources, also known as CALM resources. Policies for the SafeObject resource AppObject grant or deny specified identities write and read actions on an application-level resource, as indicated in the filters. Other policies for the SafeObject resource class grant or deny specified identities write and read actions on global resources.
The type of policy or policies you create depends on the resource to which you want to limit access. A summary of the policy requirements by resource follows:
The following guidelines highlight the differences in the approaches for creating policies, where differences are based on the resources you want to control.
To control access to EventForwarding, EventGrouping, Integration, Profile, and Report
The following approach applies only to policies on the CALM resources, EventGrouping, Integration, Profile, and Report. These application resources require a CALM policy and two scoping policies.
To control access to Alert, Database, Tag, and agent-related resources
The following approach applies to application resources that require only a CALM policy to grant or restrict access.
Note: Access to agent-related resources makes available the buttons from the Agent Explorer folder or its subfolders on the Log Collection subtab of the Administration tab. Access to the Alert resource lets the Identity access the Alerts tab. Access to the Tag resource lets the identity create a Tag for a custom query or report. Access to Database lets the Identity run an archive query.
To control access to global resources used in the CAELM application
The following approach applies to global resources, which require only a scoping policy to limit access.
Note: Global resources are available with buttons on the User and Access Management subtab of the Administration tab.
When you create an access policy for CALM or a scoping policy, you select one of the following three types:
This choice impacts the level of detail for access policy configuration, where access policy is the broadest.
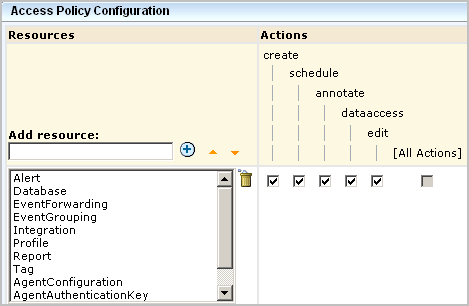
Note: The examples shown here are access policies for the CALM resource class and therefore, include actions and resources specific to CA User Activity Reporting Module.
An access policy specifies actions that are valid for any of the selected resources that are granted to all selected identities. When you create a generic policy for CA User Activity Reporting Module, you add resources belonging to the CALM resource class, and then you select actions from the displayed list. The actions you select apply to the selected resources for which they are valid. In this example, the policy allows each selected action to be performed on all the selected resources for which create is valid.
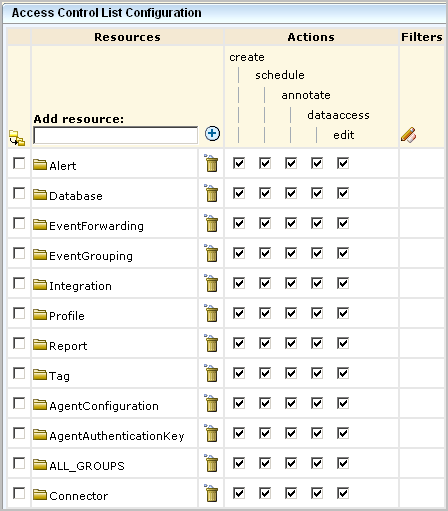
An access control list specifies actions valid for each resource separately for the selected identities. When you create a resource-centric policy, you specify what actions are permitted on each resource. You do not need to select actions for a given resource simply because they are valid. For example, you can allow create for reports but not allow create for alerts, even though create is a valid action for alerts. The access control list is the most fine-grained policy when it is implemented for one identity at a time.
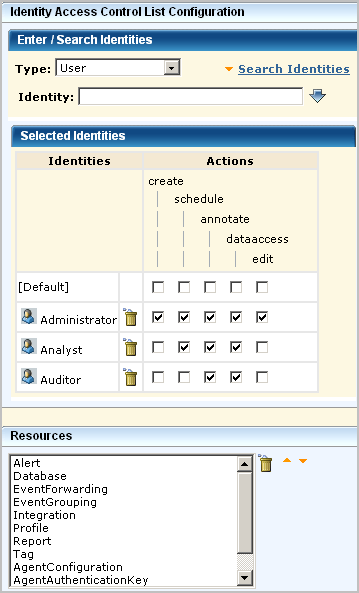
An identity access control list specifies the actions granted to selected identities for all applicable selected resources. When you create an identity-centric policy, specify which identities can perform which actions (create, schedule, annotate, edit) on all the listed resources to which each action applies. If you want to restrict the Auditor from scheduling alerts, you would leave schedule blank. However, leaving schedule blank would also restrict the Auditor from scheduling reports.
When creating policies, configure an access policy for which an access filter is needed. An access filter is a filter that the Administrator can set to control what event data non-Administrator users or groups can view. For example, an access filter can restrict the data that appears on reports viewed by the specified users or groups. Access filters are automatically converted into EEM Obligation Policies. Access filters are often expressed in terms of the relative paths for the objects to which user access is limited. You can view these relative paths in the EEM Folders area of the interface.
Typically, policies that authorize actions such as create and schedule are defined with the CALM resource class and CALM resources such as reports, tags, DM and MP files, and suppression and summarization rules. Policies that authorize the read and write actions are defined with the SafeObject resource class and the AppObject resource. The Edit action is the only valid action for agent-related resources in the CALM resource class.
More specifically, actions that can be authorized for objects belonging to the CALM resource class follow:
|
Action |
Resource |
Description |
|---|---|---|
|
Annotate |
Report |
Record comments on reports |
|
Create |
EventForwarding |
Create rules to forward specific events to specific third-party applications. |
|
Create |
EventGrouping |
Create suppression and summarization rules using common event grammar |
|
Create |
Integration |
Create data mapping and message parsing files using common event grammar |
|
Create |
Profile |
Create profiles |
|
Create |
Report |
Create reports and queries |
|
Create |
Tag |
Create tags for reports and queries |
|
Dataaccess |
Data |
Access the CALM event data, which can be limited by data access filters. |
|
Edit |
AgentConfiguration |
Create agent groups. Configure installed agents with sources for collection and destination for processing |
|
Edit |
AgentAuthenticationKey |
Create and edit the agent authentication key that is specified during agent installation |
|
Edit |
ALL_GROUPS |
Edit all available agent groups Note: Access can be restricted to a particular agent group by specifying the Agent Group name as the resource |
|
Edit |
Connector |
Configure connectors |
|
Edit |
Database |
Determine the logs that exist that match the archive catalog query criteria and recatalog the database |
|
Edit |
Integration |
Edit integration details |
|
Schedule |
Alert |
Schedule action alerts |
|
Schedule |
Report |
Schedule reports and queries |
The actions that allow users to view or edit an object belonging to the SafeObject resource class follow:
|
Action |
Resource |
Description |
|---|---|---|
|
Read |
AppObject |
View report templates, query templates, tags, scheduled report jobs, alert jobs, service configurations, data mapping (DM) files, message parsing (XMP) files, suppression and summarization rules, and event forwarding rules. |
|
Read |
Calendar |
View the calendars listed under Administration, User and Access Management, Calendars |
|
Read |
Folder |
View the folders listed under Administration, User and Access Management, EEM Folders |
|
Read |
GlobalUser |
View information displayed for users listed when you query for Global Users under Administration, User and Access Management, Users |
|
Read |
iPoz |
View the user store setting under Administration, User and Access Management, User Store View the password policy settings under Administration, User and Access Management, Password Policies |
|
Read |
Policy |
View the policies listed under Administration, User and Access Management, Access Policies |
|
Read |
User |
View User details when you query for Application User Details under Administration, User and Access Management, Users |
|
Read |
UserGroup |
View the application group membership for users listed when you query for Application User Details under Administration, User and Access Management, Users |
|
Write |
AppObject |
Edit or delete report templates, query templates, tags, scheduled report jobs, alert jobs, service configurations, data mapping (DM) files, message parsing (XMP) files, suppression and summarization rules, and event forwarding rules. |
|
Write |
Calendar |
Edit user-defined calendars |
|
Write |
Folder |
Edit user-defined data added to the EEM Folders structure |
|
Write |
GlobalUser |
Edit global user details |
|
Write |
iPoz |
Configure user store and password policies |
|
Write |
Policy |
Edit user-defined and predefined policies |
|
Write |
User |
Edit application user details |
|
Write |
UserGroup |
Create, edit, or delete an application user group |
For every custom CALM policy involving EventForwarding, EventGrouping, Integration, Profile, or Report that you create from scratch, you create a scoping policy on AppObject. The scoping policy has read/write access that filters on the EEM paths for each CALM resource listed in the corresponding CALM policy. The same user groups that are Identities for the CALM policy are assigned as Identities to this policy. To complete the policy set, create an additional scoping policy for read only, assign an Identity that can only view the resource, and enter a filter with an EEM folder path.
Note: Whether a CALM policy requires a supporting scoping policy depends on the resource that the CALM policy uses. For example, the Database, Tag, and Alert resources are purely CALM resources and no scoping policies are required for them. Scoping policies are not required for agent-related resources either.
You can view EEM folders from the Administration tab, User and Access Management subtab. When you select a folder such as Suppression, that path is displayed. See the following example:
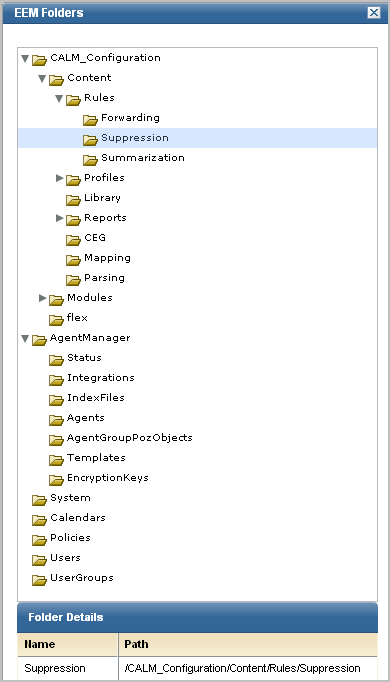
You specify the EEM folder path as the value in an expression that begins with pozFolder CONTAINS, as shown in the Filters section of a Policy definition. An example follows:
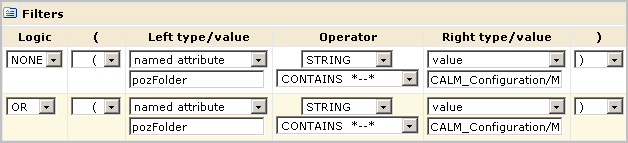
The following tables provide guidelines for the value specified in the filter of a scoping policy that is related to a CALM policy that grants, or denies, access to specific CALM resources.
Note: There is not a one-to-one correspondence between the CALM resources and the folders.
|
When creating a scoping policy that grants access to the content of this CALM resource |
Add a filter specifying this EEM Folder path |
|---|---|
|
EventForwarding |
pozFolder CONTAINS /CALM_Configuration/Content/Rules/Forwarding |
|
EventGrouping |
pozFolder CONTAINS /CALM_Configuration/Content/Rules/Summarization pozFolder CONTAINS /CALM_Configuration/Content/Rules/Suppression |
|
Integration (Server) |
pozFolder CONTAINS /CALM_Configuration/Content/Mapping pozFolder CONTAINS /CALM_Configuration/Content/Parsing |
|
Profile |
pozFolder CONTAINS /CALM_Configuration/Content/Profiles |
|
Report |
pozFolder CONTAINS /CALM_Configuration/Content/CEG pozFolder CONTAINS /CALM_Configuration/Content/Reports |
|
When creating a scoping policy that requires access to this CALM module |
Add a filter specifying this EEM Folder path |
|---|---|
|
Agent Manager |
pozFolder CONTAINS /CALM_Configuration/Modules/AgentManager |
|
Event Log Store |
pozFolder CONTAINS /CALM_Configuration/Modules/logDepot |
|
Report Server |
pozFolder CONTAINS /CALM_Configuration/Modules/calmReporter |
|
Subscription Module |
pozFolder CONTAINS /CALM_Configuration/Modules/Subscription |
You can create a scoping policy that is similar in intent to a CALM policy, except the resources are global rather than product-specific. Global resources are those resources that are used across multiple CA products. You can create policies that grant or deny access to specific global resources, accessed by buttons on the Administration tab, User and Access Management subtab.
Use the following table as a guide when creating a scoping policy that grants or denies specified Identities the ability to read and write where the resource specified is a global resource.
|
Task |
Action |
Global Resource |
|---|---|---|
|
Show, create, edit, or delete a global user, a global user group, and an application user group (role); add an application group (role) to a global user or create a global user with a role. |
read, write |
User UserGroup GlobalUser GlobalUserGroup |
|
Create, edit, copy, export, disable, test, view or delete a policy; add a calendar to a policy |
read, write |
Policy Calendar |
|
Create, edit, copy, view, or delete an access filter; view EEM Folders |
read, write |
Policy |
|
Create a calendar |
read, write |
Calendar |
|
Configure the user store; create, edit, or view password policies |
read, write |
iPoz |
When creating a filter for a global resource, refer to the filter for the CALM Application Access policy as an example. One of the things the filter does is to specify what actions go with what resource. If you click Edit on a predefined policy, you can examine the source for an example of how to enter the logic.
If the predefined application user groups, Administrator, Analyst, and Auditor, are insufficient for your needs, you can create custom roles with new application user groups. For example, to assign a small group of individuals to manage user accounts, where these individuals have no access to unrelated functionality in the CA User Activity Reporting Module, you could define a UserAccountAdministrator role, create a scoping policy for that role, add that role to the CALM Application Access Policy, and assign that role to the users who are to manage user accounts.
User planning for CA User Activity Reporting Module involves the following steps:
If you are considering creating custom roles with associated access policies, consider the following approach:
You can also consider the following alternatives to user-defined roles (application groups):
This approach may be useful if policies are created for the purpose of restricting access by geographical location and you want the same users to have the same level of rights on multiple CA products. For example, a global group for Location-A_Admin could be assigned to users that were to administer several CA products at Location-A. Policies for each CA product could be created that grant administrative rights to the servers on which that product was installed in Location-A.
A user role can be a predefined application user group or a user-defined application group. Custom user roles are needed when the predefined application groups (Administrator, Analyst, and Auditor) are not sufficiently fine-grained to reflect work assignments. Custom user roles require custom access policies and modification of predefined policies to include the new role.
Administrators can create user roles and corresponding policies as follows:
Note: Identities can be other application groups designed to make up a super group.
Administrators can also create restrict user access with access filters. If a particular kind of restricted access applies to only one individual, you can omit assigning that person an application group, or role. To limit the access of a user:
Administrators can customize user access to the CA User Activity Reporting Module resources. Consider the following examples:
Administrators can create server-based policies using either of the following approaches:
You can restrict access to specific logs by creating a data access filter, setting the filter for receiver_name field, and specifying a value such as systemstatus or syslog.
You can restrict access to a particular CA User Activity Reporting Module server by creating a policy on the SafeObject resource class with AppObject as the selected resource. That is, to restrict access just to the report server configuration on a particular host, define a filter such as the following:
pozFolder contains /CALM_Configuration/Modules/calmReporter/LogServer01
You can create a new application user group to support the roles you need. Once you create a new application user group, you must create access policies for that group.
One case where new access policies are not needed for a new group is when that group is given memberships to existing groups. Consider the scenario where you need one role for individuals who are dedicated to creating data mapping and message parsing files, another role for individuals dedicated to creating suppression and summarization rules, and a third role for those who can perform either of these two tasks. You might define one application user group called AdminDMMP with a policy that grants create access to the Integration resource and another group called AdminSS with a policy that grants create access to the EventGrouping resource. You could then create a third group called AdminDMMPSS with memberships to the AdminDMMP group and the AdminSS group. This third group would automatically inherit the policies from the two membership groups.
Rather than creating new application groups or roles, you can expand the roles of the predefined Analyst and Auditor roles. For example, if you want Analysts to be able to create suppression and summarization rules and you want Auditors to be able to view these rules, you could create a CALM policy that grants the ability to create summarization and suppression rules and a scoping policy that grants the ability to view or edit custom rules and assign the Analyst role to those policies. You could then create a scoping policy that grants users the ability to view suppression and summarization rules and assign the Auditor group to that policy.
Only Administrators can create new roles.
To create a new application user group (role)
Note: If this new group is composed of existing groups, existing policies for each of the component groups will apply to this group. No additional policies are required.
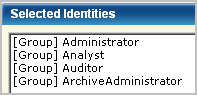
When you create an application user group, or role, be sure to add it to the predefined CALM Application Access policy. Only identities that are explicitly added to this policy can access CA User Activity Reporting Module. Identities can be individual users or members of a user group.
If you encounter a situation where users assigned to a new user group cannot log into the CA User Activity Reporting Module, verify that the Identities of the CALM Application Access policy include this group.
To grant CA User Activity Reporting Module access to a user-defined application user group
The name of the new application group appears in the displayed list of identities.
When you create a new application user group, you can add the new group to existing policies, if applicable. When you create a user that has no role but has access limited with an access filter, you can add such a user to existing policies.
Important! When working with the installed access policies, take special care not to delete them as they are not locked or protected.
If a predefined access policy is accidentally deleted, users will be unable to access the CA User Activity Reporting Module server until it is restored. You can restore policies using the safex utility.
To add an identity to an existing policy
The name of the new application group appears in the displayed list of identities.
You can create a CALM access policy to grant (or deny) one or more valid actions on one or more CALM resources.
The following CALM resources are application-specific; that is, they are used only by the CA User Activity Reporting Module product:
To create a new CALM policy from scratch
Note: It is not possible to save filters for multiple resources. The workaround is to create separate policies, one for each resource/filters combination.
With this type, you can grant the ability to perform an action such as create on one resource but not on another.
You can create a scoping policy on any global resource. Actions on scoping policies are limited to read and write.
You can create a policy from scratch if no policy exists from which you can leverage the settings. If you are creating a scoping policy associated with a CALM policy you have created, specify the same identities as those in the related CALM policy.
Only Administrators can create, edit, delete, and view access policies.
To create a new explicit grant scoping policy
Note: It is not possible to save filters for multiple resources. The workaround is to create separate policies, one for each resource/filters combination.
Note: To grant/deny create access, you must define a CALM access policy and select CA User Activity Reporting Module resources individually.
Important! Define one policy for each resource/filters combination.
The identity-specific actions apply to all the selected resources. That is, a given identity can view, view and edit, or just edit all of the selected resources.
You can create a new access policy by copying an existing access policy and modifying the copy. This procedure can save you the time it takes to manually duplicate the specifications of an existing policy that requires only minor modifications to satisfy your current requirements.
Only Administrators can create, edit, delete, or view access policies.
To create a policy based on an existing policy
The Explorer user Prompt dialog appears.
For example, replace the copied Identity with the name of the role (user-defined application user group) to which this policy applies. Consider modifying the actions permitted on the copied resources. Consider clicking Filters and specifying an additional filter for the new role.
You can test whether a new policy is syntactically correct with the Test Policies feature. The Test Policies feature lets you run ad-hoc queries against the access policies you define. You can consider a permission as a request: "Can {identity} perform {action} against the resource of type {resource class} and of name {resource} [with the following attributes}] [at the {specified time}]?" A result of ALLOW means that the identity you entered can perform the specified action on the specified resource with the specified attributes at the specified time.
Before you begin, have your policy at hand.
To test a policy
The Permission Check Parameters page appears.
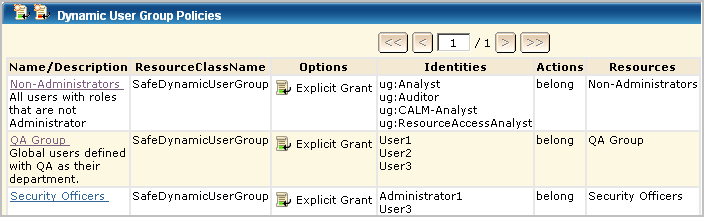
A dynamic user group is composed of global users that share one or more common attributes. A dynamic user group is created through a special dynamic user group policy where the resource name is the dynamic user group name and membership is based on a set of filters configured on user and group attributes.
You can create a dynamic group composed of Users, Application Groups, Global Groups, or Dynamic Groups. For example, you can create a dynamic group of Global Groups or Application Groups based on Name, Description, or Group Membership. Or, you can create a dynamic group of Users with different roles based on a common attribute in their global user profile, for example:
Only Administrator can create Dynamic User Group Policies.
To create a dynamic user group policy
The New Dynamic Group Policy page appears.
For example, if you selected User, you could enter Job Title Like Manager and click Search to find all of the users who have the job title of Manager.
You can create an access filter to restrict access to log data meeting the filter criteria. By default all CA User Activity Reporting Module application users have query access to event log data stored in the event log stores of the active CA User Activity Reporting Module server, peer servers in a meshed federation or descendant servers in a hierarchical federation.
You can restrict access to the event log store of one or more specific CA User Activity Reporting Module servers by creating a data access filter. You can apply an access filter to an individual or a group.
To create an access filter for a user-defined role
The Access Filter Design wizard appears.
For example, select the application group you created for this purpose.
The Access Filter you created appears.
As an Administrator, you can perform the following maintenance tasks on user accounts and access policies:
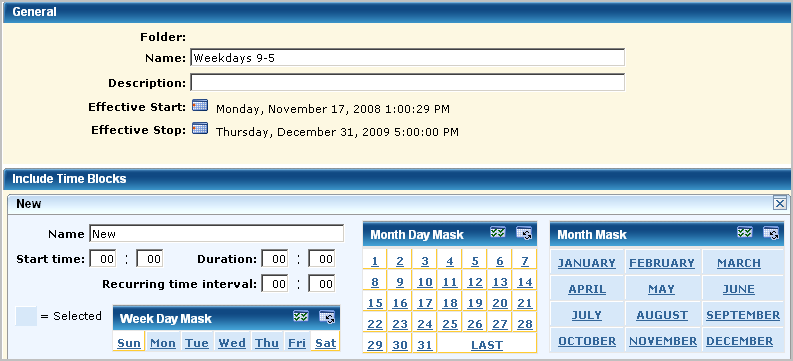
You can create a new calendar to help restrict user access during certain time periods. Calendars work as part of access policies. When you define a calendar, you can include or exclude time blocks in hours, days of the week, or dates.
To create a calendar
The Calendars page appears.
The New Calendar details pane appears.
When creating a policy, you can select an existing calendar that specifies when the specified identities can perform the selected actions on the specified resources. A calendar can define start and end dates and time blocks in hours or days of the week.
To add a calendar to a policy
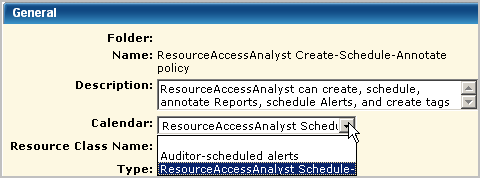
You can restrict the time of day or days of the week a given user group can access CA User Activity Reporting Module by creating a calendar for the times to grant access, creating a custom role, creating a new policy based on the policy providing CA User Activity Reporting Module access, and assigning the calendar and custom role to this policy.
Example--Limit External Auditors' Access to CA User Activity Reporting Module to Weekdays
To limit certain group's access to CA User Activity Reporting Module to business days, create a calendar for weekdays and add it to the policies that grant auditors specific access.
For example, if you wanted to limit External Auditor's access to CA User Activity Reporting Module to business hours, create a calendar that specifies weekdays, Monday through Friday, 9 a.m. to 5 p.m., for all months of the year.
Create a role for external auditors.
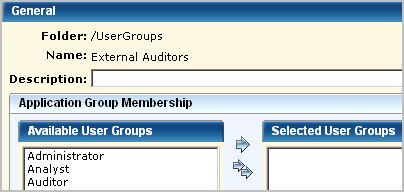
Open the CALM Application Access scoping policy and save it as ExternalAuditors-CALM Application Access, select the Weekdays 9-5 calendar and select the user group External Auditors as the identity.
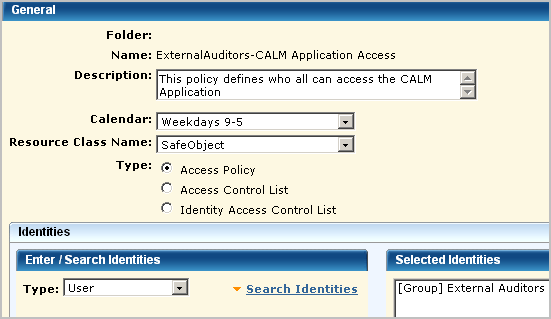
Important! Use the Calendar feature only with policies that grant access. Do not use it with policies that deny access.
You can export all policies of a selected type at any time, both predefined policies and custom policies. Exporting policies is a good way to keep a current backup.
An export creates an XML file for each selected policy, where all XML files are zipped into a file named CAELM[1].xml.gz.
To export access policies
The File Download dialog appears.
You can delete a custom policy for any of the following reasons:
Important! Take care not to delete a predefined policy. Should this occur, you can restore it if you exported a backup.
To delete a custom policy
You can delete an access filter and the obligation policy generated by the filter to remove the data access limitation.
Do not delete the obligation policy generated by the filter from Access Policies.
To delete an access filter and its obligation policy
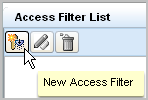
The Access Filter List appears at the top of the left pane.
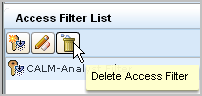
The Delete Access Filter Confirmation warning message appears.
Suppose you want to allow a non-Administrator group to manage auto-archiving. You could create a group called ArchiveAdministrator, a CALM policy that allows the edit action on the resource database. This allows read access on the archive catalog of databases for querying, write access on the archive catalog for ReCatalog, and the ability to use LMArchive utility for manual archiving or the restore-ca-elm shell script for restoring auto-archived databases.
To allow specified non-Administrators to handle archiving
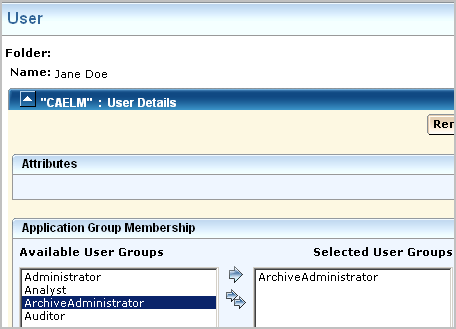
The Application Group, or role, ArchiveAdministrator is created.

The User and Access Management tab appears with the buttons in the left pane.
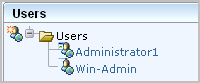
The selected user name appears under the Users folder.
You can limit reports users can view to those with a specified tag. You can limit the data users can view on those reports to data generated from specified event sources. Limiting access to reports with a given tag is done with an access policy. Limiting data access to events returned to a particular CA User Activity Reporting Module server is done with an access filter. With an access filter defined, a role assignment is optional. That is, you can create a new user, assign no role, and limit data access for that user with an access filter.
Consider the scenario for ABC company with four data centers in the U.S. The Administrator wants to give the Windows Administrator in the Houston region read access to Windows events processed by the domain controller in the Houston area. Windows events processed by the CA User Activity Reporting Module server installed on the Houston domain controller are sent from sources where the host names begin with the string, ABC-HOU-WDC.
This example walks you through creating a user called Win-Admin and ensuring that this user can only view reports that have a System Access tag and that the data on these reports is limited to events from event sources with host names that begin with the known naming convention.
The example provides details for each of the following steps:
You can create a user without a role (application group) if you specify data access with an access filter.
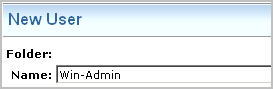
Step 1 of the complete process for restricting data access in this way is to create the user.
You create a user only if the global user account is not available for import from an external directory. When creating such an account, do not add application user details. In this example scenario, Win-Admin is the user name.
If you search for users, the new name appears in the list
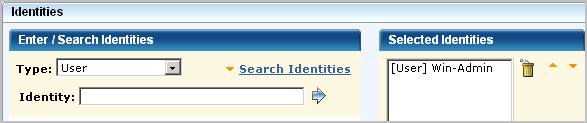
The second step in restricting data access of a user named Win-Admin is to grant this identity access to the CA User Activity Reporting Module application.
Add the new user to the CALM Application Access policy. The procedure is the same as granting CA User Activity Reporting Module access to a new role except when you search identities, you specify Type as User.
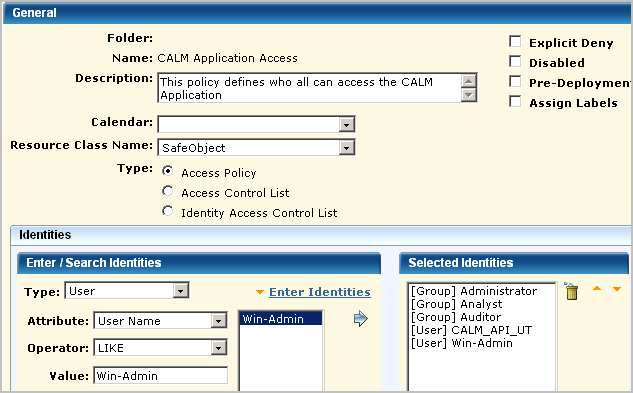
Step 2 grants access to log on to the CA User Activity Reporting Module application.
Step 3 restricts, or scopes, access to the CA User Activity Reporting Module application after logon. At the broadest level, you can grant read only access or both read and write access to the specified identities.
Selection of policy type determines the granularity at which you can specify permitted actions.
You can permit limited access to a resource by creating a filter that specifies the EEM folder for that resource and then specifying restrictions on the folder.
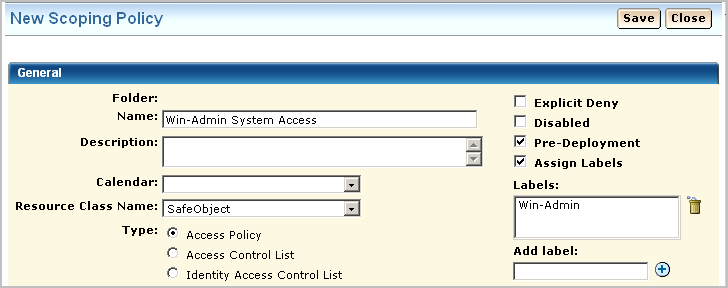
This example demonstrates how to restrict access to read access in general with further restrictions to a specific feature. Specifically, Step 3 restricts the Win-Admin user to viewing system access reports. The following example shows how to create a scoping policy called Win-Admin System Access that grants read access to the SafeObject, AppObject and specifies filters that restrict report access to those with the System Access tag. It also demonstrates how to test the policy, and after verification how to remove the pre-deployment setting.
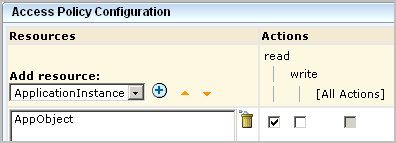
The General area of a scoping policy designed to specify application access to read only or both read and write specifies SafeObject as the resource class name. The following example shows the policy name of Win-Admin System Access. It is a good practice to select Pre-deployment for a new policy until you have tested it and are satisfied it is ready for use in a production environment.
You can grant access to either users or groups. In this example, access is granted to the new user Win-Admin.
The "highest-level" policy created for CA User Activity Reporting Module is the CALM Access Policy, where CAELM is the application instance. This scoping policy is to specify that the read action is allowed on the application objects, AppObject, which refers to all the application features.
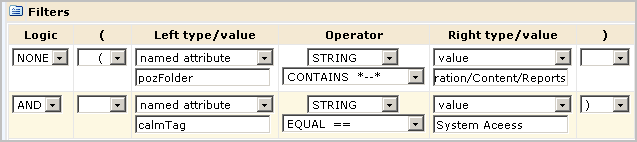
You can further limit the specified action allowed on all objects by specifying filters. Filters are often specified in pairs, where the first filter specifies the CA EEM folder where data related to a given feature is stored and the second filter specifies a restriction on objects in that location. The first filter in the following example limits CA EEM folder access to the folder where the reports resource is stored. Specifically, it specifies that the pozFolder contains /CALM_Configuration/Content/Reports. The second filter limits access to reports with the tag System Access by specifying calmTag is equal to System Access.
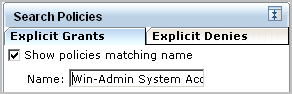
After saving a policy, you can search for it to review. You can search for policies by name, identity or resource. You can enter a partial value. You can also enter multiple criteria. Examples for this scenario follow.
Searching by the full name displays the one policy you need.
Searching by identity only displays all policies that apply to this identity including those that apply to all identities.
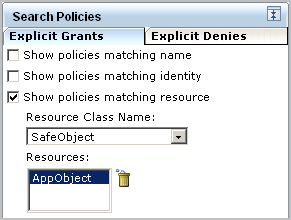
Searching by resource only where the resource is AppObject displays all system supplied and custom policies that grant read or read and write access to any identity.
When the custom policy you search for displays on the policy table, examine the values, including the filters. If you notice anything that requires correction, you can click the name link to redisplay the policy for editing.


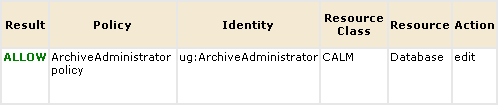
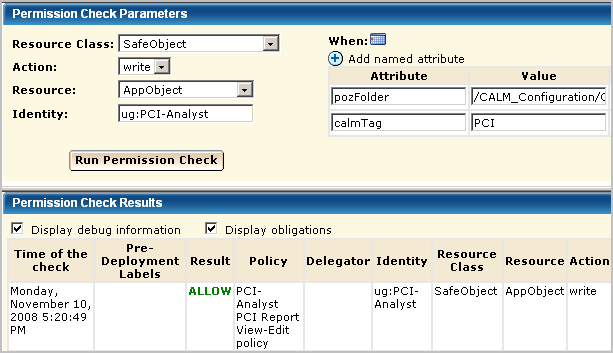
It is a good practice to test each new policy. Be sure to enter the attribute/value pairs in the order you entered the filters, with the higher-level attribute first.

Verify that the result is ALLOW.

After verifying the result is ALLOW, clear the Pre-Deployment setting on the policy. Otherwise, you will not be able to log in as Win-Admin to evaluate what this user can do.

Step 3 restricts the Win-Admin user to viewing system access reports. This level of access allows the Win-Admin user to view system access reports across all four regions of the ABC company.
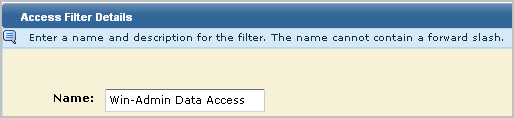
Step 4 creates an access filter to limit the data the Win-Admin user can view to the system access reports for the Houston domain controller.
Creating a data access filter begins with specifying its name. The name used in this scenario is Win-Admin Data Access.
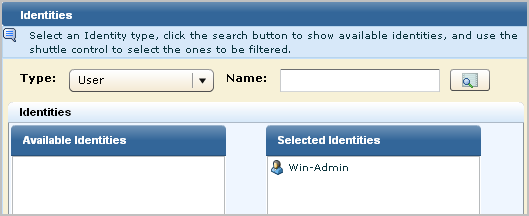
You specify the identities to which the access filter applies in the Identities area. A filter can apply to users or groups. In this scenario, this access filter applies only to the Win-Admin user.
For Access Filters, you define each condition in terms of the value for a CEG column. Values following the LIKE operator can contain either of the following wildcard characters:
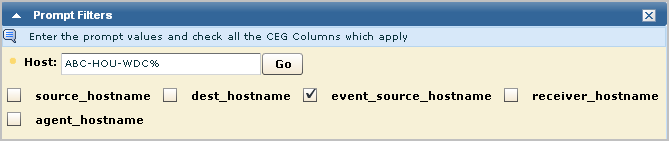
The first filter for this scenario takes advantage of the fact that all Windows events are prefixed with NT-. To limit the data to Windows events, you can specify that the event_logname CEG column must have data that includes the string NT-%. To further limit Windows events to those from a specific domain controller, this example specifies that event_source_hostname must have data that includes a string using local conventions. The value ABC-HOU-WDC% is based on a naming convention of a hyphenated name composed of abbreviations for the company, the region, and the prefix for the domain controller type.

Note: In the absence of event sources with a standardized naming convention, you can create a keyed values list with the desired event_source_hostnames and use the keyed values list name as the value.
When there are only two filters and the logic is AND, parentheses are not required. If you enter a complex expression, such as the following, parentheses are required.
(event_logname like NT-%
And event_source_hostname=ABC-%)
Or (event_logname like CALM-%
And event_source_hostname=XYZ-%)
When you save a data access filter, its name is displayed in the access filter list.

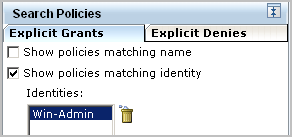
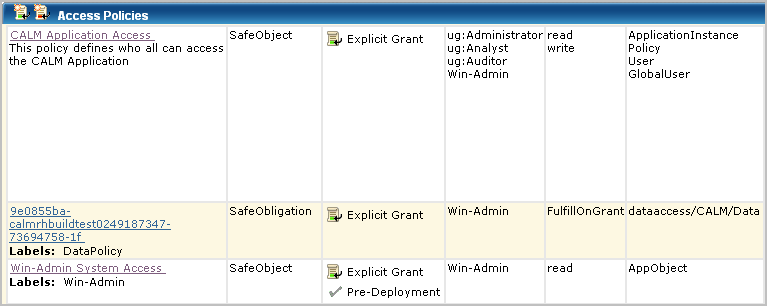
A search for policies matching the Win-Admin user name displays the three policies for All Identities plus another three: the CALM Application access policy where Win-Admin was added, the Win-Admin System Access policy created from scratch, and the data policy that is added automatically when you define an access filter. The data policy is listed first in the following. You can also view it under Obligation policies. You never create Obligation policies directly with CA User Activity Reporting Module.
Before you create policies for a given user or application user group, log on as that user or group member and determine what you can and cannot do. First, verify that the restrictions you expect to be in place are working. Second, verify that you can perform the tasks you expect such users to do.
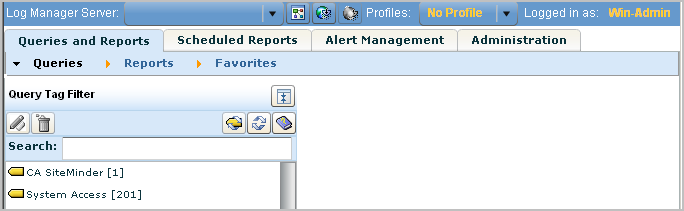
For this scenario, you expect to be able to view only reports or action alerts that are tagged with System Access. In the example, the only available query tag filter is System Access. Therefore, the expectation is verified.
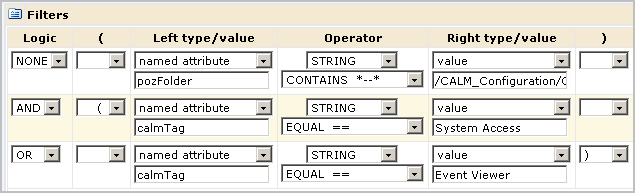
A quick way to test an access filter is to use the Prompts function. However, this function is not available to the Win-Admin user. All the prompt queries have the tag "Event Viewer". Access to Prompt Filters can be granted with the policy filter calmTag=Event Viewer.
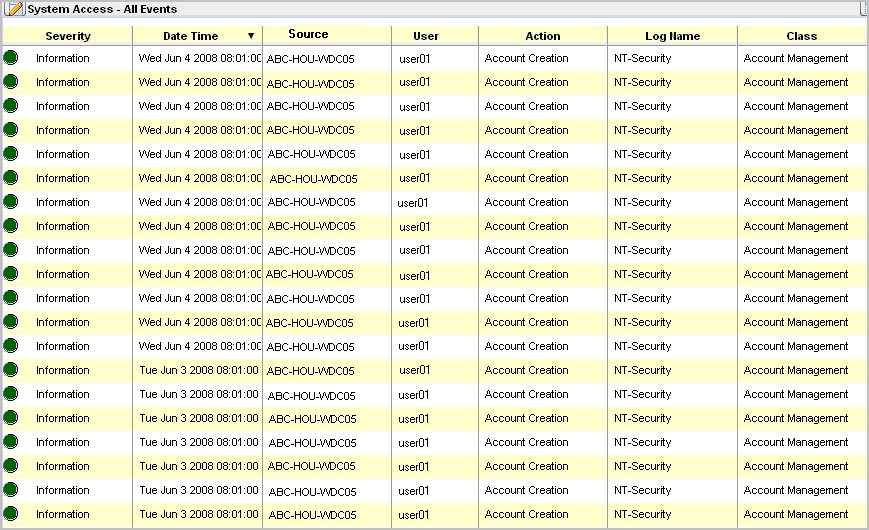
The best way to test an access filter is to review the data displayed on a report. Consider the following access filter. The event_logname CEG column begins with NT- and the CEG column event_source_hostname begins with ABC-HOU-WDC, an abbreviation for the ABC company, Houston location, Windows Domain Controller.
event_logname Like NT-% AND event_source_hostname Like ABC-HOU-WDC%
The following example shows a report viewed by the user to whom this access filter applies. Notice the data in the Log Name column begins with NT- and the data in the Source column begins with ABC-HOU-WDC.
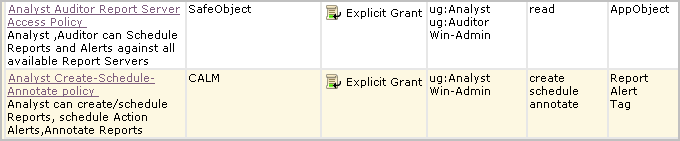
The policies and access filter defined in steps 2, 3, and 4 of this example enable the Win-Admin user to view System Access reports, with limits on the data. With this access alone, the Win-Admin user cannot schedule a report, schedule an alert, or annotate a report. To do these things, add Win-Admin to the Analyst Auditor Report Server Access Policy and the Analyst Create-Schedule-Annotate policy. Example of these policies with Win-Admin added follow:
For Win-Admin to be able to create a report, this user needs write access added to the Win-Admin System Access policy. This requires opening the Win-Admin System Access policy for editing and adding write to the permitted actions.
![]()
For Win-Admin to be able to use prompts, the filter for Win-Admin System Access can be modified such that the attribute calmTag equals either System Access or Event Viewer.
You can create a role that is similar to a predefined role and quickly create policies modeled on predefined policies. The user-defined role may be similar to the predefined role in that it provides the same access to the same resource types, but different in that it limits access based on a filter not present in the predefined role. There may be several policies to which this predefined role has been added as an identity. If the configuration of any policy is such that it applies to your new role, you just add the new role to the existing policy. If the configuration is such that you need to change the type, the resources, the actions, or the filters, you can create a new policy from a copy of the existing one.
This example walks you through creating a role for an analyst that is to work only with reports that have a PCI tag. The associated policy for this role is created from a copy of an existing policy for all Analysts.
The process involves the following procedures:
If the access allowed by the role and policies is what you expect, assign the role to all individuals who are to analyze PCI reports.
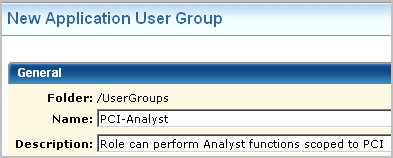
Suppose you want to create a role similar to Analysts, but restrict access to PCI-related reports and queries. Plan a name for the role that describes its function, for example, PCI-Analyst.
Before you begin creating new roles, or application user groups, consider the policies that are required to support the new role. It is a good practice to identify the existing policies that are candidates for use as templates. Under Identities, look for the role that is similar to the one you are planning.
In this example scenario, that role is ug:Analyst. Under Search Policies, check Show policies matching identity, enter the identity, ug:Analyst, and click Go. The policies displayed include those for All Identities and those where ug:Analyst is explicitly named under Identities.
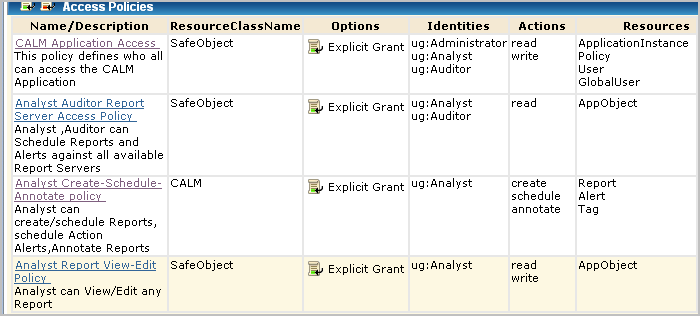
The policy names that include this role follow:
For each of the candidate policies, examine the definition and determine which of the following actions to take:
This action is appropriate for the following policies in this example:
This action is appropriate for the following policy in this example, where the new copy would include only the new identity and would have an additional filter to limit the read/write access to reports tagged PCI:
You can create a custom role to represent any task that multiple users perform with the CA User Activity Reporting Module application. A role is the same thing as an application user group.
Step 1 of the process of restricting access for a role is to create the role.
When creating a custom role that is not a superset of an existing role, do not make a selection from Available User Groups.
After creating any new role, the next step is to give this role basic logon ability to the CA User Activity Reporting Module application. By default, only the predefined roles have logon access. Add this application group to the CALM Application Access policy.
Once you identify the policies that apply to an application user group of which the new role is a subset, you add the new role to the current list of Identities.
For this scenario, add the PCI-Analyst role to the following existing policies:
When you create a policy based on an existing policy, you copy the existing policy and save it to a new name. Then, you rename it, edit the description to fit the new role, and replace the existing identities with your new identity. When the policy you are using as a template provides access that is too broad for your new role, you create filters to limit that access.
For the PCI-Analyst scenario, you copy the Analyst Report View-Edit policy, save it to a new name, open the new policy, replace the identity with the PCI-Analyst group, and add a filter to limit report access to those reports tagged with the PCI calmTag.

It is a good practice to test a policy based on an existing policy just as you would a policy you created from scratch. When you test a policy with a filter, be sure to enter the filter exactly as it is entered in the policy. When you enter a group name for identity, be sure to prefix it with ug:, for example, ug:PCI-Analyst.
After creating a new role and its supporting policies, it is a good practice to log on as a user with just this role assigned to evaluate whether the access provided is what is needed. Once verified, the new role can be added to the accounts of all users who are to perform the tasks for which the role was designed.
You can create a temporary user account for the purpose of testing a new role and then delete that account when testing is complete. Or, you can create a user called Test-User and replace the role assignment at each reuse.
Verify that the policies are sufficient to limit access to reports and alerts tagged as PCI. Assign the PCI-Analyst role to a user and log into the CA User Activity Reporting Module as that new user.
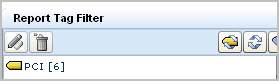
View report tags. Verify that the reports you can view are only those with the PCI tag.
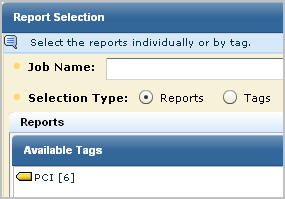
Schedule a report. Verify that the reports you can schedule are only those with the PCI tag.
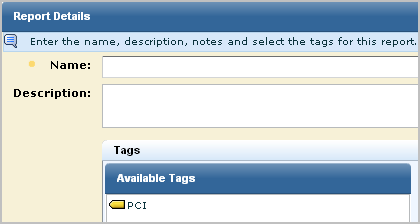
Create a report. Verify that the only available tag for the new report is PCI.
You can give non-Administrators the ability to create custom integrations by creating one custom role, one CALM policy, and one scoping policy. You can give other non-Administrators the ability to view custom integrations by creating an additional custom role with an associated scoping policy. You add both custom roles to the CALM Application Access policy and assign users to these roles.
The following example procedure shows you how to do this:


Note: The CEG policy grants all Identities rights to view the Common Event Grammar.


You can authorize non-Administrators to create custom suppression rules and custom summarization rules by creating one custom role, one CALM policy and one scoping policy. You can give other non-Administrators the ability to view custom suppression rules and custom summarization rules by creating an additional custom role with an associated scoping policy. You add both custom roles to the CALM Application Access policy and assign users to these roles.
The following example procedure shows you how to do this.


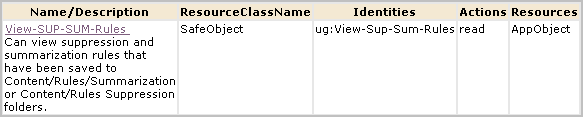
An alternative to creating two new roles explicitly for the create/edit/view task and the view-only task is to expand the roles of the predefined Analyst and Auditor roles. For example, you could eliminate steps 1, 2, 3, and 8 of the previous procedure and instead assign the Analyst as the identity to EventGrouping Create policy and View-Edit-SUP-SUM-Rules and assign the user group Auditor as the identity to View-SUM-SUP-Rules.
|
Copyright © 2014 CA Technologies.
All rights reserved.
|
|