

Creating custom roles requires the editing of predefined policies and the creation of custom policies. Before you begin these tasks, it is helpful to examine the predefined policies associated with each of the predefined roles. It is a good practice to back up predefined access policies before doing any editing.
This section contains the following topics:
An access policy is a rule that grants or denies an identity (user or user group) access rights to an application resource or a global resource. CA User Activity Reporting Module determines whether policies apply to the particular user by matching identities, resources, resource classes, and evaluating the filters. That is, a policy states the actions that are granted or denied to specific identities on specific resources. Policies that deny access to a given resource have precedence over policies that grant access to the same resource.
CA User Activity Reporting Module supports the following types of access policies:
CA User Activity Reporting Module is installed with predefined CALM access policies and scoping policies for three CA User Activity Reporting Module application user groups: Administrator, Analyst, and Auditor. These policies are sufficient if you plan to assign only the out-of-the-box application user groups to users performing the various roles.
Important! We recommend that you take a backup of the predefined policies that are provided with CA User Activity Reporting Module. If a CALM Access policy is inadvertently deleted, users cannot access CA User Activity Reporting Module until that policy is restored from a backup.
If you use the out-of-the-box features, where you assign a predefined application group (Administrator, Analyst, or Auditor) as the role for each user, you do not need to create any access policies. All required policies are predefined and are ready for use.
You can examine policies for all users. Edit the CALM Application Access policy to define custom roles. All custom roles must be added as identities to this policy.
To examine policies for all users
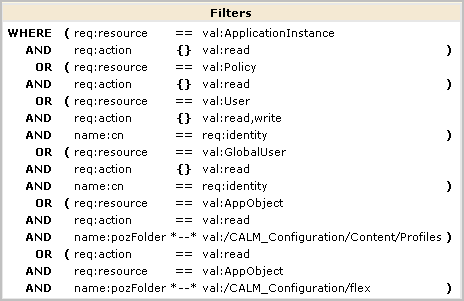
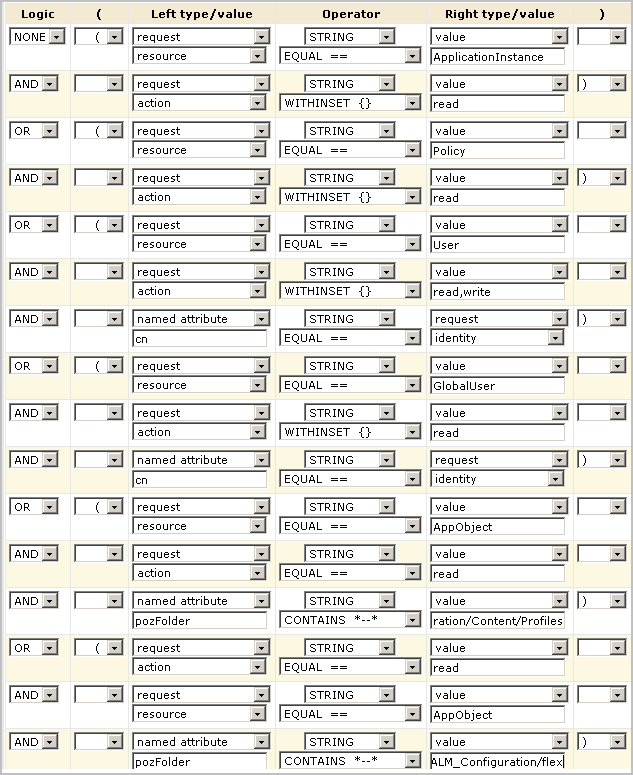
This policy grants read and write access to the listed resources for all members of the default application user groups (Administrator, Analyst, and Auditor) and to others who use the CA User Activity Reporting Module API:

The listed resources are as follows:
The filter for CALM application access specifies the action limitations on each resource.
Four policies appear, including the CEG Policy and the Default Data Access Policy. (If you do not explicitly enter [All Identities], many additional policies display.)
The predefined Default Data Access policy on the CALM resource class grants all users access to CA User Activity Reporting Module data to the extent specified in an access filter. An access filter is translated into an obligation policy with the FulfillOnGrant Action to dataaccess/CALM/Data.

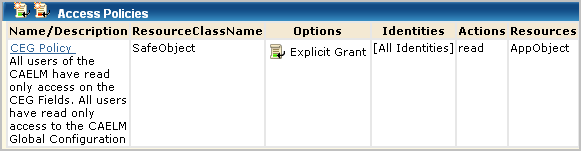
The predefined CEG Policy grants all users with CALM Application Access the ability to view Common Event Grammar fields. Therefore the CEG fields appear in drop-down lists for simple and advanced filters for all users, because all users can set global and local filters for the queries they run. Users with rights to create and edit queries can set the filters for the queries they create and edit. This policy also helps ensure that all users can view the Global Configuration settings.

You can examine the predefined policies for Auditors to see how they limit application access to resources required to perform the following tasks.
To examine predefined policies for Auditors
All policies for [All Identities] and ug:Auditor appear.
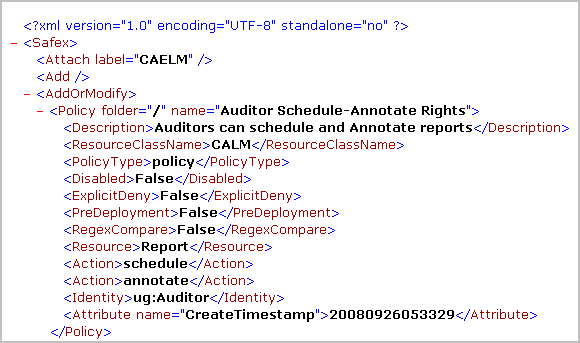
All CALM access policies define the actions that can be performed against application-specific resources. This policy grants users assigned the application user group, Auditor, the ability to schedule and annotate reports.

Compare this policy with the Analyst Create-Schedule-Annotate policy and the Administrator Create policy.
This scoping policy gives Auditors the ability to set the report destination to any Report Server and to create a federated report, which requires access any Event Log Store. The resource listed in the policy is AppObject, where the application objects are the Report Servers and Event Log Stores.


Note: For a given CALM Access policy, that is, policy for the CALM Resource Class, there is typically a related scoping policy for the SafeObject resource class.
This scoping policy grants users read access to reports. The resource listed in the policy is AppObject.

AppObject is limited to a specific application resource with a filter that grants the right to view reports. The path is an EEM folder path that stores the content of all reports.
![]()
You can examine the predefined policies for Analysts to see how they limit application access to resources required to perform the following tasks:
To examine predefined policies for Analysts
This CALM access policy defines the actions that can be performed against application-specific resources. The policy grants users assigned the CA User Activity Reporting Module application user group, Analyst, the ability to create, schedule, and annotate reports, create and schedule action alerts, and create tags. (Auditors can only schedule and annotate reports.)
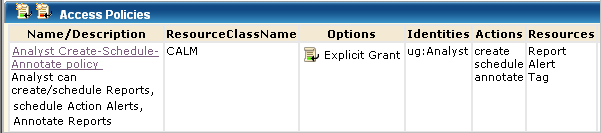
This scoping policy grants Analysts schedule rights for any Report Server. The resource listed in the policy is AppObject.
AppObject is limited to specific resources with filters.

This scoping policy grants users assigned the Analyst role the ability to view, edit, or delete any report. The resource specified in the policy is AppObject.

AppObject is limited to reports by the following filter, which grants the right to view generated reports saved in the EEM Folder /CALM_Configuration/Content/Reports.

Note: The ability to edit reports granted by this policy is extended by the CEG policy, which grants the right to add filters to reports using CEG columns.
Administrators assign the Administrator role to users who are to have full access to the CA User Activity Reporting Module application and all of its features. You can examine the predefined policies for Administrators to see how to grant access to those users who are to perform the following tasks:
To examine predefined policies for Administrators
All policies for [All Identities] and ug:Administrator appear.
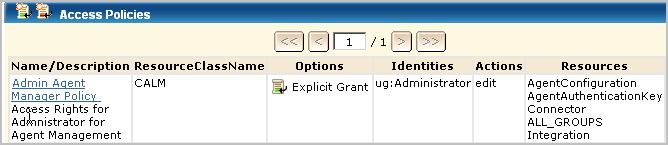
This policy defines the actions that can be performed against application-specific resources. The policy grants users assigned the application user group, Administrator, the ability to perform the specified actions as they apply to the specified resources.
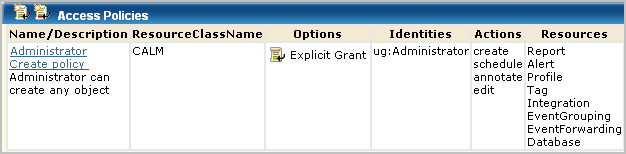
The policy grants Administrators the right to create agent groups, edit all agent groups, configure connectors, and create integrations. The policy lets Administrators edit the Agent Authentication Key for the application instance of the CA User Activity Reporting Module server to which the agent transfers collected events. By default, the configured Agent Authentication Key applies to all CA User Activity Reporting Module servers across application instances, but can be set to be unique to the application instance.
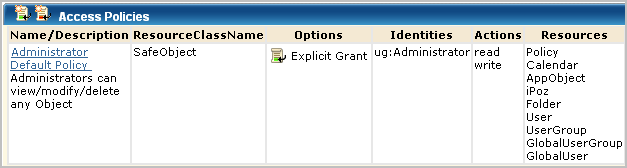
This policy grants Administrators the right to view, edit, or delete the listed resources. The listed resources are not specific to CA User Activity Reporting Module, and AppObject. AppObject refers to application-specific objects, which are resources listed in the CALM Administrator Create policy and in the CALM Admin Agent Manager policy.
When a product is registered with CA User Activity Reporting Module, a new certificate is generated and certain access policies are updated to allow read only access to all tags, queries, and reports. Specifically, the certificate name that is used to authenticate the registered product is added as the Identity cert name to the following policies:
The addition of the certificate name to the policies lets users of any CA product, third-party product, or CA customer get a list of queries and reports by tag. These users can display the lists within their own user interface and retrieve the refined event data they need.
Exporting predefined access policies is a recommended way of preserving a backup in the event an access policy is inadvertently deleted or corrupted.
Important! Since corruption to policies can occur during a system or CA EEM service restart, it is important to have a current backup to restore. In addition, you should back up CA EEM periodically, for example, after an installation of a new CA User Activity Reporting Module and after creating custom policies.
You can export all of the policies for each type of access policy. When you export policies, an XML file is generated for each policy of the selected type. The XML files are zipped into a zip file named CAELM[1].xml.gz that contains the CAELM[1].xml document. You save the exported zip file to a directory of your choice.
Before you can restore your saved backup file, you need to copy them to the following directory of the CA User Activity Reporting Module with the internal user store: /opt/CA/LogManager/EEM. You can do this copy after a save to your local directory or wait and copy them only if a restore is needed.
The format in which policies are exported depends on the number of objects being exported.
It is a good practice to rename filename (CAELM[n]), in a meaningful way when you do the export. For example, export the files from the three policy folders containing predefined policies as CAELM_CalmAccessPolicies, CAELM_EventPolicies, and CAELM_ScopingPolicies.
Note: The same extensions, xml.gz or tar.gz, must be maintained.
You can extract the XML file containing the access policy definition from the zip file and use it as input to the safex utility, used to restore the access policy.
To back up all access policies
That policy table, Access Policies - "CALM" appears
The Save As dialog appears.
If you do not change the file name, the zip file is saved as CAELM[1].xml.gz.
The Download Complete dialog closes. The policy list remains displayed in the left pane.
That policy table, Event Policies appears
A message appears asking whether you want to replace the existing CAELM[1].xml.gz file.
The Download Complete dialog closes. The policy list remains displayed in the left pane.
That policy table, Scoping Policies appears
A message appears asking whether you want to replace the existing CAELM[1].xml.gz file.
The Download Complete dialog closes. The policy list remains displayed in the left pane.
The Access Policies list closes.
Example --CAELM[1].xml for CALM Access Policies
Following is an entry for one policy in the CAELM[1].xml file.
You can restore an access policy that has been deleted or changed in a way that causes problems. If an access policy is accidentally deleted or corrupted, users referenced as Identities in that policy cannot access CA User Activity Reporting Module until that policy is redefined or restored.
Restoring access policies requires running the safex utility for policies.
Use one of the two following procedures, depending on whether your export created a backup file with the xml.gz extension or the tar.gz extension.
To restore access policies from a backup named filename.xml.gz
/opt/CA/LogManager/EEM
gunzip filename.xml.gz
This creates filename.xml.
./safex -h eemserverhostname -u EiamAdmin -p password -f filename.xml
When the CA User Activity Reporting Module server is in FIPS mode, be sure to include the -fips option.
The policy or policies defined in filename.xml being restored are added to the appropriate policy type and put into effect.
To restore access policies from a backup named filename.tar.gz
/opt/CA/LogManager/EEM
gunzip filename.tar.gz
This creates filename.tar.
tar -xvf filename.tar
This creates filename.xml.
./safex -h eemserverhostname -u EiamAdmin -p password -f filename.xml
To recreate the CALM Access Policy if you have no backup
If you have no backup, you can recreate the CALM Application Access policy.
The presence of this policy enables any Administrator to log in and create the other policies.
|
Copyright © 2014 CA Technologies.
All rights reserved.
|
|