

Overview Guide › Windows Agent Deployment › Install an Agent
Install an Agent
Before you begin, have at hand the following:
- IP address of the CA User Activity Reporting Module server from which you downloaded the agent program
- User name and password from the user account you created for the agent
- Agent authentication key you set
To install an agent for a Windows host
- Double-click the agent installation launcher.

The installation wizard starts.
- Click Next, read the license, click I accept the terms in the license agreements to continue, and click Next.
- Accept the installation path or change it and click Next.
- Enter the requested information as follows:
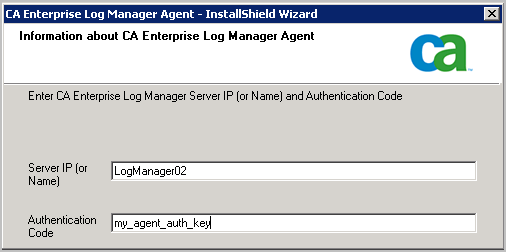
- Enter the hostname for the CA User Activity Reporting Module to which this agent is to forward the logs it collects.
Note: Since the CA User Activity Reporting Module in this example scenario uses DHCP for IP address assignment, you should not enter the IP address here; doing so introduces the risk of having to reinstall the agent if the IP address of the server ever changes.
- Enter the agent authentication key.
An example follows:
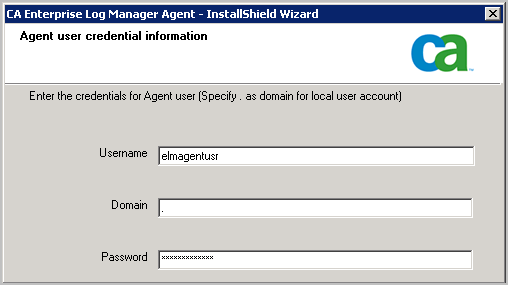
- Enter the name and password defined in the user account you set up for the agent and then click Next.
- Click Next. Specifying an exported connector file is optional.
The Start Copying Files page appears.
- Click Next.
The agent installation process completes.
- Click Finish.
- Continue with configuring connectors for this agent.
After connectors are configured, the collected events are sent to the CA User Activity Reporting Module Event Log Store through port 17001.
Important! If you do not allow outgoing traffic from the host on which you installed the agent and you use the Windows Firewall, you need to open this port on your Windows Firewall.
More information:
Download the Agent Installation Program
Create a User Account for the Agent
Set the Agent Authentication Key
How to Protect Agents from Impact of Server IP Address Changes
Copyright © 2013 CA.
All rights reserved.
|
|