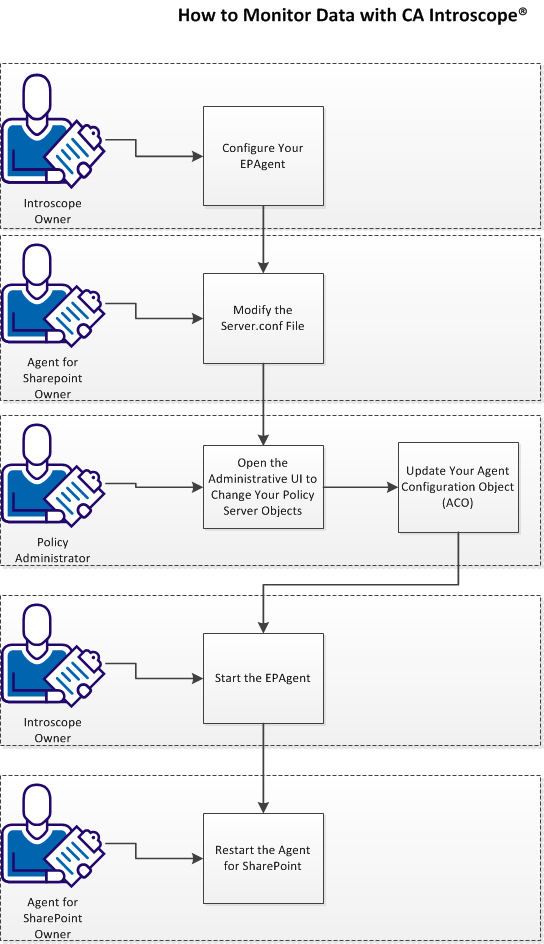

CA Introscope® can monitor the following statistics of the server that hosts the CA SiteMinder® Agent for SharePoint:

Follow these steps:
You can configure the following items on your EPAgent:
The properties used by the EPAgent are the same as the properties that are used for the Java agent.
Follow these steps:
Note: For more information about properties, see the [assign the value for wapm in your book] Java Agent Implementation Guide.
-Dcom.wily.introscope.epagent.properties=filename
Note: This system property should immediately follow "java" in the command line. If it is placed later on the command line—for example, after -jar—it will not work.
By default, the EPAgent sends message and error output to the command console. You can configure the EPAgent to send message and error output to a log file also.
Follow these steps:
To run EPAgent using the default plug-ins, you simply need to uncomment certain properties in IntroscopeEPAgent.properties file.
However, you may want to remove plug-ins you don’t need from the default plug-ins in the IntroscopeEPAgent.properties file, or add additional plug-ins.
EPAgent plug-ins are separated into two sections in the IntroscopeEPAgent.properties file, stateful and stateless.
You can configure the EPAgent to accept data from network sources.
After the Introscope owner configures the EPAgent, the next step is modifying the server.conf file of the server on which the CA SiteMinder® Agent for SharePoint runs.
Follow these steps:
Agent-for-SharePoint_Home/proxy-engine/conf/server.conf
Indicates the directory where the CA SiteMinder® Agent for SharePoint is installed.
Default: (Windows) [32-bit] C:\Program Files\CA\Agent-for-SharePoint
Default: (Windows) [64-bit] C:\CA\Agent-for-SharePoint
Default: (UNIX/Linux) /opt/CA/Agent-for-SharePoint
<metric-reporter name="WilyMetricReporter">
enabled="yes"
The server.conf file is modified. Continue with the next steps of having your policy administrator open the Administrative UI and update your Agent Configuration object (ACO).
Change the objects on your Policy Server by opening the Administrative UI.
Follow these steps:
https://host_name:8443/iam/siteminder/adminui
Specifies the fully qualified Administrative UI host system name.
Note: If your superuser account password contains dollar‑sign ($) characters, replace each instance of the dollar-sign character with $DOLLAR$. For example, if the CA SiteMinder® superuser account password is $password, enter $DOLLAR$password in the Password field.
The next step in monitoring data with CA Introscope® involves updating a configuration parameter in your Agent Configuration Object (ACO).
Follow these steps:
Collects information about the agent and sends it to CA Introscope® using a plug-in. This parameter uses the following settings:
Default: No.
Limits: Yes, Both, No, None.
Example: (HTTP header) sm-wa-perf-counters = server_name.example.com:6180,86117203,86118343,1,0,0,1,0,0,1,0,0,0,0,0,1,0,0,0,0,0,0,0,1125,0,15,1,1,750,750,
Specifies whether the agent sends monitoring information to the Policy Server.
Default: Yes.
Your Agent Configuration object is updated. Continue with the next step of having your Introscope administrator start the EPAgent.
You can run the EPAgent as either a standalone .jar file, or a Java application.
To run the EPAgent as a standalone .jar file
java -jar <EPAgent_Home>/epagent/lib/EPAgent.jar -Dcom.wily.introscope.epagent.properties="<EPAgent_Home>/epagent/IntroscopeEPAgent.properties"
To run the EPAgent as a Java application
java -classpath "<EPAgent_Home>/epagent/lib/EPAgent.jar" -Dcom.wily.introscope.epagent.properties="<EPAgent_Home>/epagent/IntroscopeEPAgent.properties"
You can use a control script (shell script) to run the Introscope EPAgent on a UNIX operating system.
Follow these steps:
cd Introscope<version_number>/bin
Starts the EPAgent.
Shows the status of EPAgent process whether it is running or stopped.
Stops the EPAgent process
Displays the help menu.
Starting or stopping the CA SiteMinder® Agent for SharePoint involves the following separate procedures:
Change the value of the EnableWebAgent parameter to accomplish either of the following tasks:
Follow these steps:
Agent-for-SharePoint_home\proxy-engine\conf\defaultagent\WebAgent.conf
EnableWebAgent="NO"
You can change the states of the related services on your CA SiteMinder® Agent for SharePoint.
Note: To start or stop your CA SiteMinder® Agent for SharePoint, change the value of the EnableWebAgent parameter first.
Follow these steps:
The Services dialog appears.
The states of the services and CA SiteMinder® Agent for SharePoint are changed.
Agent-for-SharePoint_home/proxy-engine
./sps-ctl start
The service and the CA SiteMinder® Agent for SharePoint start. The CA SiteMinder® Agent for SharePoint stops or starts according to the value you set in the EnableWebAgent parameter.
Agent-for-SharePoint_home/proxy-engine
./sps-ctl stop
The service and the CA SiteMinder® Agent for SharePoint stop.
|
Copyright © 2014 CA.
All rights reserved.
|
|