Previous Topic: Leave the Clean Up URL UnprotectedNext Topic: Leave the Clean Up URL Unprotected


Leave the Sign-out Service URL Unprotected

As a policy administrator who manages the polices on the Policy Server, the next step in configuring single logout is leaving the sign-out service URL unprotected.

Leaving the sign-out service URL unprotected prevents a security challenge from appearing during the single logout process.

Follow these steps:

  1. Click Infrastructure, Agent, Agent Groups.
  2. Select the FederationWebServicesAgentGroup name in the agent groups list and click Modify.
  3. Click Add/Remove.
  4. Select the agent you want to add to the agent group from the list of Available Members, and click the right-facing arrows.
  5. Click OK, Submit.
  6. Click Policies, Domain.
  7. Select FederationWebServicesDomain, and click Modify.
  8. Click Realms.
  9. Select the public realm and click Modify.
  10. Ensure that the Unprotected option is selected in the Default Resource Protection field. If not, select the Unprotected option.
  11. Click the Resource Filter field and add the following text:
    /affwebservices/public/wsfedsignout?wa=wsignout1.0
    
  12. Click Finish.
  13. Repeat Steps 1 through 12 for each policy domain or application policy (EPM) protecting your SharePoint web applications.

    The sign-out service URLs are unprotected. Have your policy administrator continue with the next step of leaving the confirmation URL unprotected.

Leave the Confirmation Page Unprotected

As a policy administrator who manages the polices on the Policy Server, the next step in configuring single logout is leaving the confirmation page unprotected.

Leaving the confirmation page unprotected prevents a security challenge from appearing during the single logout process.

Follow these steps:

  1. Pick the appropriate procedure for your type of policy from the following list:
  2. Leave the confirmation page unprotected in your policy domain with the following steps:
    1. Click Policies, Domain, Realms.
    2. Click Create Realm
    3. Verify that the domain with your SharePoint web applications is selected and then click Next.
    4. Enter a name and optional description for the new realm.
    5. Click the Lookup Agent/Agent Group button, and then add the agent object that protects your SharePoint web applications.
    6. Click the resource filter field, and then add the following text:
      affwebservices/spsignoutconfirmurl.jsp
      
    7. Click the Unprotected option button.
    8. Click Finish.
  3. Repeat Steps 2a through 2h for each policy domain protecting your SharePoint web applications.
  4. Leave the confirmation page unprotected in your application policy (EPM) with the following steps:
    1. Click Policies, Application, Applications.
    2. Click the edit icon of the application that protects your SharePoint web applications.
    3. Verify that the General tab is selected, and then click Create Component.
    4. Enter a name for the component.
    5. Click the Lookup Agent/Agent Group button, and then add the agent object that protects your SharePoint web applications.
    6. Click the resource filter field, and then add the following text:
      affwebservices/spsignoutconfirmurl.jsp
      
    7. Click the Unprotected option button.
    8. Click OK.
    9. Click Submit.
  5. Repeat Steps 4a through 4i for each application policy (EPM) protecting your SharePoint web applications.

    The confirmation pages are unprotected. Have your SharePoint administrator continue with the next step of enabling single logout by running the SharePoint connection wizard.

Enable Single Logout by Running the SharePoint Connection Wizard

As an agent owner who is responsible for running the server hosting the Agent for SharePoint, run the SharePoint connection wizard to finish enabling single logout.

Follow these steps:

  1. Edit the existing connection using the Connection Wizard with the following steps:
    1. Log in to the server that runs your Agent for SharePoint.
    2. Navigate to the following directory:
      Agent-for-SharePoint_home/sharepoint_connection_wizard
      
    Agent-for-SharePoint_Home

    Indicates the directory where the CA SiteMinder Agent for SharePoint is installed.

    Default: (Windows) [32-bit] C:\Program Files\CA\Agent-for-SharePoint

    Default: (Windows) [64-bit] C:\CA\Agent-for-SharePoint
    Default: (UNIX/Linux) /opt/CA/Agent-for-SharePoint

    1. Do the appropriate step for your operating environment:
      • Windows: Right-click the executable and then pick Run as administrator.
      • Solaris: sh ./ca-spconnect-version_number-sol.bin
      • Linux: sh ./ca-spconnect-version_number-rhel30.bin

      The SharePoint Connection wizard starts.

    2. Click Next.

      The Login Details screen appears.

    3. Enter the following login for the Policy Server.
      Policy Server Name

      Specifies the Policy Server name or IP address.

      Username

      Specifies the Policy Server administrator username.

      Password

      Specifies the Policy Server administrator password.

      Agent Name

      Specifies the Agent-4x. The connection with the Policy Server is established using the details given in the Agent Name.

      Shared Secret Key

      Specifies the shared secret key that is associated with the Agent.

    4. Click Next

      The Select Action screen appears.

    5. Select Edit a SharePoint Connection option.
    6. Click Next.

      The SharePoint Connection Properties screen appears.

    7. Click through the wizard until you reach the Single Logout Configuration screen.
    8. Select the Enabled SignOut check box.
    9. Click the CleanUp URL field and then type the cleanup URLs from all of your protected web applications.

      Note: Separate multiple URLs with semi-colons.

    10. Click the Confirm URL field and type the confirmation pages (URLs) from all of your protected web applications. Use the following examples as a guide:
      http://SharePoint_web_application_one_page_URL/affwebservices/spsignoutconfirmurl.jsp;
      http://SharePoint_web_application_two_page_URL/affwebservices/spsignoutconfirmurl.jsp
      

      Note: Separate multiple URLs with semi-colons.

    11. Click through the wizard until the Commit Details screen appears.
    12. Click Install.

      The Save Complete screen appears.

    13. Click Done.

    The SharePoint connection wizard closes. Single logout is enabled.

How to Configure SLO for SharePoint 2013

Users visiting multiple web sites that the CA SiteMinder Agent for SharePoint protects have a Fedauth cookie from each site in their browsers. The SLO feature removes these Fedauth cookies when the users log out.

Configuring the single log-out feature of CA SiteMinder Agent for SharePoint for SharePoint 2010 to support SharePoint 2013 involves several separate procedures.

This scenario assumes that the following prerequisites are met:

The following graphic describes how to configure SLO for SharePoint 2013:
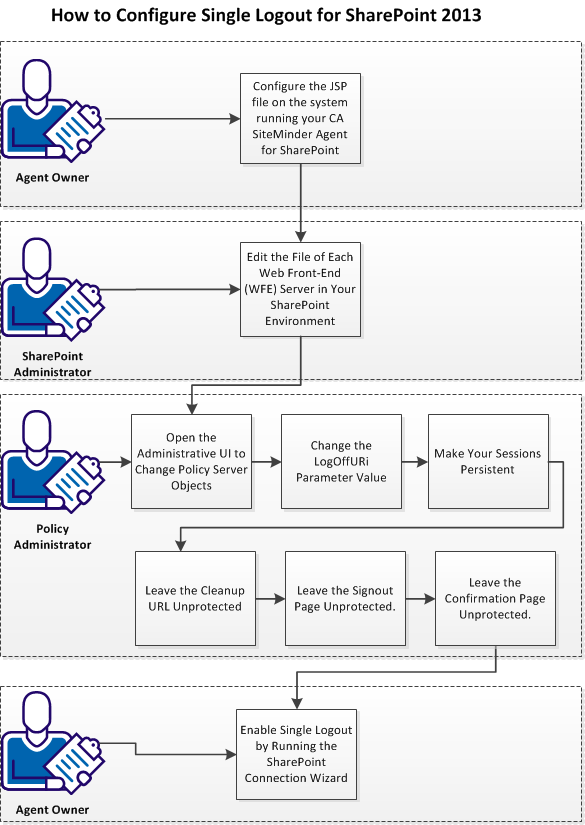
This workflow shows how to configure the single log-out feature of the CA SiteMinder Agent for SharePoint 2010 to accomodate SharePoint 2013

Follow these steps:

  1. Configure the JSP file on the system running your CA SiteMinder Agent for SharePoint.
  2. Edit the file of each Web Front-End (WFE) Server in Your SharePoint environment.
  3. Open the Administrative UI to change the Policy Server objects.
  4. Change the LogOffURI parameter value.
  5. Make your sessions persistent.
  6. Leave the cleanup URL unprotected.
  7. Leave the sign‑out service URL unprotected.
  8. Leave the confirmation page unprotected.
  9. Enable single log‑out by running the SharePoint connection wizard.

Configure the JSP file on the system that is running your CA SiteMinder Agent for SharePoint

As an agent owner who is responsible for running the server hosting the CA SiteMinder Agent for SharePoint, configure the following file:

spsignout.jsp

Follow these steps:

  1. Log in to the system hosting your CA SiteMinder Agent for SharePoint.
  2. Navigate to the following directory:
    Agent-for-SharePoint_Home\Tomcat\webapps\affwebservices
    
    Agent-for-SharePoint_Home

    Indicates the directory where the CA SiteMinder Agent for SharePoint is installed.

    Default: (Windows) [32-bit] C:\Program Files\CA\Agent-for-SharePoint

    Default: (Windows) [64-bit] C:\CA\Agent-for-SharePoint
    Default: (UNIX/Linux) /opt/CA/Agent-for-SharePoint

  3. Open the following file with a text editor:
    spsignout.jsp
    
  4. Locate the following line:
    <%response.sendRedirect("http://SharePointServerHostName>Port>/affwebservices/public/wsfedsignout?wa=wsignout1.0");%>
    
  5. Replace the URL shown in the previous line URL of the protected SharePoint application. If the URL of your protected SharePoint application is example.com, then edit the line to match the following example:
    <%response.sendRedirect("http://example.com/affwebservices/public/wsfedsignout?wa=wsignout1.0");%>
    
  6. Save the file and close the text editor.

    The JSP file is configured.

Edit the File of Each Web Front-End (WFE) Server in Your SharePoint Environment

As a SharePoint administrator who is responsible for running the SharePoint environment, edit the Welcome.ascx file on your WFE servers to accommodate SharePoint 2013. Editing the file replaces the SharePoint signout URL with the URL of the CA SiteMinder signout page.

Follow these steps:

  1. Log in to your WFE server.
  2. Make a backup copy of the following file:
    %ProgramFiles%\Common Files\Microsoft Shared\Web Server Extensions\15\TEMPLATE\CONTROLTEMPLATES\Welcome.ascx
    
  3. Open the original version of the Welcome.ascx file with a text editor:

    Important! Do not use Notepad, Wordpad (or any other text editor with line-length limitations) to edit the .config (XML) files. A text editor that is designed for writing programming source code typically does not have such line-length limitations. For more information, see the documentation or online help for your respective editor.

  4. Locate the following line:
    <SharePoint:MenuItemTemplate runat="server" id="ID_Logout"
    
  5. Change ID_Logout to ID_Logout2, as shown in the following example:
    <SharePoint:MenuItemTemplate runat="server" id="ID_Logout2"
    
  6. Locate the following line:
    UseShortID="true"
    
  7. Add a line following the previous line (shown in Step 6).
  8. Add the following settings to the new line:
    ClientonClickNavigateurl="http://example.com/affwebservices/spsignout.jsp"
    
  9. Replace the example.com text in the previous line with the domain of your SharePoint web application. For example, if the domain of your SharePoint web application is support.example.com, then the text in Step 8 would resemble the following example:
    ClientonClickNavigateurl="http://support.example.com/affwebservices/spsignout.jsp"
    

    Note: If the realm or component protecting the directory of the spsignout.jsp page is set to /*, create a realm or component to leave /affwebservices/spsignout.jsp unprotected.

  10. Verify that the edited Welcome.ascx file resembles the following example:
    <SharePoint:MenuItemTemplate runat="server" id="ID_Logout2"
    
    Text="<%$Resources:wss,personalactions_logout%>"
    Description="<%$Resource3s:wss,personalactions_logutdescription%>"
    MenuGroupID="100"
    UseShortID="true"
    ClientOnClickNavigateUrl="http://example.com/affwebservices/spsignout.jsp
    
  11. Save the file and close the text editor.
  12. Restart the Internet Information Services (IIS) on your WFE server.
  13. Repeat Steps 1 through 12 on all of your WFE servers.

    The files of each WFE servers are edited. Have your policy administrator perform the next steps by opening the Administrative UI.

Open the Administrative UI to Change Policy Server Objects

Change the objects on your Policy Server by opening the Administrative UI.

Follow these steps:

  1. Open the following URL in a browser.
    https://host_name:8443/iam/siteminder/adminui
    
    host_name

    Specifies the fully qualified Administrative UI host system name.

  2. Enter your CA SiteMinder superuser name in the User Name field.
  3. Enter the CA SiteMinder superuser account password in the Password field.

    Note: If your superuser account password contains one or more dollar‑sign ($) characters, replace each instance of the dollar-sign character with $DOLLAR$ in the Password field. For example, if the CA SiteMinder superuser account password is $password, enter $DOLLAR$password in the Password field.

  4. Verify that the proper server name or IP address appears in the Server drop-down list.
  5. Select Log In.
Change the LogOffURi parameter value

The SLO feature requires the following value in the LogOffURi agent configuration parameter:

/_layouts/15/SignOut.aspx

Follow these steps:

  1. From the Administrative UI, click Infrastructure, Agent, Agent Configuration Objects.
  2. Click the edit icon in the line Agent Configuration Object that protects your SharePoint 2010 resources.

    Note: This agent configuration object must be based on the SharePoint 2010 default settings template.

  3. Locate the following parameter:
    LogOffUri

    Enables full log‑out and displays a confirmation page after users are successfully logged off. Configure this page so that it cannot be stored in a browser cache. If a cached page is used, session hijacking by unauthorized users is possible.

    When the SharePoint users click the Sign out link, the following URI is used:

    • /_layouts/SignOut.aspx

    When the SharePoint users click the Sign in as another user link, the following URI is used:

    • /_layouts/accessdenied.aspx?loginasanotheruser=true

    If you have multiple SharePoint web sites below a top-level SharePoint website, add the URIs of the lower-level sites to the LogOffURI parameter.

    Note: When the CookiePath parameter is set, the value of the LogOffUri parameter must point to the same cookie path. For example, if the value of your CookiePath parameter is set to example.com, then your LogOffUri must point to example.com/logoff.html

    Default: /_layouts/SignOut.aspx, /_layouts/accessdenied.aspx?loginasanotheruser=true

    Limits: Multiple URI values permitted. Do not use a fully qualified URL. Use a relative URI.

    Example: (for a parent site of www.example.com with two lower-level sites named finance and hr respectively) /finance/_layouts/SignOut.aspx, finance/_layouts/accessdenied.aspx?loginasanotheruser=true /hr/_layouts/SignOut.aspx, /hr/_layouts/accessdenied.aspx?loginasanotheruser=true

  4. Click the edit icon next to the previous parameter, and then add the following value:
     /_layouts/15/SignOut.aspx
    
  5. Click OK.
  6. Click Submit.

    The value of the LogOffURi parameter has changed.

Make Your Sessions Persistent

As a policy administrator who manages the polices on the Policy Server, the next step in configuring single logout is making your sessions persistent.

Follow these steps:

  1. Pick the appropriate procedure for your type of policy from the following list:
  2. Make the sessions in your policy domain persistent with the following steps:
    1. Click Policies, Domain, Realms.
    2. Click the edit icon of the realm that protects your SharePoint web applications.
    3. Click the Persistent option button (in the Session section).
    4. Click Submit.
  3. Repeat Steps 2a through 2d for any other policy domains on which you want to configure single logout.
  4. Make the sessions in your application policy (EPM) persistent with the following steps:
    1. Click Policies, Application, Applications.
    2. Click the edit icon of the application that protects your SharePoint web applications.
    3. Verify that the General tab is selected, and then click Advanced Settings...
    4. Click the Persistent option button (in the Session section).
    5. Click OK.
    6. Click Submit.
  5. Repeat Steps 4a through 4f for any other policy applications (EPM) on which you want to configure single logout.

    The sessions are persistent. Have your policy administrator continue with the next step of leaving the cleanup URL unprotected.