Previous Topic: Disable Client LoopbackNext Topic: Leave the Clean Up URL Unprotected


How to Configure Single Logout on SharePoint 2010

Users who visit multiple websites that the Agent for SharePoint protects have a Fedauth browser cookie for each website. Configuring the single logout verifies that these Fedauth cookies are removed from the browser of the user upon logout.

This graphic describes the workflow for configuring the Single Log Out feature of the SiteMinder Agent for SharePoint

Follow these steps:

  1. Verify that the server hosting your Agent for SharePoint contains the proper files.
  2. Edit the file of each web front-end (WFE) server in your SharePoint environment.
  3. Open the Administrative UI, and then perform the following tasks:
    1. Make your sessions persistent.
    2. Leave the cleanup URL unprotected.
    3. Leave the sign-out service URL unprotected.
    4. Leave the confirmation page unprotected.
  4. Enable single logout by running the SharePoint Connection wizard.

Verify the Server Hosting Your Agent for SharePoint Has the Proper Files

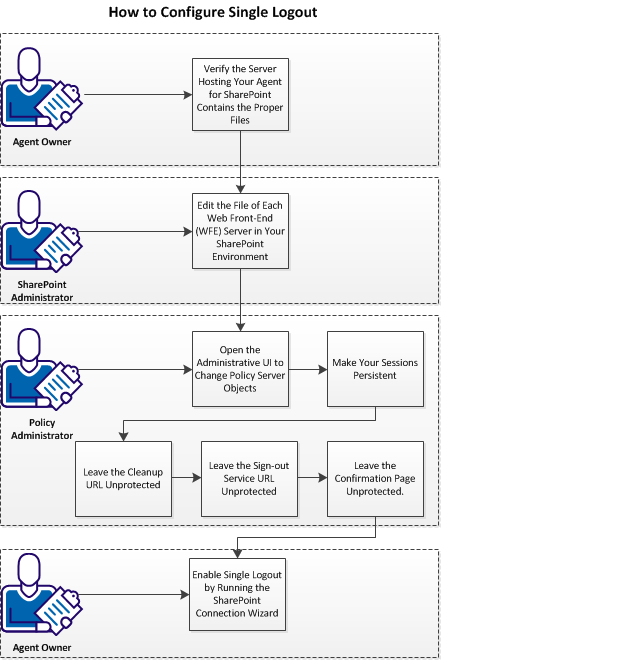
As an agent owner who is responsible for running the server hosting the Agent for SharePoint, verify that the server contains the correct .jsp file. This step is the first step in configuring the single log-out feature.

Follow these steps:

  1. Log in to the system hosting your Agent for SharePoint.
  2. Navigate to the following directory:
    Agent-for-SharePoint_Home\Tomcat\webapps\affwebservices
    
    Agent-for-SharePoint_Home

    Indicates the directory where the CA SiteMinder Agent for SharePoint is installed.

    Default: (Windows) [32-bit] C:\Program Files\CA\Agent-for-SharePoint

    Default: (Windows) [64-bit] C:\CA\Agent-for-SharePoint
    Default: (UNIX/Linux) /opt/CA/Agent-for-SharePoint

  3. Verify that the following files exist:

    Note: If the previous file does not exist, verify that the proper version of the Agent for SharePoint is installed on your server.

    The presence of the proper file is verified. Have your SharePoint administrator continue with the next step of editing the files on your web front-end (WFE) servers.

Edit the File of Each Web Front-End (WFE) Server in Your SharePoint Environment

As a SharePoint administrator who is responsible for running the SharePoint environment, edit the Welcome.ascx file on your WFE servers. Editing the file replaces the SharePoint signout URL with the URL of the <stmdnr> signout page. This step is the next step in configuring the single logout feature.

Follow these steps:

  1. Log in to your WFE server.
  2. Make a backup copy of the following file:
    %ProgramFiles%\Common Files\Microsoft Shared\Web Server Extensions\14\TEMPLATE\CONTROLTEMPLATES\Welcome.ascx
    
  3. Open the original version of the Welcome.ascx file with a text editor:

    Important! Do not use Notepad, Wordpad (or any other text editor with line-length limitations) to edit the .config (XML) files. A text editor that is designed for writing programming source code typically does not have such line-length limitations. For more information, see the documentation or online help for your respective editor.

  4. Locate the following line:
    <SharePoint:MenuItemTemplate runat="server" id="ID_Logout"
    
  5. Change ID_Logout to ID_Logout2, as shown in the following example:
    <SharePoint:MenuItemTemplate runat="server" id="ID_Logout2"
    
  6. Locate the following line:
    UseShortID="true"
    
  7. Add a line following the previous line (shown in Step 6).
  8. Add the following settings to the new line:
    ClientonClickNavigateurl="http://example.com/affwebservices/public/wsfedsignout?wa=wsignout1.0"
    
  9. Replace the example.com text in the previous line with the domain of your SharePoint web application. For example, if the domain of your SharePoint web application is support.example.com, then the text in Step 8 would resemble the following example:
    ClientonClickNavigateurl="http://support.example.com/affwebservices/public/wsfedsignout?wa=wsignout1.0"
    
  10. Save the file and close the text editor.
  11. Restart the Internet Information Services (IIS) on your WFE server.
  12. Repeat Steps 1 through 11 on all of your WFE servers.

    The files of each WFE servers are edited. Have your policy administrator perform the next steps by opening the Administrative UI.

Open the Administrative UI to Change Policy Server Objects

Change the objects on your Policy Server by opening the Administrative UI.

Follow these steps:

  1. Open the following URL in a browser.
    https://host_name:8443/iam/siteminder/adminui
    
    host_name

    Specifies the fully qualified Administrative UI host system name.

  2. Enter your CA SiteMinder superuser name in the User Name field.
  3. Enter the CA SiteMinder superuser account password in the Password field.

    Note: If your superuser account password contains one or more dollar‑sign ($) characters, replace each instance of the dollar-sign character with $DOLLAR$ in the Password field. For example, if the CA SiteMinder superuser account password is $password, enter $DOLLAR$password in the Password field.

  4. Verify that the proper server name or IP address appears in the Server drop-down list.
  5. Select Log In.
Make Your Sessions Persistent

As a policy administrator who manages the polices on the Policy Server, the next step in configuring single logout is making your sessions persistent.

Follow these steps:

  1. Pick the appropriate procedure for your type of policy from the following list:
  2. Make the sessions in your policy domain persistent with the following steps:
    1. Click Policies, Domain, Realms.
    2. Click the edit icon of the realm that protects your SharePoint web applications.
    3. Click the Persistent option button (in the Session section).
    4. Click Submit.
  3. Repeat Steps 2a through 2d for any other policy domains on which you want to configure single logout.
  4. Make the sessions in your application policy (EPM) persistent with the following steps:
    1. Click Policies, Application, Applications.
    2. Click the edit icon of the application that protects your SharePoint web applications.
    3. Verify that the General tab is selected, and then click Advanced Settings...
    4. Click the Persistent option button (in the Session section).
    5. Click OK.
    6. Click Submit.
  5. Repeat Steps 4a through 4f for any other policy applications (EPM) on which you want to configure single logout.

    The sessions are persistent. Have your policy administrator continue with the next step of leaving the cleanup URL unprotected.