

Agent for SharePoint Guide › Advanced Options › How to Enable SSL for the Agent for SharePoint › Register the Claims Search Service Endpoint on all WFE Servers › Change the States of the Services on your Agent for SharePoint
Change the States of the Services on your Agent for SharePoint
You can change the states of the related services on your Agent for SharePoint.
Note: To start or stop your Agent for SharePoint, change the value of the EnableWebAgent parameter first.
Follow these steps:
- To change the states of the related services, select one of the following procedures:
- For Windows operating environments, go to Step 2.
- To start the Agent for SharePoint on UNIX operating environments, go to Step 3.
- To stop the Agent for SharePoint on UNIX operating environments, go to Step 4.
- For Windows operating environments, do the following steps:
- From the Windows Start menu navigate to Administrative Tools, Services.
The Services dialog appears.
- Scroll down the list of services and select SiteMinder Agent for SharePoint.
- From the Action menu, select All Tasks and select the command that you want.
- Repeat Step b for SiteMinder Agent for SharePoint Proxy Engine.
The states of the services and Agent for SharePoint are changed.
- To start the Agent for SharePoint on UNIX operating environments, do the following steps.
- Log in as a root user.
- Navigate to the following directory:
Agent-for-SharePoint_home/proxy-engine
- Run the following command:
./sps-ctl start
The service and the Agent for SharePoint start. The Agent for SharePoint stops or starts according to the value you set in the EnableWebAgent parameter.
- To stop the Agent for SharePoint on a system running UNIX, do the following steps:
- Navigate to the following directory:
Agent-for-SharePoint_home/proxy-engine
- Run the following command:
./sps-ctl stop
The service and the Agent for SharePoint stop.
How to Configure Multiple User Directories
If the users who access your protected SharePoint web applications are stored in more than one user directory, configure multiple user directories.
Important! Multiple directory connections are supported with Policy Server version 12.5 and above only.
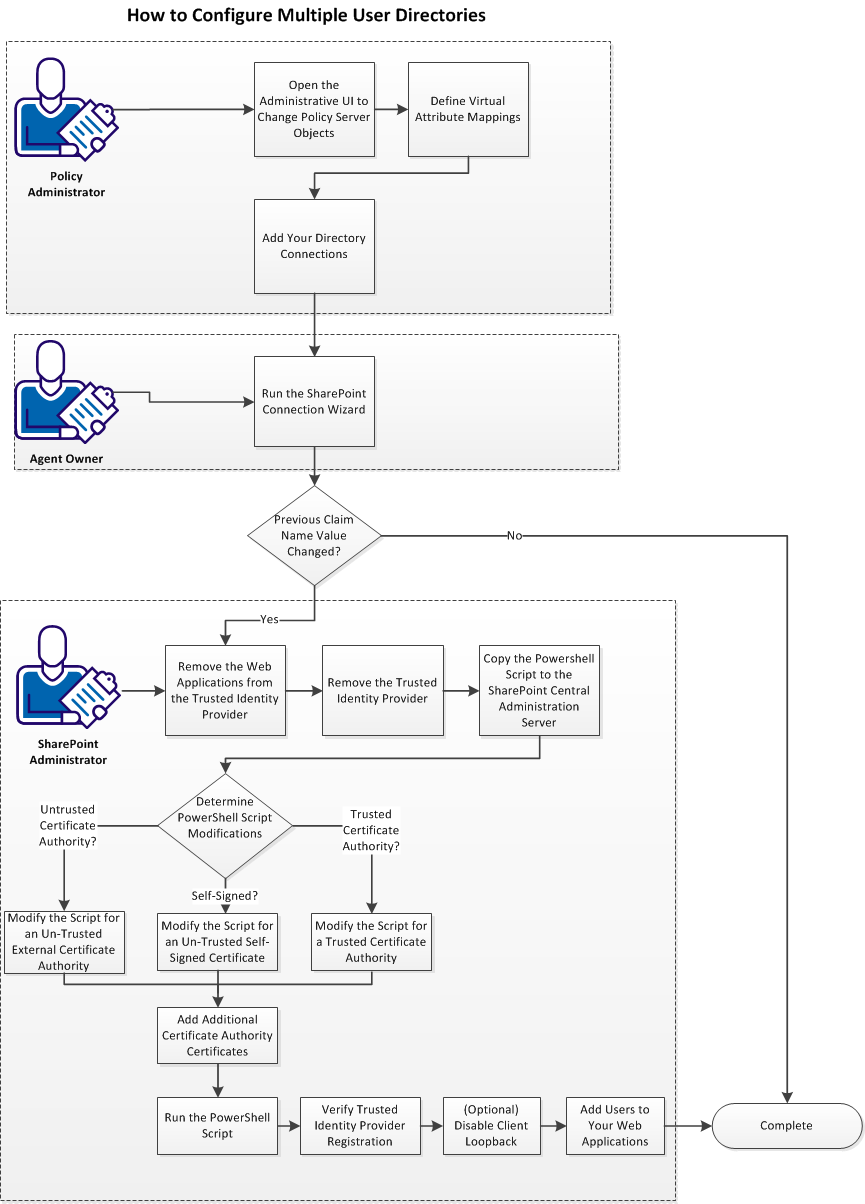
Follow these steps:
- Open the Administrative UI to change Policy Server objects.
- Define virtual attribute mappings.
- Add directory connections.
- Run the SharePoint connection wizard.
- If you changed the value of an existing Claim Name (attribute), do the following steps:
- Remove the web applications from the trusted identity provider.
- Remove the trusted identity provider.
- Copy the PowerShell script to the SharePoint central administration server.
- Determine the PowerShell script modifications (pick one of the following procedures):
- Add certificate authority certificates.
- Run the PowerShell script.
- Verify the trusted identity provider registration.
- (Optional) Disable client loopback.
- Add users to your web applications.
Open the Administrative UI to Change Policy Server Objects
Change the objects on your Policy Server by opening the Administrative UI.
Follow these steps:
- Open the following URL in a browser.
https://host_name:8443/iam/siteminder/adminui
- host_name
-
Specifies the fully qualified Administrative UI host system name.
- Enter your CA SiteMinder superuser name in the User Name field.
- Enter the CA SiteMinder superuser account password in the Password field.
Note: If your superuser account password contains one or more dollar‑sign ($) characters, replace each instance of the dollar-sign character with $DOLLAR$ in the Password field. For example, if the CA SiteMinder superuser account password is $password, enter $DOLLAR$password in the Password field.
- Verify that the proper server name or IP address appears in the Server drop-down list.
- Select Log In.
Define Virtual Attribute Mappings
The next step in configuring multiple user directories is defining the virtual attribute mappings in each user directory. For example, suppose that some users exist in an Active Directory server while others exist in an LDAP directory server. Defining virtual attribute mappings, or aliases for each directory allows CA SiteMinder access to both directories.
The following table provides examples of typical attribute mappings for an Active Directory server, an LDAP directory server, and an ODBC database:
|
User Attribute Field (in Administrative UI)
|
Active Directory Attribute Name
|
LDAP Directory Attribute Name
|
ODBC Attribute Name
|
|
UID
|
sAMAccountname
|
cn
|
Name
|
|
AliasID
|
sAMAccountname
|
cn
|
Name
|
|
mail
|
userPrincipalName
|
Mail
|
EmailAddress
|
|
smusergroups
|
Manager
|
Name
|
Name
|
Follow these steps:
- Click Infrastructure, Directories, User Directories.
- Click the Edit icon of a user directory that you want.
- Create an attribute mapping with the following steps:
- Scroll to the Attribute Mapping list, and then click Create.
The Create Attribute Mapping pane opens.
- Verify that Create a new object is selected, and click OK.
The Create Attribute Mapping: Name pane opens.
- Type a name and an optional description for the attribute mapping. For example, to create an attribute mapping for the UID, type UID.
- Select the Alias option button.
- In the Definition field, type the attribute name that you want to add, as shown in the following examples:
- (Active Directory) sAMAccountname
- (LDAP directory server) cn
- (OBDC database) Name
- Click OK.
- Repeat Steps 3a through 3f until all of the attributes have been added to the user directory.
- Click Submit.
The attribute mappings are added to your directory.
- Repeat Steps 2 through 6 to add attributes to another user directory.
The attribute mappings are defined.
Add Directory Connections
The next step in configuring multiple user directories is adding the user directory connections that contain the attribute mappings to the following items:
- Policy domains.
- Policy applications (EPM).
Follow these steps:
- Pick the appropriate procedure for your type of policy from the following list:
- If you use policy domains, go to Step 2.
- If you use application policies (EPM), go to Step 4.
- Add directory connections to your policy domain with the following steps:
- Click Policies, Domain, Domains.
- Click the edit icon of the domain that protects your SharePoint web applications.
The Modify Domain: screen appears with the General tab selected.
- If the user directories to which you defined the attribute mappings do not appear in the list, go to Step 2d . Otherwise, click Cancel and go to Step 3.
- Click Add/Remove.
- Click the directory connection that you want from the Available Members list, and then click the right arrow.
- Repeat Step 2f to add other directories.
- Click OK.
- Click Submit.
- Repeat Steps 2a through 2h for any other policy domains on which you want to add directory connections.
- Add directory connections your application policy (EPM) with the following steps:
- Click Policies, Application, Applications.
- Click the edit icon of the application that protects your SharePoint web applications.
The Modify Application: screen appears with the General tab selected.
- If the user directories to which you defined the attribute mappings do not appear in the list, go to Step 4d. Otherwise, click Cancel and go to Step 5.
- Click Add/Remove.
- Click the directory connection that you want from the Available Members list, and then click the right arrow.
- Repeat Step 4f to add other directories.
- Click OK.
- Click Submit.
- Repeat Steps 4a through 4h for any other application policies (EPM) on which you want to add directory connections.
The directory connections are added. Have your agent owner continue with the next step of running the SharePoint connection wizard.
Run the SharePoint Connection Wizard
As an agent owner who is responsible for running the server hosting the Agent for SharePoint, run the SharePoint connection wizard to finish configuring multiple user directories.
Follow these steps:
- Log in to the server that runs your Agent for SharePoint.
- Navigate to the following directory:
Agent-for-SharePoint_home/sharepoint_connection_wizard
- Do the appropriate step for your operating environment:
- Windows: Right-click the executable and then select Run as administrator.
- Solaris: sh ./ca-spconnect-12.0-sp3-sol.bin
- Linux: sh ./ca-spconnect-12.0-sp3-rhel30.bin
The SharePoint Connection wizard starts.
- Click Next.
The Login Details screen appears.
- Enter the following login for the Policy Server.
- Policy Server Name
-
Specifies the Policy Server name or IP address.
- Username
-
Specifies the Policy Server administrator username.
- Password
-
Specifies the Policy Server administrator password.
- Agent Name
-
Specifies the Agent-4x. The connection with the Policy Server is established using the details given in the Agent Name.
- Shared Secret Key
-
Specifies the shared secret key that is associated with the Agent.
- Click Next
The Select Action screen appears.
- Select Edit a SharePoint Connection option.
- Click Next.
The SharePoint Connection Properties screen appears.
- Click through the wizard until you reach the Define Additional Claims screen.
- Verify that Name Value Pair appears in the Attribute drop-down list.
- Verify that User Attribute appears in the Claim Type drop-down list.
- Click the Claim Name field. Type the name of the user attribute that is defined in one of your directory connections in the Administrative UI. For example, if your policy administrator defined UID as a user attribute in the Administrative UI, then type UID as the Claim Name.
- Type the alias name of the attribute from your directory that your policy administrator defined in the Administrative UI. For example, if the alias name for the user attribute is userid then type userid as the directory attribute.
- Click Add.
- Repeat Steps 10 through 14 to add the attributes for your other directories.
- Click through the wizard until the Commit Details screen appears.
- Click Install.
The Save Complete screen appears.
- Click Done.
The SharePoint connection wizard closes.
Remove the Web Applications from the Trusted Identity Provider
A trusted identity provider cannot be removed from SharePoint while any web applications are using it. Before you remove the trusted identity provider itself, remove the association between the CA SiteMinder trusted identity provider and any of your web agents using it.
Follow these steps:
- Log in to your SharePoint central administration server.
- Click Start, Microsoft SharePoint 2010 Products, SharePoint 2010 Central Administration.
The Central Administration home page opens.
- Under Application Management, click Manage web applications.
The web application management page opens.
- Click the line corresponding to the name of a web application using the CA SiteMinder trusted identity provider.
The web application is selected.
- On the ribbon, click Authentication Providers.
The Authentication Providers dialog appears.
- In the Authentication Providers dialog, click the link that corresponds to the zone of your web application. For example, if the web application using the CA SiteMinder trusted identity provider is in the Intranet zone, click the Intranet link.
The Edit Authentication page appears.
- Under Claims Authentication types, clear all Trusted Identity provider check boxes.
- Click Save.
The CA SiteMinder trusted identity provider is removed from the web application in the zone.
- Repeat Steps 3 through 8 for all web applications and the zones using the CA SiteMinder trusted identity provider.
The trusted identity provider is removed from all web applications and their respective zones.
Remove the Trusted Identity Provider
You can perform the following procedure to remove the trusted identity provider for SharePoint using Windows PowerShell.
Follow these steps:
- Log in to your SharePoint central administration server.
- Select Start, All Programs, Microsoft SharePoint 2010 Products, SharePoint 2010 Management Shell.
The Microsoft PowerShell command prompt appears.
- Enter the following command:
Remove-SPTrustedIdentityTokenIssuer -Identity
- -Identity
-
Specifies the name of the identity provider to remove.
Example: Remove-SPTrustedIdentityTokenIssuer TestSTS
The trusted identity provider for SharePoint is removed.
Copyright © 2013 CA.
All rights reserved.
|
|