

Agent for SharePoint Guide › Advanced Options › How to Enable SSL for the Agent for SharePoint › Copy the Powershell Script to the SharePoint Central Administration Server
Copy the Powershell Script to the SharePoint Central Administration Server
Extra configuration steps are required if you changed the value of an existing Claim Name when you configured multiple user directories. The SharePoint connection wizard creates a PowerShell script that contains the new Claim Name. Copy this PowerShell script from your Agent for SharePoint host to your SharePoint central administration server.
Follow these steps:
- Navigate to the following directory on the server running your Agent for SharePoint:
Agent-for-SharePoint_home\sharepoint_connection_wizard\
- Locate the PowerShell script that the SharePoint connection wizard created. The script uses the connection name that you chose while running the wizard as the file name. For example, if your connection name was my_connection, the name of the script is my_connection.ps1.
- Copy the PowerShell script to a directory on your SharePoint central administration server.
Determine PowerShell Script Modifications
To create a trusted identity provider on your SharePoint central administration server, edit the PowerShell script to include the following information about your SharePoint environment:
The specific modifications to the PowerShell script vary according to the type of certificates you want to use with your CA SiteMinder trusted identity provider.
Find the proper procedure for your situation in the following table:
Modify the Script for an Un-Trusted External Certificate Authority
f your signing certificate is signed by an external certificate authority, modify the PowerShell script to do the following tasks:
- Import the certificate authority certificate (root certificate) into SharePoint.
- Create a SharePoint trusted root authority that is based on the certificate authority certificate.
- Import the signing certificate.
Follow these steps:
- Open the PowerShell script with any text editor.
- Locate the following text:
"<full path to Root certificate file>"
- Replace the previous text with the full path to your root certificate. For example, if the full path to your certificate is C:\certificates\sharepoint\certificate_authority_certificate.cer, the updated line matches the following example:
"C:\certificates\sharepoint\certificate_authority_certificate.cer"
- Locate the first occurrence of the following text:
<Trusted root authority name>
- Replace the previous text with a friendly name for the new trusted root authority in SharePoint. For example, if the name you want is SPCAAuth, the updated line matches the following example:
"SPCAAuth"
- Locate the following text:
"<full path to Signing certificate file>"
- Replace the previous text with the full path to your Signing certificate. For example, if the full path to your certificate is C:\certificates\sharepoint\signing_certificate.cer, the updated line matches the following example:
"C:\certificates\sharepoint\signing_certificate.cer"
- Locate the second occurrence of the following text:
<Trusted root authority name>
- Replace the previous text with a friendly name for the new trusted root authority in SharePoint. For example, if the name you want is SPSigningAuth, the updated line matches the following example:
"SPSigningAuth"
- Locate the following text:
"<Name of the trusted identity provider>"
- Replace the previous text with the name of your SharePoint realm (the realm name follows $realm = in the PowerShell script). For example, if the name of your SharePoint realm is $realm="urn:moss2O1O-wsfed1-casm", the updated line could match the following example:
"moss2O1O-wsfed1-casm"
- Locate the following text:
"<Description for the Trusted Identity Provider>"
- Replace the previous text with a description for your trusted identity provider. For example, if you want to describe the trusted identity provider as "SiteMinder Provider," the updated line could match the following example:
"SiteMinder Provider"
- If your certificate chain contains more than one certificate authority certificate, add the other certificate authority certificates to the script. If your script contains one certificate authority certificate, go to the next step.
- Save your changes and close your text editor.
The PowerShell script is modified.
- Run the PowerShell script.
Modify the Script for an Un-Trusted Self-Signed Certificate
If you are using a self-signed certificate that is issued by a certificate authority which is not explicitly trusted by your SharePoint server, modify the PowerShell script to do the following tasks:
- Import the certificate authority certificate (root certificate) into SharePoint.
- Create a SharePoint trusted root authority that is based on the certificate authority certificate.
- Import the signing certificate.
Follow these steps:
- Open the PowerShell script with any text editor.
- Locate the following text:
"<full path to Root certificate file>"
- Replace the previous text with the full path to your root certificate. For example, if the full path to your certificate is C:\certificates\sharepoint\certificate_authority_certificate.cer, the updated line matches the following example:
"C:\certificates\sharepoint\certificate_authority_certificate.cer"
- Locate the first occurrence of the following text:
<Trusted root authority name>
- Replace the previous text with a friendly name for the new trusted root authority in SharePoint. For example, if the name you want is SPCAAuth, the updated line matches the following example:
"SPCAAuth"
- Locate the following text:
"<full path to Signing certificate file>"
- Replace the previous text with the full path to your Signing certificate. For example, if the full path to your certificate is C:\certificates\sharepoint\signing_certificate.cer, the updated line matches the following example:
"C:\certificates\sharepoint\signing_certificate.cer"
- Locate the second occurrence of the following text:
<Trusted root authority name>
- Replace the previous text with a friendly name for the new trusted root authority in SharePoint. For example, if the name you want is SPSigningAuth, the updated line matches the following example:
"SPSigningAuth"
- Locate the following text:
"<Name of the trusted identity provider>"
- Replace the previous text with the name of your SharePoint realm (the realm name follows $realm = in the PowerShell script). For example, if the name of your SharePoint realm is $realm="urn:moss2O1O-wsfed1-casm", the updated line could match the following example:
"moss2O1O-wsfed1-casm"
- Locate the following text:
"<Description for the Trusted Identity Provider>"
- Replace the previous text with a description for your trusted identity provider. For example, if you want to describe the trusted identity provider as "SiteMinder Provider," the updated line could match the following example:
"SiteMinder Provider"
Note: The LDAP directory and Active Directory charts contain additional examples of possible names.
- If your certificate chain contains more than one certificate authority certificate, add the other certificate authority certificates to the script. If your script contains one certificate authority certificate, go to the next step.
- Save your changes and close your text editor.
The PowerShell script is modified.
- Run the PowerShell script.
Modify the Script for a Trusted Certificate Authority
If you are using a certificate signed by a certificate authority that is trusted by the SharePoint server, modify the PowerShell script to do the following tasks:
- Skip the step to import the certificate authority certificate.
- Skip the stop to create a new SharePoint trusted root authority.
- Import only the signing certificate.
Follow these steps:
- Open the PowerShell script with any text editor.
- Comment the first two lines in the PowerShell script, as shown in the following example:
#$rootcert = New-Object System.Security.Cryptography.X509Certificates.X509Certificate2("<full path to Root certificate file>")
#New-SPTrustedRootAuthority -Name "<Trusted root authority name>" -Certificate $rootcert
- Locate the following text:
"<full path to Signing certificate file>"
- Replace the previous text with the full path to your Signing certificate. For example, if the full path to your certificate is C:\certificates\sharepoint\signing_certificate.cer, the updated line matches the following example:
"C:\certificates\sharepoint\signing_certificate.cer"
- Locate the second occurrence of the following text:
<Trusted root authority name>
- Replace the previous text with a friendly name for the new trusted root authority in SharePoint. For example, if the name you want is SPSigningAuth, the updated line matches the following example:
"SPSigningAuth"
- Locate the following text:
"<Name of the trusted identity provider>"
- Replace the previous text with the name of your SharePoint realm (the realm name follows $realm = in the PowerShell script). For example, if the name of your SharePoint realm is $realm="urn:moss2O1O-wsfed1-casm", the updated line could match the following example:
"moss2O1O-wsfed1-casm"
- Locate the following text:
"<Description for the Trusted Identity Provider>"
- Replace the previous text with a description for your trusted identity provider. For example, if you want to describe the trusted identity provider as "SiteMinder Provider," the updated line could match the following example:
"SiteMinder Provider"
- Save your changes and close your text editor.
The PowerShell script is modified.
- Run the PowerShell script.
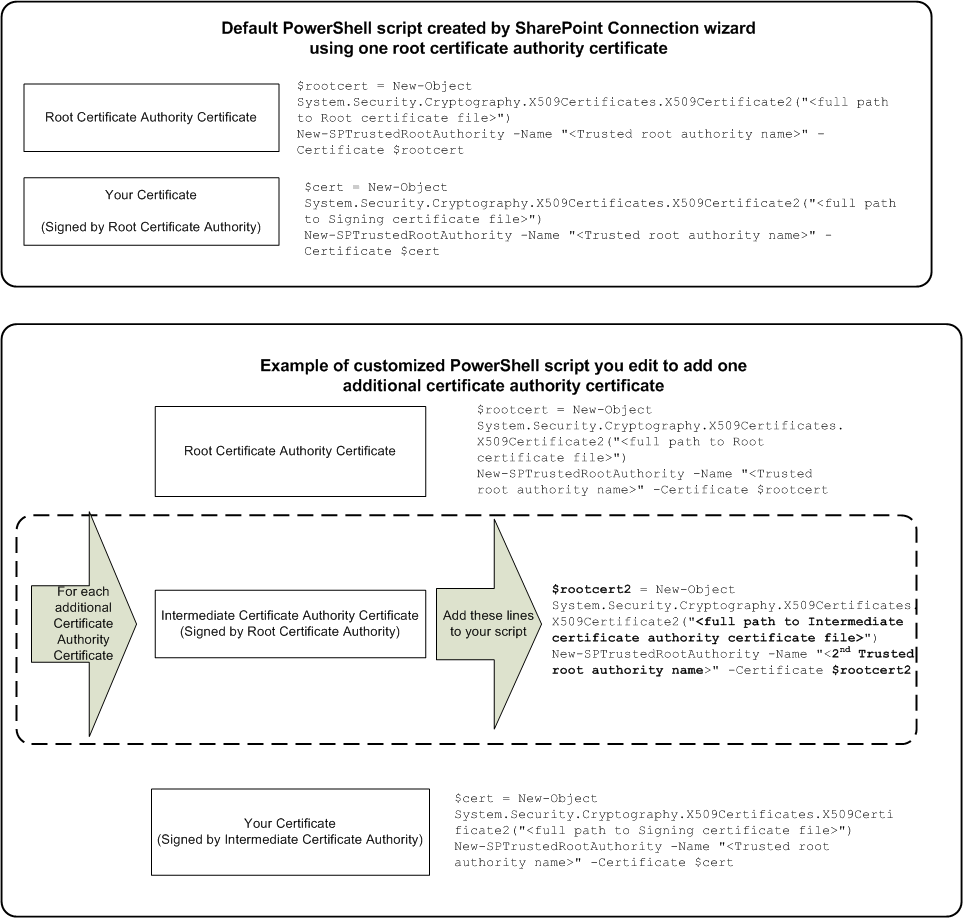
Add Additional Certificate Authority Certificates
he PowerShell script created by the SharePoint connection wizard accommodates the following certificates:
- A certificate authority certificate (also named a root certificate)
- One SSL certificate.
The trusted identity provider requires that all certificates in the certificate chain are included. If an intermediate certificate authority signed your certificate instead, modify the PowerShell script to include both certificate authority certificates.
The following graphic describes the differences between the default PowerShell script, and a PowerShell script that accommodates multiple certificate-authority certificates:
Follow these steps:
- Copy the following section from your PowerShell script:
$rootcert = New-Object System.Security.Cryptography.X509Certificates.X509Certificate2("<full path to Root certificate file>")
New-SPTrustedRootAuthority -Name "<Trusted root authority name>" -Certificate $rootcert
- Copy the following section from your PowerShell script:
- Add a new line after the section you copied, and then paste the copied into the new line.
- Edit the pasted section using the changes shown in the following table as a guide:
|
Change this value:
|
To this value:
|
|
$rootcert
|
$rootcert2
|
|
<full path to Root certificate file>
|
<full path to additional certificate authority certificate file>
|
|
<Trusted root authority name>
|
Name of the additional trusted root authority
|
- To add additional certificate authority certificates, repeat Steps 1 through 4.
- Save your changes and close your text editor.
The additional certificate authority certificates are added.
- Run the PowerShell script.
Copyright © 2013 CA.
All rights reserved.
|
|