

To protect web services in your organization, you create application security policies. These policies define the resources you want protected and specify who is allowed access to the protected application.
Application objects provide an intuitive method of defining a complete security policy for one or more related web services. Application objects associate resources with user roles to specify entitlement policies that determine what web service users can access what web service application resources. Roles identify the set of users who have access to a resource or group of resources in terms of a named or unnamed expression.
This scenario describes how a policy administrator defines the security policy for web service resources from their associated Web Service Definition Language (WSDL) files.
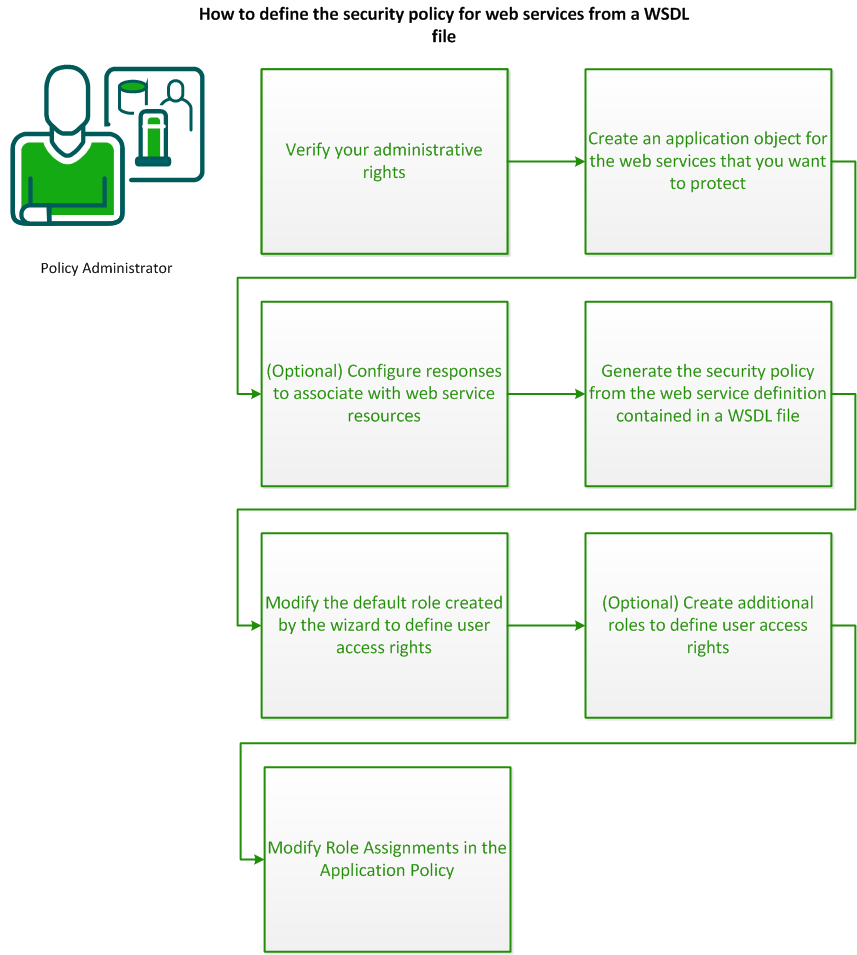
To define the security policy for one or more related web services from a WSDL file, do the following procedures:
To implement application security policies, you require the necessary administrative rights. An administrator can be assigned the following application-related rights:
The application administration right lets you create, modify, and delete an application and its components.
The policy administration right lets you define the resources, roles, and policies that are associated with an application.
If you do not have the necessary rights, contact the CA SiteMinder® superuser.
The application object you create for one or more related web services must specify the top-level location of the resources that you want to protect, and a directory of users who are authorized to use the resources.
To identify the application and select the directory server
The Create Application pane opens.
Note: Click Help for descriptions of settings and controls, including their respective requirements and limits.
Name of the application
(Optional) A description of the application.
Note: These fields are mandatory, but the component they define is not used; component definitions for your web services will be created from their WSDL files.
Web Agent
Any SiteMinder WSS Agent.
*
The Choose User Directories dialog opens.
You return to the General tab.
The application is identified and the directory selected.
To include a response (for example, to generate WS-Security headers) in the application security policy you generate from a WSDL file, first configure the response.
Follow these steps:
The Create Application Response pane opens.
To configure a response to produce WS-Security headers, select WebAgent-WS-Security-Token. To configure a response to produce SAML Session Tickets, select WebAgent-SAML-Session-Ticket-Variable.
The fields on the Attribute Fields group box are updated to match the specified attribute type.
Note: For WebAgent-SAML-Session-Ticket-Variable and WebAgent-WS-Security-Token attributes, you can either enter values directly in the Variable Name and Variable Value fields or populate those fields with valid values from the Select a Name and Select a Value lists that appear.
The Create Response Attribute Task is submitted for processing, and the response attribute is added to the Attribute List on the Create Response Attribute pane.
The Create Response Task is submitted for processing and you are returned to the Responses tab.
After you create the application object, you generate the security policy to protect web service resources from their associated WSDL file.
Follow these steps:
The Secure Web Services from WSDL: Select Application pane appears.
The Secure Web Services from WSDL: Input WSDL pane appears.
http://example.com/WSDL/my-wsdl.wsdl
The Secure Web Services from WSDL: Define Policies pane appears, displaying a selectable table of the web services (ports) defined in the WSDL file.
(To return to the top-level WSDL view, click the All Web Services link at the top-left corner of the table.)
The Secure Web Services from WSDL: Summary pane opens, displaying a summary of the components, subcomponents, and resources that will be created according to your selections.
The Administrative UI creates component and resource definitions corresponding to your settings for all specified web service ports and operations, a default application role (that defines no user access), and a security policy that binds that default role with resources.
However, if you assigned different authentication schemes to a web service port and any of its operations, you must manually create a resource definition for that web service port:
The Modify Application pane opens
A list of applications that match the search criteria opens.
The Modify Object: Name pane opens.
The Create Application Resource pane opens.
Specifiy a name for the resource, accept the default resource filter (/*) and select the ProcessSOAP and ProcessXML Web Agent actions.
The Administrative UI creates component and resource definitions corresponding to your settings for all specified web service ports and operations, a default role (that defines no user access), and a security policy that binds that default role with resources.
The web services you chose to protect are now secure. No access requests will be authorized until you modify the default role to define access privileges or create more roles and bind them to resources in the authorization policy.
Note: You can repeat this procedure to add the resources from multiple WSDL files to the same application. However, the Secure Web Services from WSDL operation is only intended for initial generation of policy objects from a particular WSDL file; if a web service changes or you must enable other operations from a previously loaded WSDL file you must delete the previously created application or edit it manually.
Roles associate resources with groups of users must be created.The Secure Web Services from WSDL wizard creates a default role that allows no access when it secures web services from a WSDL file. You must modify this role to define a group of users that can access a resource to which the role is assigned.
To create a new role
The Modify Application pane opens
A list of applications that match the search criteria opens.
The Modify Object: Name pane opens.
The Modify Role pane opens.
Note: Click Help for descriptions of settings and controls, including their respective requirements and limits.
The role is modified.
Roles associate resources with groups of users must be created. The Secure Web Services from WSDL wizard creates a default role which is assigned to all resources in when it secures web services from a WSDL file. If required, you can create additional roles.
Note: The following procedure assumes that you are creating an object. You can also copy the properties of an existing object to create an object. For more information, see Duplicate Policy Server Objects.
To create a new role
The Modify Application pane opens
A list of applications that match the search criteria opens.
The Modify Object: Name pane opens.
Note: Click Help for descriptions of settings and controls, including their respective requirements and limits.
Note: The Users Setup and Advanced sections do not apply when the All Users option is set and are no longer displayed.
The role is created.
The Secure Web Services from WSDL wizard generates an application security policy that binds the web service resources specified in a WSDL to a default. You can modify this policy to change the roles assigned to resources to allow different groups of users to access different resources protected by the application.
Follow these steps:
A list of applications that match the search criteria opens.
The Modify Object: Name pane opens.
The Policies pane opens and displays a table listing the configured resources and available roles. This table lets you quickly see which roles can be granted access to which resources.
For example, if you had a human resources application that secures a web service for benefits management and another for performance appraisals and separate roles for employees and managers, you could:
Security policies are created for each role assigned.
Note: If you need to edit resources or roles, you must make the changes on the respective tabs and not on the Policies pane.
|
Copyright © 2013 CA.
All rights reserved.
|
|