

This section contains the following topics:
Advantages of Securing Your Resources Using Application Objects
How to Define the Security Policy for a Web Application in an Application Object
Use Cases for Defining Application Security Policies Using Application Objects
Application objects provide an access management model that lets you protect business applications without an in-depth knowledge of CA SiteMinder®-specific concepts and components. This model is also known as Enterprise Policy Management (EPM).
Application objects present policy configuration in the context of securing an application. To protect an application, you create an Application object and are only required to provide data for configuration settings that do not have defaults. Modifying other settings is optional. Application objects therefore make policy configuration more straightforward. You can manipulate additional CA SiteMinder® settings that allow you to define more fine-grained protection of an application; however, such manipulation is not required.
For the administrator already familiar with CA SiteMinder® domain-based policies, there is a relationship between the application-oriented concepts and the underlying CA SiteMinder® policy objects. This relationship is reflected in the Administrative UI and is shown in the following table:
|
Application Dialogs and Group Boxes |
Underlying SiteMinder Component |
|---|---|
|
General settings |
Defines the policy domain |
|
Components |
Defines the realm |
|
Resource |
Specifies the rule |
|
Application Roles |
Define the policy users |
Application roles define the set of users who have access to a resource or group of resources defined in an Application object. Roles can include all users in configured user directories, be limited to selected groups, organizations, and users with matching user attributes, or specified using a named or unnamed expression.
Application objects offer the following benefits:
The focus on applications relates closely to the view of access management by most businesses.
The security enforcement model for application objects is no different than implemented by the more domain-centric model. However, the domain-specific components are hidden from configuration.
Securing resources is simplified—you name the application, the application resources that need protecting, and the application roles that are permitted access. You are not required to examine or modify every aspect of a component to establish a security policy.
A CA SiteMinder® administrator can grant access to an application without expert knowledge of CA SiteMinder®. This ability enables a senior security administrator to delegate access management responsibilities to other administrators.
Application objects provide an intuitive method of defining a complete security policy for a web application (or website). Application objects associate resources with user roles to specify entitlement policies that determine what users can access what resources.
Note: An application object defines policy information that can otherwise be configured in a policy domain and its subobjects. That is, realms, rules, rule groups, responses, and policies.
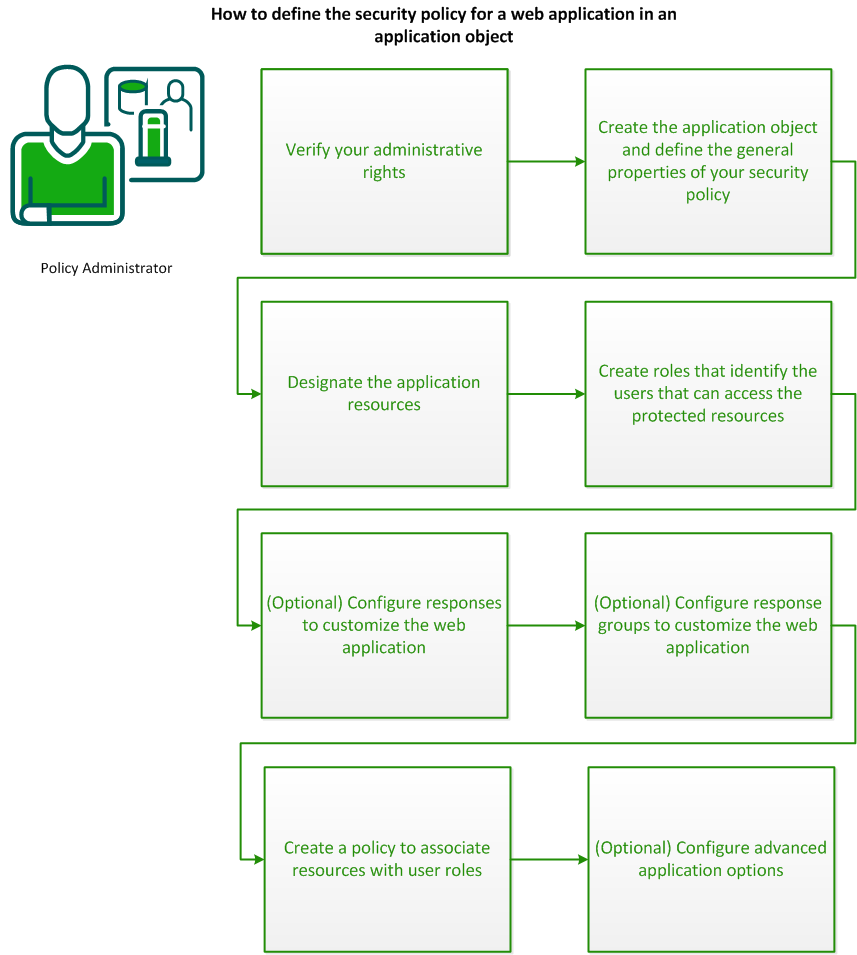
To define the security policy for a web application in an application object, complete the following procedures:
To implement application security policies, you require the necessary administrative rights. An administrator can be assigned the following application-related rights:
The application administration right lets you create, modify, and delete an application and its components.
The policy administration right lets you define the resources, roles, and policies that are associated with an application.
If you do not have the necessary rights, contact the CA SiteMinder® superuser.
Create an application object and configure the following general properties of the security policy that it defines:
Follow these steps:
The Create Application page appears.
Note: Click Help for descriptions of settings and controls, including their respective requirements and limits.
The user directories are removed from the list of Available Members and added to the list of Selected Members.
Note: To select more than one member at one time, hold down the Ctrl key while you click the additional members. To select a block of members, click the first member and then hold down the Shift key while you click the last member in the block.
The selected user directories are listed under User Directories on the Create Application page.
The application object is created.
After defining the application components that you want to protect, designate the specific resources within each component that you want to protect.
Follow these steps:
Note: Click Help for descriptions of settings and controls, including their respective requirements and limits.
The Effective Resource updates to include the resource.
The Action List is populated with actions appropriate for the selected action type.
The Resource is created.
The web application resources are now defined.
After defining the web application components and resources, you specify roles that define the set of users who have access to a particular resource.
Follow these steps:
Note: Click Help for descriptions of settings and controls, including their respective requirements and limits.
Note: The Users Setup and Advanced sections do not apply when the All Users option is set and are no longer displayed.
Configure responses to pass text, user attributes, DN attributes, active responses, or the runtime values of defined variables from the Policy Server to an agent. Web applications can use response data to display customized content, to determine privileges or for fine-grained access control. Response data can also be used to change SiteMinder settings or to redirect users to different resources.
Follow these steps:
Note: Click Help for descriptions of settings and controls, including their respective requirements and limits.
The details in the Attribute Fields are updated to match the specified attribute kind.
Note: The Attribute Setup section closes when you edit the attribute on the Advanced section.
Note: The maximum time limit that can be entered is 3600 seconds.
The response attribute is added to the Attribute List.
The Response is created.
Configure a response group to combine multiple responses in a single object. When you create your application policy, you can more easily associate multiple responses with a single resource within that policy.
Follow these steps:
Note: Click Help for descriptions of settings and controls, including their respective requirements and limits.
The Response Group Members page appears.
Note: The Available Members column lists all responses and response groups that are defined in the application object.
The responses are removed from the list of Available Members and added to the list of Selected Members.
Note: To select more than one member at a time, hold down the Ctrl key while you click the additional members. To select a block of members, click the first member and then hold down the Shift key while you click the last member in the block.
The selected responses are added to the response group.
The Response Group is created.
Associate resources with user roles in the application policy to define which users are authorized to access each resource. If you want to return data to the authorizing agent when a resource is accessed, also associate responses with resources in the policy.
Follow these steps:
The Policies tab displays two tables, one that lists resources and roles, the other that lists resources and responses.
Note: Click Help for descriptions of settings and controls, including their respective requirements and limits.
Note: Responses are not listed in the responses table until you select a role/resource table entry.
A confirmation screen appears. The application security policy is created.
You can also configure the following advanced options for your application security policy:
You can define custom attributes to add unique identifying metadata about your application. The metadata describes the application by adding information, such as the name of the person who created the application or the purpose of the application.
Follow these steps:
The Custom Attributes tab displays a table that contains the name and value of any existing metadata.
Note: Click Help for descriptions of settings and controls, including their respective requirements and limits.
A blank entry is added to the Custom Attributes table.
The custom attribute is added to the table and a new blank entry is added.
If CA SiteMinder® is integrated with a supported risk analysis engine, a confidence level is available for use in application objects. Confidence levels extend applications to include the results of the risk evaluation that is completed as part of user authentication. The Policy Server can use these results when making authorization decisions.
You can apply a confidence level to the following objects:
A confidence level that you configure in an application component applies to all resources that are associated with the component. Confidence levels represent a higher level of granularity than the default application settings provide. Use the advanced settings of the application component to apply a confidence level.
Note: Applying a confidence level to an application component requires that you enable confidence level support. For more information, see the CA SiteMinder® Implementation Guide.
A confidence level that you configure as part of an application role allows for more granular authorization decisions. A confidence level represents an active component that you can use to define further the user group or groups that can access the resources. Confidence levels represent a higher level of granularity that the default role memberships provide. Use a named expression that references the SM_USER_CONFIDENCE_LEVEL CA SiteMinder® generated attribute to add a confidence level to a role.
Note: Applying a confidence level to an application role remains supported from previous releases and is enabled by default.
If CA SiteMinder® is integrated with CA DataMinder, content classifications are available for use with application objects. Content classifications extend applications to include the type of content a user is requesting. The Policy Server can use the results of the CA DataMinder content analysis to make authorization decisions.
Note: Applying content classifications to an application component requires that you enable the environment for the CA DataMinder integration. For more information, see the CA SiteMinder® Implementation Guide.
You can apply a CA DataMinder content classification to the following objects:
Application objects provide configuration options that let the following types of users modify CA SiteMinder® components beyond the default settings:
Follow these steps:
The Modify Component page appears. The Modify Component page includes the session and advanced features of policy realms. For example, if confidence level support is enabled, you can add a minimum confidence level to the component.
Note: For more information about enabling confidence level support, see the CA SiteMinder® Implementation Guide.
|
Copyright © 2013 CA.
All rights reserved.
|
|