

After you complete the POST single sign-on configuration, you can add more features to the federated network.
The additional tasks covered in this deployment example are:
Note: Some of these additional features are required for single sign-on in a production environment, such as digital signing for POST binding. Required tasks are noted.
The single logout protocol (SLO) results in the simultaneous end of all sessions for a particular user, to help ensure security. Associate these sessions with the browser that initiated the logout. Single logout does not necessarily end all sessions for a user.
Configuring single logout enables the Identity Provider and Service Provider to support the single logout protocol. The configuration also determines how single logout is handled.
You can initiate single logout at the IdP. At the IdP, idp.demo, enable single logout on a per-SP basis.
Follow these steps:
The remaining fields become active.
http://www.sp.demo:81/affwebservices/public/saml2slo
Defines the SLO servlet at the SP.
http://www.idp.demo:80/idpsample/SLOConfirm.jsp.
For instructions, see the Policy Server Administration Guide.
You can initiate single logout at the Service Provider.
Follow these steps:
The rest of the fields become active.
http://www.idp.demo:80/affwebservices/public/saml2slo
http://www.sp.demo:81/spsample/SLOConfirm.jsp
For instructions, see the Policy Server Administration Guide.
Use the web pages included with the sample application to test single logout. To have access to these pages, you must have run the sample application.
The web pages are located in the following two folders.
policy_server_home/samples/federation/content/idpsample
policy_server_home/samples/federation/content/spsample
Specifies the installed location of the CA SiteMinder® Policy Server.
Important! If you have run the sample application, the idpsample and spsample folders are automatically copied into the document root directory of your web server.
If you have not run the sample application, use your own web pages. Verify that your HTML page for testing SP-initiated single sign-on includes a hard-coded link to the single logout service.
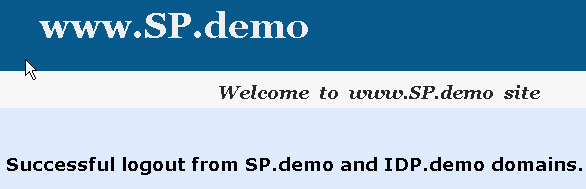
After you have successfully tested single sign-on, you can test single logout from the SP.demo welcome page.
To test single logout
On the SP Welcome page, click the link labeled Single Logout using HTTP Redirect binding.
If single logout is successful, the following page appears:
Complete tasks at the Identity Provider and Services Provider to configure artifact single sign-on.
Required tasks at the Identity Provider:
Required tasks at the Service Provider:
For artifact binding, set up and enable the session store at the IdP. When you use the artifact binding, the session store is required to store the assertion before it is retrieved with the artifact.
To enable the session store
For instructions, see the Policy Server Installation Guide.
SiteMinder Session Data Source
admin
dbpassword
dbpassword
16 (default)
Enable SSL for the web server where the Web Agent Option Pack is installed. Enabling SSL verifies that the back channel over which the assertion is passed is secure.
Follow these steps:
For the IIS Web Server used in the sample network, the IIS Certificate Wizard would be used.
The Web Agent Option Pack installs the Federation Web Services application (FWS). When you install the Policy Server for the same IdP as the Web Agent, several policies for services within the FWS application are automatically created. One of these policies protects the artifact resolution service for HTTP-Artifact single sign-on.
Specify which relying partners can access the artifact resolution service by enforcing protection of this artifact resolution policy.
Follow these steps: at the IdP
The Agent Groups dialog opens.
The Policy dialog opens.
The Users/Groups dialog opens.
The policy that protects the artifact resolution service is now being enforced.
Enable a persistent session for the realm that contains the protected authentication URL (Protect the Authentication URL). The persistent session is required to store assertions for SAML artifact binding.
If you did not enable a persistent session when you protected the authentication URL, enable it now.
Follow these steps:
For artifact single sign-on, enable the artifact binding.
Follow these steps:
sp.demo
This value must match the value at the Service Provider.
http://www.sp.demo:81/affwebservices/public/
saml2assertionconsumer
accept the defaults
In a test environment, you can increase the Validity Duration value above 60, the default, if you see the following message in the Policy Server trace log:
Assertion rejected (_b6717b8c00a5c32838208078738c05ce6237) - current time (Fri Sep 09 17:28:33 EDT 2005) is after SessionNotOnOrAfter time (Fri Sep 09 17:28:20 EDT 2005)
The artifact is added to a URL-encoded query string.
smfederation
smfederation
The Identity Provider uses this password for secure communication across the backchannel.
For artifact single sign-on, if Basic over SSL is the authentication scheme protecting the Artifact Resolution Service, add a certificate to the certificate data store at the Service Provider.
The certificate data store holds the Certificate Authority certificate that establishes an SSL connection between the Service Provider and the Identity Provider. The certificate secures the back channel that the assertion is sent across. Protect the Artifact Resolution Service and secure the back channel so the Service Provider knows that a trusted authority secures the SSL connection.
A set of common root and intermediate CAs are included with CA SiteMinder®. To use CA certificates that are not in the certificate data store, import them.
For this deployment, the alias is sampleAppCertCA and the certificate of the CA is docCA.crt.
Follow these steps:
Note: Click Help for a description of fields, controls, and their respective requirements.
The wizard skips the Password step.
The CA certificate is imported into the certificate data store. The change takes place directly after the import is complete.
Important! You cannot delete a CA certificate that is part of a trust chain for other certificates the system uses. If you try to delete a CA certificate in use, an error message states that the certificate cannot be deleted.
At the Service Provider, configure the single sign-on bindings for the SAML authentication scheme. The configuration instructs the Service Provider how to communicate with the Identity Provider.
Follow these steps:
https:/www.idp.demo:443/affwebservices/saml2artifactresolution
Basic
sp.demo
smfederation
smfederation
The password must match the password at the Identity Provider. This password enables secure access across the back channel to the artifact resolution service at the Identity Provider.
Test single sign-on in a CA SiteMinder®-to-CA SiteMinder® network using the web pages included with the sample application. The sample web pages are available provided you run the sample application script. If you do not run the sample application, use your own web pages to test single sign-on.
The sample application web pages are located in the following two folders.
policy_server_home/samples/federation/content/idpsample
policy_server_home/samples/federation/content/spsample
Specifies the installed location of the CA SiteMinder® Policy Server
Important! If you have run the sample application, the idpsample and spsample folders are automatically copied into the document root directory of your web server.
If you use your own HTML page, it must contain a hard-coded link to the AuthnRequest service. For this deployment, the link for Artifact binding is:
http://<server:port>/affwebservices/public/saml2authnrequest?ProviderID=
IdP_ID&ProtocolBinding=urn:oasis:names:tc:SAML:2.0:bindings:HTTP-Artifact
Defines the name and port of the server at the SP where the Web Agent Option Pack is installed.
Defines the provider ID.
The link for this deployment is:
http://www.sp.demo:81/affwebservices/public/saml2authnrequest?ProviderID=
idp.demo&ProtocolBinding=urn:oasis:names:tc:SAML:2.0:bindings:HTTP-Artifact
The HTML source file with the link is similar to the following example:
<a href="http://www.sp.demo:81/affwebservices/public/saml2authnrequest?ProviderID=
idp.demo&ProtocolBinding=urn:oasis:names:tc:SAML:2.0:bindings:HTTP-Artifact">
Link for ARTIFACT Single Sign-on</a>
The AuthnRequest Service redirects the user to the Identity Provider specified in the link to retrieve the authentication context of the user. After the Identity Provider authenticates the user and establishes a session, it directs the user back to the target resource at the Service Provider.
Note: The ProviderID in the Authnrequest link must match the IdP ID field value at the SAML authentication scheme at the SP. The IdP ID field is on the Scheme Setup tab of the Authentication Scheme Properties dialog.
Now, follow the steps to test SP-initiated single sign-on.
You can add attributes from the user store record to a SAML assertion to identify a user. The attribute must exist in the user store of the Identity Provider for that specific user who is requesting access to the target resource.
For this deployment, add an attribute for user1 that represents the givenname in the user record.
Follow these steps: at the Identity Provider
unspecified (default)
User Attribute
firstname
givenname
givenname is an attribute in the profile of user1.
For SAML 2.0 POST single sign-on, the Identity Provider must sign the SAML response. The configuration tasks at the Identity Provider enable digital signing. The configuration tasks at the Service Provider enable signature verification.
Important! In a production environment, signature processing is a mandatory security requirement.
Keys and certificates that sign SAML assertions for POST binding are stored in the certificate data store. Signing a SAML response is required, so the certificate data store at the Identity Provider must contain the appropriate key/certificate pair.
Deploy the sample application using the key/certificate pair that it automatically installs. If you want to import a new key/certificate pair, complete the following procedures.
To import a private key/certificate pair
idp.demo signs the SAML response.
Enter the alias that you specified when importing the private key/certificate pair.
RSAwithSHA1 (default)
Sign Assertion (default)
For POST single sign-on, the Identity Provider must digitally sign the SAML assertion. Consequently, the Service Provider must validate the signature.
To validate a digital signature
To import the public key
The key/certificate pair is added to the data store.
CN=Certificate Manager,OU=IAM,O=CA.COM
008D 8B6A D18C 46D8 5B
The D-Sig information enables the Service Provider to verify the SAML response signature. The values for the Issuer DN and Serial Number are from the certificate stored in the certificate data store at the Service Provider.
Validation configuration is now complete.
For added security, you can encrypt the assertion. Encryption is an optional task that can be performed after you have configured a basic single sign-on network.
The Identity Provider encrypts the assertion with the certificate that corresponds to the private key/certificate pair that the Service Provider uses to decrypt the assertion.
The configuration tasks are available at the Identity Provider and Service Provider.
In this deployment, sp_encrypt.crt is the certificate for encryption.
To enable encryption at the IdP
CN=Doc Certificate Authority, OU=Doc, O=CA.COM
Note: The value you enter for the Issuer DN field should match the issuer DN of the certificate in the certificate data store. View the DN to verify at you enter a matching value.
The number must be hexadecimal.
If the assertion is encrypted at the Identity Provider, the Service Provider must have the private key and corresponding certificate in the certificate data store.
The Service Provider accepts an encrypted assertion from the Identity Provider as long as it has the private key/certificate pair to decrypt the assertion.
Note: You do not have to enable the Require an Encrypted Assertion feature to accept an encrypted assertion at the Service Provider.
Follow these steps:
|
Copyright © 2013 CA.
All rights reserved.
|
|