

This section contains the following topics:
Manual CA SiteMinder®-to-CA SiteMinder® Deployment Overview
Confirm that Required Components are Installed
Set Up the Identity Provider for the Sample Network
Set up the Service Provider for the Sample Network
Add Functionality to the Federation Deployment
You can accomplish a deployment manually. The manual deployment tasks begin with a simple configuration, single sign-on with POST binding. By starting with a basic configuration, you can complete the least number of steps to see how CA SiteMinder® federation works.
After getting POST single sign-on to work, additional tasks, such as configuring the artifact binding, digital signing, and encryption are described. You can add these features to reflect a real production environment.
Important! The deployment exercise is only for SAML 2.0. These procedures do not apply to a SAML 1.x or WS-Federation configuration.
The manual deployment examples are different from the sample application deployment in the following ways:
Important! The procedures throughout the manual deployment use sample data. To use data from your environment, specify entries for your Identity Provider and Service Provider configuration.
Federation requires that the following components are installed:
This sample federation deployment example assumes that these components are installed and working.
Optionally, set up these features:
SSL is optional for securing communication across the back channel for HTTP-artfact single sign-on.
The session store is required for storing the assertion at the asserting party when using HTTP-Artifact binding. The session store is also required for single logout at either party.
For instructions on setting up a session store database, see the Policy Server Installation Guide. Enable the session store using the Policy Server Management Console. See the Policy Server Administration Guide for instructions.
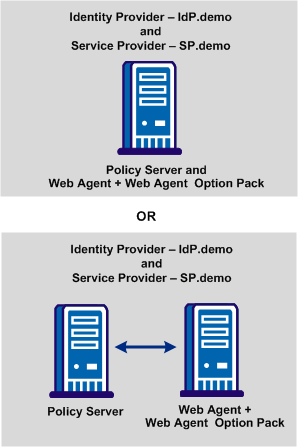
The sample websites in the CA SiteMinder® federated network are an Identity Provider named idp.demo, and a Service Provider named sp.demo. A business partnership is established between idp.demo and sp.demo.
The following illustration shows the sample federated network.
IdP.demo is the Identity Provider. The following table contains sample data for the most basic SAML 2.0 POST single sign-on configuration.
|
Identity Provider Component |
Sample Network |
|---|---|
|
IdP Policy Server
|
Server: www.idp.demo:80 Server type: IIS Web Server |
|
IdP policy store |
IP Address: www.idp.demo:389 Storage: LDAP Root DN: o=idp.demo Admin Username: cn=Directory Manager Password: federation |
|
User store |
Directory name: IdP LDAP Server: www.idp.demo:42088 Server Type: Sun One Directory Server (LDAP) User store: The LDAP directory contains the following users:
userpassword: test mail: <user_name>@idp.demo Root: dc=idp,dc=demo Start: uid= End: ,ou=People,dc=idp,dc=demo |
|
IdP Web Agent with Web Agent Option Pack |
Server: www.idp.demo:80 Server Type: IIS Web Server Agent name: idp-webagent |
|
Assertion Consumer Service URL |
URL: http://www.sp.demo:81/affwebservices/ public/saml2assertionconsumer |
|
Assertion Retrieval Service URL |
URL: http://www.idp.demo:80/affwebservices/assertionretriever |
|
Authentication URL |
URL: http://www.idp.demo/siteminderagent/ |
The following table contains sample data for more advanced SAML 2.0 features, such as the artifact profile, signing and encrypting assertions.
|
Identity Provider Component |
Sample Network |
|---|---|
|
Session store |
Server: www.idp.demo Database type: ODBC Database Source Information: SiteMinder Session Data Source User Name: admin Password: dbpassword |
|
SSL-enabled server |
Server: www.idp.demo:443 Server Type: IIS 6.0 Web The web server with the Web Agent Option Pack is SSL-enabled for artifact binding |
|
Certificate of the Certificate Authority (CA) |
Certificate of CA: docCA.crt DER-encoded Cert: docCA.der This CA signs the server-side certificate to enable SSL |
|
Private key/certificate pair to sign SAML responses |
Certificate: post-cert.crt Private key: post-pkey.der Password: fedsvcs |
|
Certificate (public key) for encryption |
Public key: sp-encrypt.crt |
|
Attribute to include in assertion |
Attribute: unspecified (default) Attribute Kind: User DN Variable Name: firstname Variable Value: givenname
|
The Service Provider is SP.demo. The following table contains sample data for the most basic SAML 2.0 POST single sign-on configuration.
|
Service Provider Component |
Sample Network |
|---|---|
|
SP Policy Server |
Server: www.sp.demo:80 Server type: IIS Web Server |
|
SP policy store |
IP Address: www.sp.demo:389 Storage: LDAP (Sun One Directory Server) Root DN: o=ca.com Admin Username: cn=Directory Manager Password: federation |
|
User Store |
Directory name: SP LDAP Server: www.sp.demo:32941 Server Type: LDAP (Sun One Directory Server) User store: The LDAP directory contains the following users:
userpassword: customer mail: <user_name>@sp.demo Root: dc=sp,dc=demo Start: uid= End: ,ou=People,dc=sp,dc=demo |
|
SP Web Agent and Web Agent Option Pack |
Server: www.sp.demo:81 Server type: Sun ONE 6.1 Web Server Agent name: sp-webagent |
|
Single Sign-on Service |
SSO Service: http://www.idp.demo:80/affwebservices/public/saml2sso |
|
Target Resource |
Target Resource: http://www.sp.demo:81/ |
The following table lists sample data for more advanced SAML 2.0 features, such as setting up the artifact profile, signing and encrypting assertions.
|
Service Provider Component |
Sample Network |
|---|---|
|
Artifact Resolution |
Resolution Service: https://www.idp.demo:443/ |
|
Certificate of Certificate Authority |
Certificate of CA: docCA.crt DER-encoded cert: docCA.der This CA signs the server-side certificate to enable SSL |
|
Certificate (public key) Used to verify signature of SAML responses |
Certificate: post-cert.crt
|
|
Private key/certificate pair Used for decryption and digital signing |
Private key: sp-encrypt.der Public key: sp-encrypt.crt Password: fedsvcs Issuer DN: CN=Certificate Manager,OU=IAM,O=CA.COM Serial Number: 008D 8B6A D18C 46D8 5B |
To deploy legacy federation at the Identity Provider, the following sections detail the tasks. The entries in each section reflect the sample data that is provided for a basic configuration.
Note: These procedures assume that you have already installed the required components.
At the Identity Provider, a user store with users defined is required. The Identity Provider can create assertions for these users. In this deployment, the user store is a Sun ONE LDAP user directory. The Sun ONE Server Console is used to add users to this user store.
To configure the user store
userpassword: test
mail: user1@idp.demo
userpassword: test
mail: user2@idp.demo
Important! The email address must be the same in the Service Provider user store for the same users.
In this deployment, an LDAP policy store is used. Verify that the Policy Server is pointing to the LDAP policy store.
Note: The guide assumes that you know how to add users to the user store in your deployment.
Follow these steps:
Policy Store
LDAP
www.idp.demo:389
o=idp.demo
cn=Directory Manager
password
password
At the Identity Provider, enable logging for the Policy Server. You can view the log file smtracedefault.log to examine trace messages about single sign-on and single log out. This log file is in the directory policy_server_home/siteminder/log.
Follow these steps:
Note: Include the Fed_Server component in the log to see the federation trace messages.
You configure trace logging at the Policy Server using the Policy Server Management Console.
Configure the Federation Web Services (FWS) application for the sample deployment.
To set up FWS:
The Web Agent Option Pack requires a JDK to run the Federation Web Services application.
For the correct JDK version, go to the Technical Support site and search for the CA SiteMinder® Platform Support Matrix for the release.
For FWS to operate, you can install ServletExec or any supported application server. This sample network uses ServletExec on an IIS 6.0 Web Server.
Note: CA SiteMinder® 12.52 is shipped with a ServletExec license key file named ServletExec_AS_6_license_key.txt. If you do not have this license key, contact CA Technical Support. From this license file, copy the license key and enter it in the ServletExec License dialog of the ServletExec Administration Console. For instructions on licensing ServletExec, see ServletExec documentation, available at the New Atlanta Communication website.
Be sure to apply the most current hot fixes for the supported version of ServletExec you are using. The hot fixes are necessary for Federation Web Services to work with ServletExec. To obtain hot fixes, go to the website for New Atlanta Communication.
To set up ServletExec
The Manage Web Applications dialog opens.
affwebservices
/affwebservices/
C:\program files\ca\webagent\affwebservices
Note: The location of affwebservices in your setup can be different. Enter the correct location.
Important! The IIS user account must have proper rights for IIS to allow any plug-in to write to a file system. Therefore, for Federation Web Services to work with ServletExec, modify the directory security settings for the IIS default user account.
The IIS server user account must have proper rights for IIS to allow a plug-in to write to its file system. For ServletExec to write to the federation log files, the anonymous user account that is associated with ServletExec must have permissions to write to the file system.
Follow these steps:
The set of applications is displayed in the right pane.
The Authentication Methods dialog opens.
For anonymous access, enter a name and password of a user account that has the permissions to right to the Windows file system. To grant this right to a user account, see Windows documentation. For example, you can use the IUSR Internet Guest account for anonymous access.
The user account that is associated with ServletExec can now write to the IIS file system.
Follow these steps:
The Local Security Settings dialog displays.
The Act as part of the operating system Properties dialog opens.
The affwebservices.properties file contains all the initialization parameters for Federation Web Services. Modify at least one of the settings in this file.
To modify the affwebservices.properties file
For this deployment, an IIS web server hosts the FWS application. So, the path to the WebAgent.conf file is:
C:\\Program Files\\ca\\webagent\\bin\\IIS\\WebAgent.conf
Note: Federation Web Services is a Java component, so the Windows paths must contain double backslashes. This format applies only to Windows.
Verify that this path is entered on one line.
After you set up Federation Web Services, verify that the application is operating correctly.
Follow these steps:
http://<fqhn>:<port_number>/affwebservices/assertionretriever
Defines the fully qualified host name.
Defines the port number of the server where the Web Agent and Web Agent Option Pack are installed.
For this deployment, enter:
http://www.idp.demo:80/affwebservices/assertionretriever
If Federation Web Services is operating correctly, the following message appears:
Assertion Retrieval Service has been successfully initialized.
The requested servlet accepts only HTTP POST requests.
This message indicates that Federation Web Services is listening for data activity. If Federation Web Services is not operating correctly, you get a message that the Assertion Retrieval Service has failed. If Assertion Retrieval Service fails, examine the Federation Web Services log.
At the IdP, enable logging for the system with the Web Agent Option Pack. You want to be able to view the following logs:
Follow these steps:
The IdP user directory consists of user records for which the Identity Provider generates assertions.
The following steps specify how to configure a user directory in the Administrative UI. The directory IdP LDAP, is the Sun ONE LDAP directory that contains user1 and user2.
Follow these steps:
IdP LDAP
LDAP
www.idp.demo:42088
dc=idp,dc=demo
Accept the defaults for the other values.
Complete the following field in the LDAP User DN Lookup:
uid=
,ou=People,dc=idp,dc=demo
To identify the Service Provider to the Identity Provider, create an affiliate domain and add a service provider object for sp.demo.
Follow these steps:
Federation Sample Partners
Domain for sp.demo
Associate a user directory with the affiliate domain.
Follow these steps:
For your network, select the user store you set up at the IdP.
Add the Service Provider named sp.demo to the affiliate domain.
Follow these steps:
sp.demo
Service Provider
sp.demo
idp.demo
Accept the default
http://www.idp.demo/siteminderagent/redirectjsp/redirect.jsp
This redirect.jsp is included with the Web Agent Option Pack that is installed at the Identity Provider site. In this deployment, that server is www.idp.demo. If the user does not have a CA SiteMinder® session, the SSO service at the IdP redirects the user to the authentication URL to log in.
After successful authentication, the redirect.jsp application redirects the user back to the SSO service for assertion generation. A CA SiteMinder® policy must protect this URL.
Verify that this option is selected. By default, this option is selected.
You must protect the Authentication URL with a SiteMinder policy. Protecting the Authentication URL ensures that a user requesting a protected federated resource is presented with an authentication challenge if they do not have a SiteMinder session at the IdP.
Follow these steps:
Authentication URL Protection Realm
Using the lookup button, select FSS web agent
This is the Web Agent protecting the server with the Web Agent Option Pack.
/siteminderagent/redirectjsp/redirect.jsp
Accept the defaults for the other settings.
Select Persistent Session
Authentication URL Protection Rule
Authentication URL Protection Realm
*
Get
Accept the defaults for the other settings.
Authentication URL Protection Policy
Add user1 from the IdP LDAP user directory
add Authentication URL Protection Rule
You now have a policy that protects the Authentication URL at the Identity Provider.
When you specify a Service Provider in an affiliate domain, include a list of users and groups for which the Assertion Generator generates SAML assertions. Add only users and groups from directories that are in an affiliate domain.
To select users for assertion generation
The Users/Groups dialog opens.
Attribute-value
uid
*
These employees are listed in the IdP LDAP.
The Name ID is a unique way of identifying a user in an assertion. The NameID that you enter in the Administrative UI is included in the assertion.
To configure name IDs
The Name IDs dialog displays.
Email Address
The email address format value means that the Name ID must use an email address in the user directory to identify the user.
User Attribute
Specify the HTTP-POST as the SAML 2.0 binding for single sign-on.
Follow these steps:
sp.demo
urn:oasis:names:tc:SAML:2.0:ac:classes:Password (default)
http://www.sp.demo:81/affwebservices/public/
saml2assertionconsumer
Specifies the URL of the Assertion Consumer Service. For your network, the server you specify is the SP web server where the Web Agent Option Pack is installed.
5 (default)
60 (default)
In a test environment, if the following message appears in the Policy Server trace log, increase the Validity Duration value above 60.
Assertion rejected(_b6717b8c00a5c32838208078738c05ce6237) -current time
(Fri Sep 09 17:28:33 EDT 2005) is after SessionNotOnOrAfter time (Fri Sep 09 17:28:20 EDT 2005)
Select this check box
In a production environment, signature processing to sign assertions is required. However, for the basic sample deployment, disable signature processing.
Important! Never disable signature processing in a SAML 2.0 production environment.
Follow these steps:
Attributes is the final step in Service Provider configuration. For a basic configuration, do not configure attributes. Instead, click Finish to complete the Service Provider configuration. The configuration is submitted. You have identified a Service Provider object for the Identity Provider.
After completing the configuration at the Identity Provider, you must Set Up the Service Provider.
To deploy legacy federation at the Service Provider, the following sections detail the tasks. The entries in each section reflect the sample data provided for a basic configuration.
Note: These procedures assume you have already installed the required components.
At the SP, configure a user store and add user records for users that require assertions. When the assertion is presented during authentication, the Service Provider looks in the user store for the user record.
In this deployment, the Sun ONE LDAP user directory is the user store. Use the Sun ONE Server Console to add users to the directory.
To configure the user store
userpassword: customer
mail: user1@sp.demo
userpassword: customer
mail: user2@sp.demo
Important! The email address must be the same in the Identity Provider user store for the same users.
Establish the connection between the Policy Server and the LDAP policy store.
Follow these steps:
Complete the following fields:
Policy Store
LDAP
sp.demo:389
o=sp.demo
cn=Directory Manager
federation
federation
At the SP Policy Server, configure the SiteMinder Profiler to log federation components to the trace log, smtracedefault.log and examine trace messages.
To enable logging
To configure trace logging at the Policy Server, using the Policy Server Management Console.
The Web Agent Option Pack installed the Federation Web Services (FWS) application. Configure the FWS application for the sample deployment.
For FWS to work, do the following
The Web Agent Option Pack requires a JDK to run the Federation Web Services application. For the specific version required, go the Technical Support site and search for SiteMinder Platform Support Matrix for the release.
For FWS to operate in this deployment, ServletExec is installed on a Sun ONE 6.1 web server.
Note: CA SiteMinder® 12.52 is shipped with a ServletExec license key file named ServletExec_AS_6_license_key.txt. If you do not have this license key, contact CA Technical Support. From this license file, copy the license key and enter it in the ServletExec License dialog of the ServletExec Administration Console. For instructions on licensing ServletExec, see ServletExec documentation, available at the New Atlanta Communication website.
Apply the most current hot fixes for the supported version of ServletExec. The hot fixes are necessary for Federation Web Services to work with ServletExec. To obtain the hot fixes, go to the website for New Atlanta Communications.
To set up ServletExec
For instructions, refer to New Atlanta Communications documentation.
The Manage Web Applications dialog opens.
affwebservices
/affwebservices/
C:\program files\ca\webagent\affwebservices
The location of affwebservices in your network can be different. Enter the correct location.
The AffWebServices.properties file contains all the initialization parameters for Federation Web Services. Specify the location of the WebAgent.conf file in this file.
Follow these steps:
For this deployment, the web server hosting the FWS application at the Service Provider is a Sun ONE Web Server. So, the path to the WebAgent.conf file is:
C:\\Sun\\WebServer6.1\\https-sp.demo\\config\\WebAgent.conf
Note: Federation Web Services is a Java component, so the Windows paths must contain double backslashes. Specify this entry on one line.
After you have set up the Federation Web Services application, verify that it is operating properly.
Follow these steps:
http://fqhn:port_number/affwebservices/assertionretriever
Defines the fully qualified host name.
Defines the port number of the server where the Web Agent and Web Agent Option Pack are installed.
For this deployment, enter:
http://www.sp.demo:81/affwebservices/assertionretriever
If Federation Web Services is operating correctly, the following message appears:
Assertion Retrieval Service has been successfully initialized.
The requested servlet accepts only HTTP POST requests.
This message indicates that Federation Web Services is listening for data activity. If Federation Web Services is not operating correctly, you get a message that the Assertion Retrieval Service has failed. If Assertion Retrieval Service fails, examine the Federation Web Services log.
At the SP, enable logging for the system with the Web Agent Option Pack so you can view the following logs:
Contains error logging messages.
To enable error and trace logging
Logging is now enabled.
The SP user directory consists of user records for which the Service Provider uses for authentication.
Configure a user directory in the Administrative UI. The directory, named SP LDAP, is the Sun ONE LDAP directory that contains the users user1 and user2.
Follow these steps:
SP LDAP
LDAP
www.sp.demo:32941
dc=sp,dc=demo
Accept the defaults for the other values.
uid=
,ou=People,dc=sp,dc=demo
To authenticate users at the Service Provider, configure the SAML 2.0 authentication scheme. The assertion from the IdP provides the credentials for authentication.
Follow these steps:
Scheme Common Setup section:
Partner IDP.demo Auth Scheme
SAML 2.0 Template
5 (default)
The dialog where you specify the general and user disambiguation displays.
sp.demo
idp.demo
2.0 (default)
30 (default)
Note: The SP ID and IdP ID values must match the values at the IdP.
Username=%s
For the authentication scheme, indicate the single sign-on binding to be used so the Service Provider knows how to communicate with the Identity Provider.
Follow these steps:
302 Cookie Data (default)
User is redirected through an HTTP 302 redirect with a session cookie, but no other data.
http://www.idp.demo:80/affwebservices/public/saml2sso
sp.demo
This value must match the value at the Identity Provider.
http://www.sp.demo:81/spsample/protected/target.jsp
If you begin the Target with http, enter the full path to the resource. A CA SiteMinder® policy that uses the SAML 2.0 authentication scheme protects the target.
Disabling this option makes the sample network noncompliant with SAML 2.0. To enable the use of the single use policy feature, set up a session store at the Service Provider.
Important! Disabling signing is intended only for debugging the initial single sign-on configuration. In a production environment, signature processing is a mandatory security requirement. At the SP, enable signature validation and set up the certificate data store to validate signatures.
The basic authentication scheme configuration is complete.
After you configure a SAML 2.0 authentication scheme, use this scheme in a policy that protects the target resource at Service Provider.
Follow these steps:
Domain for IdP.demo Visitors
Add the user directory that holds user1 and user2.
SP Target Page Protection Realm
sp-webagent
/spsample/protected.jsp
Defines the path to the target resource at the Service Provider web server.
Protected
Partner IdP.demo Auth Scheme
SP Target Page Protection Rule
SP Target Page Protection Realm
*
Web Agent actions
Get
Accept the defaults for all other fields.
General page
SP Target Page Protection Policy
Users pagexs
For the SP LDAP directory, click Add Member. Add user1 so this user has access to the target.
Add the SP Target Page Protection Rule
The protection policy for the target resource is complete.
To test single sign-on in a CA SiteMinder®-to-CA SiteMinder® network, use the web pages included with the sample application. You must have previously run the sample application script to access the web pages. If you do not run the sample application, use your own web pages to test single sign-on.
The sample application web pages are located in the following two folders.
policy_server_home/samples/federation/content/idpsample
policy_server_home/samples/federation/content/spsample
Specifies the installed location of the CA SiteMinder® Policy Server.
Important! If you have run the sample application, the idpsample and spsample folders are automatically copied into the document root directory of your web server.
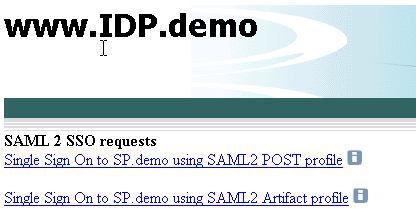
If you use your own HTML page to test SP-initiated single sign-on, the HTML page must contain a hard-coded link to the AuthnRequest service. For this deployment, the sample link for POST binding is:
http://www.sp.demo:81/affwebservices/public/saml2authnrequest?ProviderID=idp.demo
The AuthnRequest Service redirects the user to the Identity Provider specified in the link to retrieve the authentication context of the user. After the Identity Provider authenticates the user and establishes a session, it directs the user back to the target resource at the Service Provider.
Note: The ProviderID in the Authnrequest link must match the IdP ID field value specified in the SAML authentication scheme at the SP. The IdP ID field is on the Scheme Setup tab of the Authentication Scheme Properties dialog.
After you run the sample application, test single sign-on.
To test federated single sign-on
http://www.idp.demo:server_port/idpsample/index.jsp
http://www.sp.demo:server_port/spsample/index.jsp
The following figure is the IdP.demo home page:
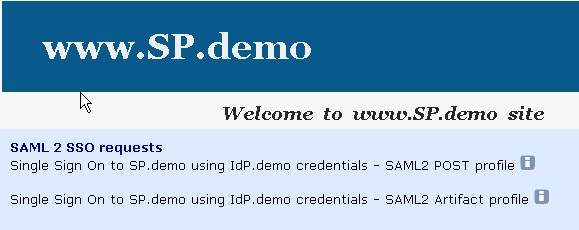
The following illustration is the SP.demo home page:
The following login challenge appears:
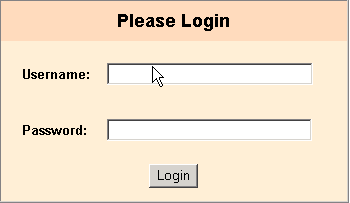
If single sign-on is successful, the following welcome page appears:
|
Copyright © 2013 CA.
All rights reserved.
|
|