

User directories store user attributes such as organizational information, user and group attributes, and individual credentials. CA SiteMinder® can read some user attribute values directly from the user directory, while other values must be calculated each time that they are needed. These calculations are stored as expressions that can be named or unnamed.
Named expressions are policy store objects that you reference by name and reuse in security policies defined in application objects. Unnamed expressions are stored in domain objects like responses and rules for use in traditional security policies.
Note: Named expressions can only be used in application objects. Named expressions cannot be used in traditional security policies defined using domain objects like responses and rules.
CA SiteMinder® evaluates all expressions, both named and unnamed, to determine the values of calculated user attributes.
To create named expressions, an administrator must have the appropriate privileges.
Note: Active expressions and named expressions are not the same. While both types of expressions are evaluated at run-time, they differ in the following ways:
Named expressions:
Named expressions are stored in the policy store as objects that can be referenced by name and reused. CA SiteMinder® evaluates named expressions to determine the values of calculated user attributes.
System administrators create each named expression once. Domain administrators reference the expression name, not the underlying expression, to obtain user information. Administrators do not have to reenter the entire expression each time that the user information is required.
System administrators create and manage named expressions in one place. If an expression must be changed, the administrator only makes the change once.
If business logic requires a change to an expression, system administrators only make the change once. Domain administrators can continue to reference the expression name without regard for the underlying change.
Only administrators who have the appropriate privileges can create named expressions. Named expressions can call privileged built-in functions and any named expression, including those that are marked as private.
For example, a named expression can call a private expression that adds the current user to a group, while an unnamed expression cannot. This restriction prevents a domain administrator from bypassing security, such as adding the current user to an administrative group.
Named expressions are policy store objects that can be referenced by name and reused in security policies defined in application objects.
Note: Named expressions can only be used in application objects. Named expressions cannot be used in traditional security policies defined using domain objects like responses and rules.
CA SiteMinder® evaluates named expressions to determine the values of calculated user attributes.
There are two types of named expressions:
A virtual user attribute lets you define a re-usable expression to calculate user information. You use this type of expression when the user attribute is not uniquely referenced by the user directory. Rather, the user attribute must be calculated using attributes and other criteria that is established by business logic.
Virtual user attributes name expressions that result in values having one of the following data types:
Virtual user attributes are prefixed by the "pound" sign (#). The "pound" sign prevents name clashes with user attribute names and mappings and is a visual reminder that the user attribute value is calculated.
As an expression, a virtual user attribute can include:
Note: Named expressions can only be used in application objects. Named expressions cannot be used in traditional security policies defined using domain objects like responses and rules.
Virtual User Attribute Use Case
This use case represents a basic scenario in which two LDAP user directories identify the last and first names of users with different underlying schema.
The following illustration shows how the virtual user attribute #SortName (LastName,FirstName) can be calculated for users in different user directories through user attribute mapping. User attribute mapping lets you map one common name to different user attribute names in different user directories.
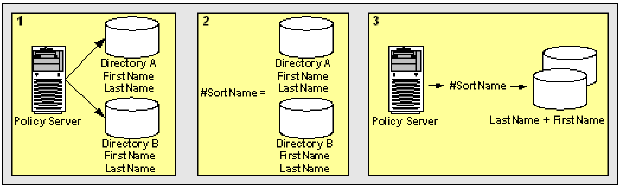
(LastName + "," + FirstName)
Define a Virtual User Attribute
You define a virtual user attribute to calculate user information that is not uniquely referenced by one or more user directories.
Note: The following procedure assumes that you are creating an object. You can also copy the properties of an existing object to create an object.
To define a virtual user attribute
The Named Expressions screen appears.
The Create Named Expression screen appears.
Note: Click Help for descriptions of settings and controls, including their respective requirements and limits.
The named expression is created.
A user class lets you define a re-usable expression to calculate user information. You use this type of expression when the user attribute is not uniquely referenced by the user directory. Rather, the user attribute must be calculated using attributes and other criteria that is established by business logic.
A user class names an expression that returns a TRUE value if a user is a member of a specified class or a FALSE value if not.
User classes are prefixed by the "at" symbol (@). The "at" symbol prevents name clashes with user attribute names and mappings and is a visual reminder that the user attribute value is calculated.
As an expression, a user class can include:
Note: Named expressions can only be used in application objects. Named expressions cannot be used in traditional security policies defined using domain objects like responses and rules.
A user class is not a role. A role is a feature of Enterprise Policy Management. While roles can use user classes, they have additional information associated with them. For more information about roles, see the Enterprise Policy Management.
User Class Use Case
This use case represents a basic scenario in which two LDAP user directories identify membership in the Administrator group using different underlying schema.
The following illustration details how the user class @Admin can be calculated for users in different user directories through user attribute mapping. User attribute mapping lets you map one common name to different user attribute names in different user directories.
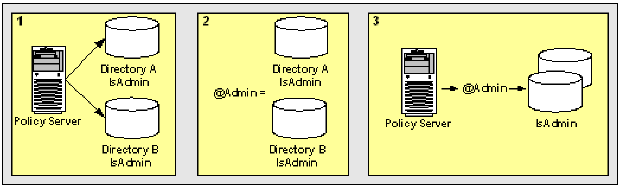
(IsAdmin)
Define a User Class
You define a user class attribute to calculate user information that is not uniquely referenced by one or more user directories. The result of the calculation can only be TRUE or FALSE. The result either applies to the user or it does not.
Note: The following procedure assumes that you are creating an object. You can also copy the properties of an existing object to create an object.
To create a user class
The Named Expressions screen appears.
The Create Named Expression screen appears.
Note: Click Help for descriptions of settings and controls, including their respective requirements and limits.
Note: The expression must be a Boolean expression.
The named expression is created.
You can use the expression editor to:
Note: If you prefer to enter an expression directly, you can click Cancel and return to the Create Expression: Name pane, where you can type the expression in the Expression field on the Add Named Expression group box.
Building a Boolean expression in the expression editor is a two-part process. The parts of the process can be repeated in any order:
In the first part of the process, you can create conditions and add them to the Infix Notation group box. A condition is a simple Boolean expression that consists of a single CA SiteMinder® function or operation. In the editor, a function can have up to three parameters and has the following format:
FUNCTION_NAME(parameter_1[, parameter_2][, parameter_3])
An operation requires two operands and has the following format:
left_operand operator right_operand
Since conditions are Boolean expressions, they result in a Boolean value. If a condition contains a function or operation that results in a string, it will be converted to a Boolean value. Specifically, the following string values are converted to TRUE: "TRUE", "true", "YES", and "yes". All other string values are converted to FALSE.
Likewise, if a condition contains a function or operation that results in a number, it will be converted to a Boolean value. All non-zero numbers are converted to TRUE, while zero is converted to FALSE.
Each condition is displayed on a separate line in the field on the Infix Notation group box and is connected to the condition in the line above by one or two Boolean operators, as follows:
condition_1
AND | OR | XOR [NOT] condition_2
In the second part of the process, you can edit the expression by modifying and deleting the conditions, changing the parentheses that group the conditions, and by changing the Boolean operators that connect the conditions in the field on the Infix Notation group box. For example, you can change how the conditions are grouped:
(condition_1
AND condition_2)
OR NOT condition_3
can become
condition_1
AND (condition_2
OR NOT condition_3)
Create a Condition Containing a Function
You can create a condition containing a built-in CA SiteMinder® function and add the condition to an expression in the expression editor.
To create a condition containing a built-in CA SiteMinder® function
Note: Clicking Named Expression opens the Variable Lookup group box.
Note: Clicking Named Expression opens the Variable Lookup group box.
The specified function is added to the Infix Notation and Resulting Notation group boxes.
Create a Condition Containing an Operation
You can create a condition containing a built-in CA SiteMinder® operation and add the condition to an expression in the expression editor.
To create a condition containing a built-in CA SiteMinder® operation
Note: Clicking Named Expression opens the Variable Lookup group box.
Note: Clicking Named Expression opens the Variable Lookup group box.
The specified operation is added to the Infix Notation and Resulting Notation group boxes.
How to Edit an Expression
Each condition that you create in the expression editor is displayed on a separate line in the field on the Infix Notation group box. As you build an expression, you can change the parentheses that group the conditions and the Boolean operators that connect the conditions by using the buttons on the Infix Notation group box.
Editing an expression is a three-step process. The first step includes four options, which can be repeated in any order:
Modify a Condition in an Expression
You can modify a condition in an expression by clicking the Modify button on the Infix Notation group box in the expression editor.
To modify a condition in an expression
The Edit group box opens, and the condition is displayed in the group box.
Delete a Condition from an Expression
You can delete one or more conditions from an expression by clicking the Remove button on the Infix Notation group box in the expression editor.
To delete a condition from an expression
Note: To select multiple adjacent conditions, hold down the Shift key while clicking.
The selected condition is removed from the expression.
Note: If multiple conditions are selected, clicking Remove deletes them one at a time.
Group the Conditions in an Expression
You can change the grouping of conditions in an expression by clicking the buttons that add and remove parentheses on the Infix Notation group box in the expression editor.
To change the grouping of conditions in an expression
Note: To select multiple adjacent conditions, hold down the Shift key while clicking.
( )
Adds parentheses to the outside of the selected conditions.
Example:
condition_1
AND condition_2
becomes
(condition_1
AND condition_2)
Remove( )
Deletes parentheses from the outside of the selected conditions.
Example:
(condition_1
OR condition_2
OR condition_3)
becomes
condition_1
OR condition_2
OR condition_3
The edited expression is displayed in the fields on the Resulting Notation and Infix Notation group boxes in the expression editor.
Change a Boolean Operator in an Expression
You can change a Boolean operator in an expression by clicking one of the following buttons on the Infix Notation group box in the expression editor:
To change a Boolean operator in an expression
Note: To select multiple adjacent conditions, hold down the Shift key while clicking.
And/Or
Switches between the Boolean operators AND and OR.
Example:
AND condition_1
becomes
OR condition_1
Note: The AND/OR button switches XOR to AND.
Not
Switches between adding and removing the Boolean operator NOT.
Example:
AND condition_1
becomes
AND NOT condition_1
XOR
Switches the Boolean operators AND and OR to XOR.
Example:
AND condition_1
becomes
XOR condition_1
Note: The exclusive OR (XOR) operator takes two Boolean operands and returns TRUE if either operand is TRUE, but not both.
Conditional?YES:NO
Adds the conditional decision operator.
Example:
condition_1
becomes
condition_1 ? "YES" : "NO"
The edited expression is displayed in the fields on the Resulting Notation and Infix Notation group boxes in the expression editor.
This use case represents a scenario in which a retail clothing company wants to define a role that prevents customers from making Web-based credit purchases if they have met or exceeded their credit limit. The company policy dictates that customers have a $1,000 credit limit, while company employees have a $2,000 credit limit.
In this use case, the CA SiteMinder® environment contains two user directories:
The following details how you can use attribute mapping, virtual user attributes, and user classes to satisfy the company's credit policy.
Note: IsCustomer is a common name that maps to the same user information in Directories A and B. To access this information, you can use IsCustomer in an expression.
Note: CreditLimit is a common name that maps to the same user information in Directories A and B. To access this information, you can use CreditLimit in an expression.
(IsCustomer AND (#CreditBalance < CreditLimit))
Note: This expression conforms to the syntax rules of a CA SiteMinder® expression.
Note: For more information about EPM Roles, see Enterprise Policy Management.
|
Copyright © 2013 CA.
All rights reserved.
|
|