

Upgrade Examples › Example: Upgrade Another Node of the Domain Orchestrator from 3.1 SP01 to Release 4.2 on Windows
Example: Upgrade Another Node of the Domain Orchestrator from 3.1 SP01 to Release 4.2 on Windows
The following example is the second of two related examples on upgrading a clustered Domain Orchestrator from 3.1 SP01 to Release 4.2 on a Windows operating system. The examples include selected screenshots and commentary for the following scenario:
- Domain Orchestrator node 1 - pam-sandbox-n1
- Domain Orchestrator node 2 - pam-sandbox-n2
- Load Balancer for Domain Orchestrator - pam-sandbox-LB
These are the steps:
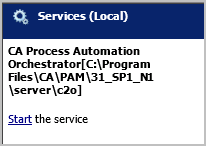
- Log on to the first server you upgraded. Start the Orchestrator Service through Administrative Tools, Services. Notice that the path is the same path in which you initially installed CA Process Automation.
- Log onto the server on which another node (for example, node2) of the clustered Domain Orchestrator is installed.
- Browse to the Domain URL, the load balancer for the Domain Orchestrator. In this example, it is http://pam-sandbox-lb/itpam.
- Log in, click the Configuration tab, and then click the Installation palette (bottom left).
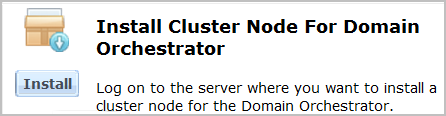
- Under Install Cluster Node For Domain Orchestrator, click Install to begin the upgrade.
- The language selection dialog appears first. Click OK.
- Click through the following Wizard pages:
- Welcome to the CA Process Automation 3rd Party Installer Setup Wizard.
- License Agreement - select I accept the terms of the license Agreement
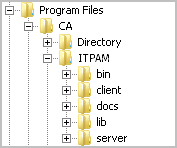
- For Select Destination Directory, browse to the exact directory that contains the files for CA Process Automation 3.1sp01: bin, client, docs, lib, and server. This directory could have the default name or a name you previously provided.
Important! You must point to the correct directory so that the installation process recognizes your previous configuration options.
- Click through the following Wizard pages:
- If you upgraded your JDK, browse to the Java Home Directory, for example, C:\Program Files\Java\jdk1.7.0_45
- When the Configuration Screen appears,
- Click the Orchestrator drop-down list and select the node of the Domain Orchestrator that you upgraded first.

- Enter a value in the Load Balancer Worker Node field. Type the designator for the node (node2, node3, node4) on which you are doing the upgrade. Consider the format worker.node2.host=current-host, as it was defined in workers.properties in the apache_install_dir/conf folder.
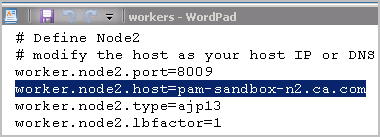
In this example, node2 of the Domain Orchestrator cluster is defined as the value for worker.node2.host=pam-sandbox-n2 in workers.properties. The load balancer FQDN is prepopulated in the Public Host Name field.
- Type your company name.
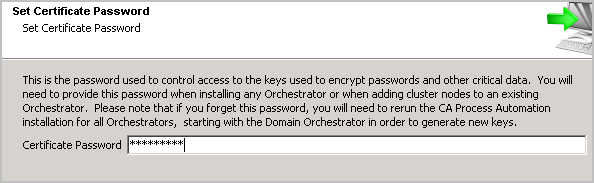
- Type the same certificate password that you entered when you installed the previous node of the Domain Orchestrator. This is the same certificate password that was used by the Domain Orchestrator in the previous release.
- Click through the following pages, which use settings from node1 in this example.
- Select Start Menu Folder.
- General Properties page (Install as Windows Service is not shown but is assumed).
- Scripts Temporary Directory
- PowerShell
- CA Embedded Entitlements Manager CA EEM Security Settings
- Database Settings - Repository
- Database Settings - Runtime
- Database Settings - Reporting
The upgrade installation begins.
- When Completing the CA Process Automation Domain Setup Wizard page appears, click Finish.
Copyright © 2014 CA.
All rights reserved.
|
|