

The CA Process Automation web interface offers a consistent set of controls. Tables, lists, pages, commands, and filters work in the same standard way from page to page.
Note: Some features are not available on all pages.
|
Item: |
Description: |
|---|---|
|
|
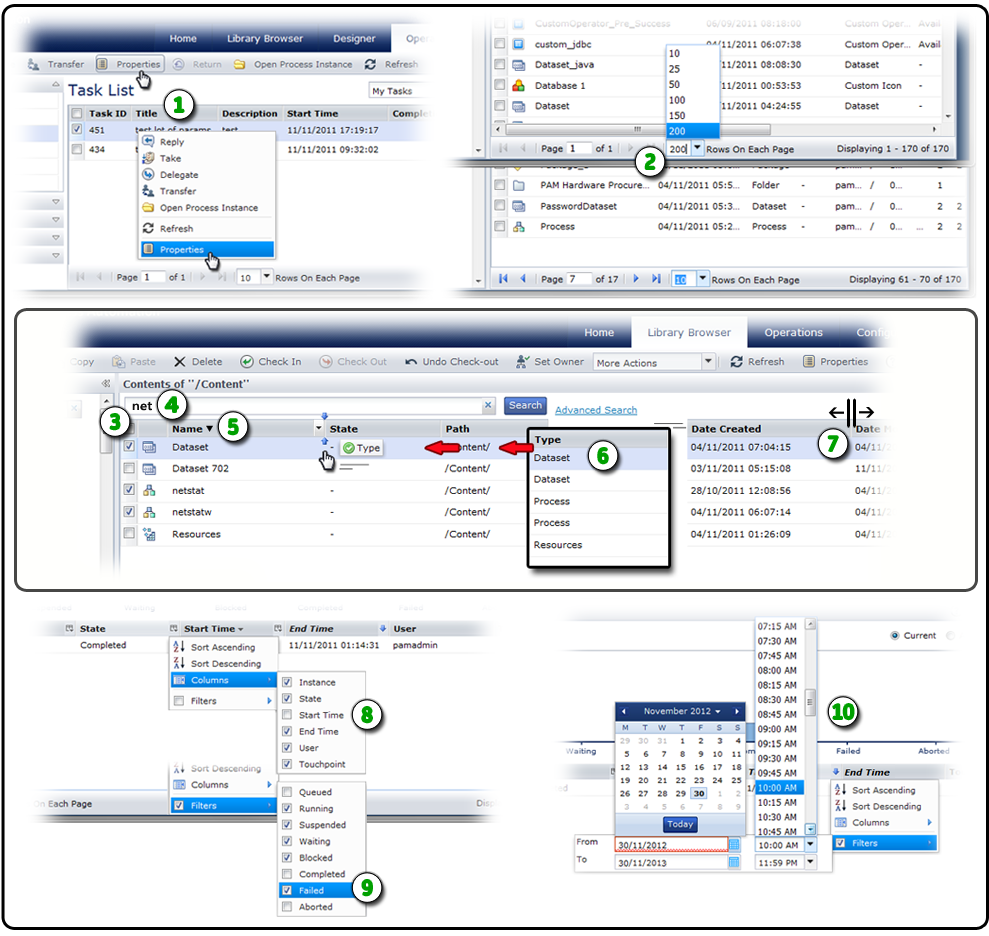
Commands: As a shortcut, you can right-click a list item to select the same commands that are available on a toolbar. In this example, you can click Properties in the toolbar or right-click a task row in the table and choose Properties from the resulting shortcut menu. |
|
|
Pagination: When CA Process Automation presents tables of data, you can control how much fits on a page. The top and bottom tables in this example both display 170 items. On the top page, the user has selected 200 Rows On Each Page. This condenses all 170 items to a single page. For the bottom page, the user has elected to view 10 rows. This setting increases the number of pages required to display all 170 items to 17 pages. Use the controls at the bottom of the window to navigate to the first, last, previous, or next on-screen page. You can also jump to a specific page by entering the page number in the Page field. |
|
|
Multi-Select: Check one or more rows to apply the same command to similar items. The application will only allow you to perform valid commands for multiple items at the same time. |
|
|
Filters: Enter an optional word or text string and press the Enter key to view only matching items. For example, type net and only the netstat and netstatw objects appear in the list. Click the X to clear the filter. |
|
|
Sort Order: Click |
|
|
Column Arrangement: Click and drag an entire column to change the sequence of columns in a table. In this example, the user has elected to position the Type column in between Name and State. |
|
|
Column Size: Position your mouse over the borderline dividing two columns. When it changes to a resize cursor, drag the column edge left or right to adjust the width of the column and its data. |
|
|
Show or Hide Columns: You can show (checked) or hide (not checked) the listed fields to control the columns that appear in a table. |
|
|
Quick Filters: If available, you can apply a quick filter to a column. Check the field values you want to include and clear the values you want to exclude. |
|
|
Date-Time Filters: For date-time fields in a table, you can define a filter as a range or span in time. The filter excludes data not in the range. In this example, the user only wants to include rows with End Time values from November 30, 2012 at 10:00 a.m. to November 30, 2013 at 11:59 p.m. |
|
Copyright © 2014 CA.
All rights reserved.
|
|
 in a field column header row to select Sort Ascending or Sort Descending. As a shortcut, just click the column header to toggle the sort order. A small triangle indicates the sort order direction: ascending (down), descending (up), or unsorted (no triangle).