

|
|
|
The Property Sheet shows you the properties of the elements that you select in either the Design Window or the Panel Palette, and enables you to change the settings for those properties. Among other things, you can change color, (in some cases) size, and position. To see what you can change about an element, select it in the Design Window or the Panel Palette, and check its properties on the Property Sheet:
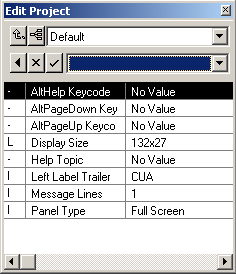
The properties you can change depend on the type of element selected. For example, you can set the Allow Blank property for a field, which determines if a blank field is a valid entry. But end users cannot enter text for a label, so if you select a label on a panel, the Property Sheet does not display this property.
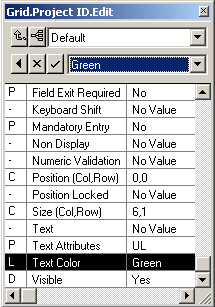
To visually indicate that the Project ID field is a key field, you will now change it so that its text appears in turquoise.
To change the text formatting for the Project ID field:
Notice the icons used. The  icon represents a region. Remember, a region is an area of a panel, and that there are five regions on this panel. In this chapter, you make changes in the Grid region, which is the section that displays the four fields you defined in Getting Started in the chapter "Your First Application in 20 Minutes."
The  icon represents a field. You expand the field icon to view or select the components (controls and labels) of the field.
in the Panel Palette.
Note: As you select a region, it is highlighted in the Design Window. When a region is highlighted, a dotted line appears around its borders.
This selects the window control part of the Project ID field. Notice that in the Design Window, the control is selected. Notice also, that the Property Sheet changed to show the properties that you can modify for the edit control.
The current value for the property (Green) appears in the top area of the Panel Palette:
![]()
The area at the top may display as an edit box, edit box with a Three Dots button, or a combo box (as in the previous graphic), depending on the property.
![]()
Notice that the color of that field changes in the Design Window.
| Copyright © 2012 CA. All rights reserved. | Tell Technical Publications how we can improve this information |