

Networks and systems are constantly changing. CA Performance Center system groups are automatically updated to include managed items as they are discovered. However, it can be difficult to keep custom groups up-to-date. Therefore, you can use rules to populate the custom groups in your monitoring system. Newly discovered items that meet rule specifications are added to groups. Similarly, items that do not meet rule requirements or that are no longer monitored are removed.
Important! If you create a group for a CA Infrastructure Management Data Aggregator data source, we recommend limiting group membership to 10,000 items. This count includes the children of managed items. Observing this limit keeps reporting time to less than 10 seconds.
Before you create rules, take some time to define the items that you want to add to your grouping structure. Group rules are best implemented as part of an overall grouping strategy to organize managed items and provide operator access to associated data. You can still add items manually to groups with existing rules.
Note: Group rules do not apply to domain groups.
Follow these steps:
The page displays current groups in a tree structure.
If items have already been added to this group, they appear in the right pane.
Note: Items that are added directly to a group as a manual step appear as Direct Items in the Group Properties pane. Items that are added to a group because they are children of a managed item are Inherited Items in the Group Properties.
The Properties page opens.
Adds the children of managed items automatically when the items are added to this group. If you disable this option and add a router to the group, the interfaces on that router are not included. Therefore, their data is not visible in drilldown views.
Default: Selected.
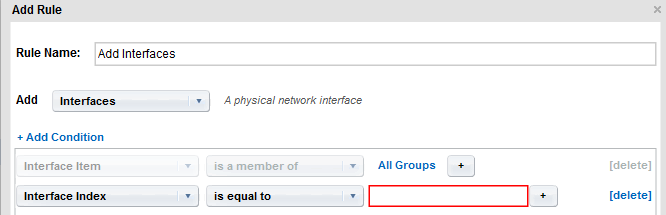
The Add Rule dialog opens.
Available options vary based on the data sources that are registered with CA Performance Center.
A row of drop-down lists and fields appears.
The remaining lists are updated to match the type of item selected.
Important! Use CIDR notation for the IP addresses that you supply for the 'is in subnet' and 'is not in subnet' options. Use dotted-decimal notation for the IP addresses that you supply for the 'is between' and 'is not between' options.
Note: Wildcard characters are accepted in this field, such as an asterisk (*) for a multicharacter match.
An 'OR' drop-down list appears.
Three more dropdown lists appear.
Note: An 'AND' condition indicator does not appear. By contrast, an 'OR' indicator appears when you select an 'OR' operator.
The results are shown in the Group Rules Preview window. You can expand each item type to see the specific items added.
Each item type requires its own rule.
|
Copyright © 2013 CA.
All rights reserved.
|
|