

You can configure how the Replayer operates by setting its properties. Use the Replayer Properties dialog to configure scroll mode operation and set optimization levels for the replayer's Time Elapse slider bar.
To set Replayer properties
The Replayer properties dialog opens, displaying the following fields:
Specifies how the auto pan mode operates. The Auto-pan Follows Recorded Mouse option does not enable or disable the Scroll Mode option for auto pan, but rather changes the way auto pan mode operates.
If this option is True and auto pan mode is selected as the Active Replay Scroll Mode, then recorded movements of the host mouse cause the playback window to pan and follow the recorded mouse pointer.
If this option is False and auto pan is selected as the Active Replay Scroll Mode, then recorded movements of the host mouse do not cause the playback window to pan and follow the recorded mouse pointer. The playback window auto pans to follow the local mouse only when moved over the recording window.
Note: The local mouse pointer takes priority in dictating the auto pan position.
Default: True
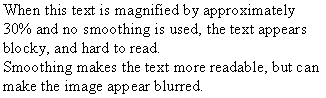
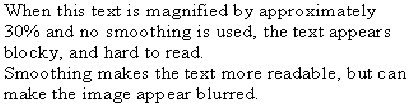
Specifies whether a smoothing filter is used when magnifying a recorded image. The Use Smoothing When Magnifying option is used with the Active Replay scroll mode, Scale to Fit. If enabled, a smoothing filter is applied to the image when scaling the recording up. The filtering removes the otherwise blocky effect of enlarging a recorded image. The filter takes effect only when the replayer is in Scale to Fit mode and when magnifying the image, so that it fills the replayer window.
Default: True
Example: Image Normal Size
Example: Image Magnified, No Smoothing
Example: Image Magnified with Smoothing

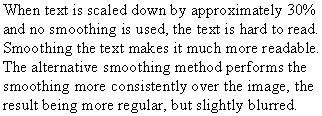
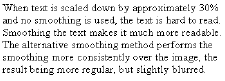
Specifies whether a smoothing filter is used when shrinking a recording image. The Use Smoothing When Shrinking option is used with the scroll modes, Scale to Fit and Shrink to Fit. If selected, the rows and columns of pixels that are lost in the scaling process are merged to give a more accurate image when scaling the recording down. This greatly improves the readability of text when scaling the image down. This filter takes effect only when the replayer is in Shrink to Fit or Scale to Fit mode and is shrinking the recording, so that it fits in the replayer window.
Default: True
Example: Image Normal Size
Example: Image Shrunk, No Smoothing
Example: Image Shrunk with Smoothing
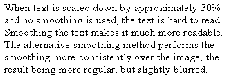
Specifies whether the Use Alternative Smoothing Method option is used with the scroll modes, Scale to Fit and Shrink to Fit. This setting changes the filtering method used by the Use Smoothing When Shrinking option. If True, a bilinear filter is used to provide a smoother scaled image, but the result is fuzzier and it is slower than the default smoothing mode.
Default: False
Example: Image Shrunk with Normal Smoothing
Example: Image Shrunk with Alternative Smoothing

Lets you quickly move to any point or event in a recording by using the Time Elapse slider bar during a replay, if selected. Move the slider bar to the right for better performance. The approximate time required to jump to any point in the replay is listed below the slider bar.
When the slider bar optimization is enabled, index files are created on the hard disk when the recorded session is opened. After the replay is closed, the index files are deleted.
Every index file requires approximately 350 KB in disk space, depending on the resolution of the host machine. As the performance is increased, the more index files need to be created on the hard disk.
Note: If set to Less Disk Space, you can use the Time Elapse slider bar to move to any point in the recording. However, this can take significantly longer when jumping to a point near the end of a long recording.
Note: Index files are created during the first play through of a recording file. Therefore, this setting has no affect on performance when jumping to the end of a long replay immediately after the file has been opened.
Your settings are saved.
|
Copyright © 2013 CA.
All rights reserved.
|
|