
Design › Designing Client Procedures › Lesson Activity › eGolfer Home › Add Procedure Step Use Statements for Servers › List Scoring Record
List Scoring Record
We can now add the call to the final server procedure step. The List Scoring Record server procedure requires a golfer as input, and produces a list (group view) of scoring records for that golfer as output. We want to reuse the existing import golfer view, but we will use Match and Copy for the export group view.
Follow these steps:
- Repeat the previous steps to add the procedure step use statement for the List Scoring Record server procedure.
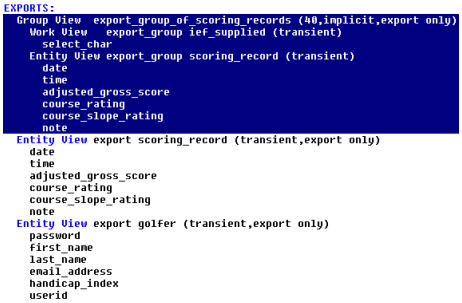
Your import views should look the same as they did before, but your export views should now have the export group of scoring records added to it as in the example:

- To make the import views look exactly the same as the export views, copy the export group of scoring records to the IMPORTS: using the name import group of scoring records to replace export group of scoring records and import group to replace export group.
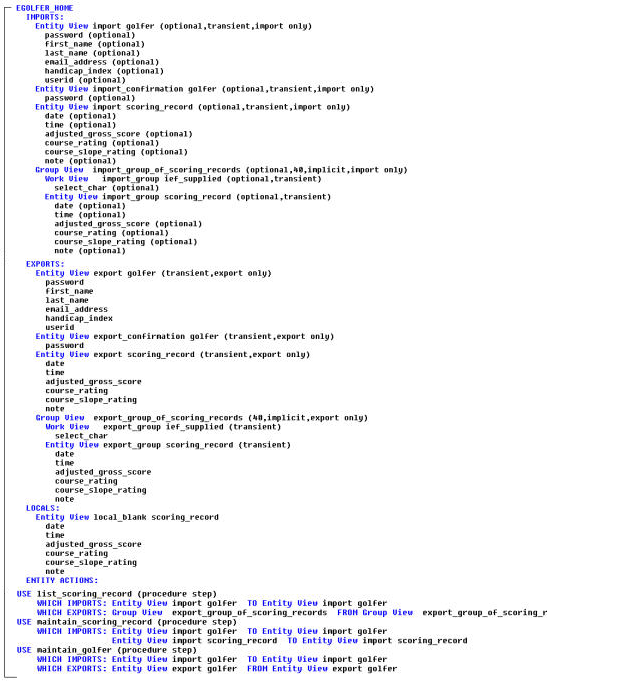
- The Update eGolfer dialog actually has two views of a golfer's password. One view is used to confirm the other. We only have one view of a golfer containing all of its attributes, including the password. Therefore, we need to add another view of a golfer, containing just the password attribute.
In the action diagram select EXPORTS:, and from the Menu Bar select Edit, then Add View, and then Add Entity View. In the Name entry field, enter export confirmation. From the list of Entity Types select GOLFER, from the list of attributes select PASSWORD, and then select the OK push button.
- Copy that new view to the IMPORTS: and name it import confirmation.
- If a golfer decides to add two or more scoring records during the same session, then we will want the Add Scoring Record dialog to be cleared each time. In a similar fashion to what we did in the eGolf Services home procedure step, we want a local blank scoring record. Copy the import scoring record to the LOCALS: and name the new view local blank.
- It can be helpful at this point to arrange the views in a more logical sequence. In the following example, we have reordered the views such that the golfer appears first, followed by the confirmation golfer, and followed by the single entity view of a scoring record, followed by the group of scoring records. You can do this by first selecting the Entity View, pressing the F7 key on your keyboard, and then selecting the Entity View you want to move the selected view directly underneath.
At this point, your action diagram should look like the following example:

- Save your model.
- Make any corrections necessary and save your model again.
- Close the action diagram.
Copyright © 2013 CA.
All rights reserved.
 
|
|


