
Design › Designing Client Procedures › Lesson Activity › eGolf Services Home › eGolfer Login
eGolfer Login
Try to build the eGolf Services Login window on your own. We will include systematic instructions at the end of the section, but try to do it on your own first. Review all of the following key points before building the window:
- Resize the window to make it roughly the same size as the other two. You can open one of the other two windows and place it behind the new one to help you size it.
- Use the same two pictures we used on the Registration window, golfrainback and golfrain_banner.
- The heading eGolfer Login is a literal. After adding it, change its font to Arial/Bold/16.
- The line across the page is a literal also, made up of approximately 40 underscores.
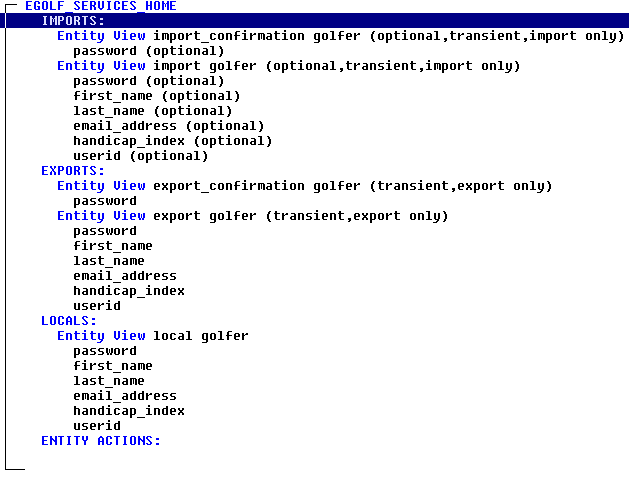
- When building additional secondary dialogs, you do not necessarily have to add additional export and import views. Where possible, you reuse the existing action diagrams views. For this dialog, we do not need to add any additional views. The User Id and Password fields are from the EXPORT GOLFER userid and password. When placing them on the dialog, make sure you map them to the IMPORT GOLFER userid and password.
- Prompts created for a field are saved, such that you can reuse for that same field on any other window or dialog. When defining the field's properties, use the prompt drop-down list to select the prompts that already exist for these two fields that have the colon after them.
- Since the password field is a password field, check the password check box on the field properties panel. That will cause asterisks to be echoed back to the user when typing in their password.
- The back push button just performs a Special Action, to Cancel – Close without Execution.
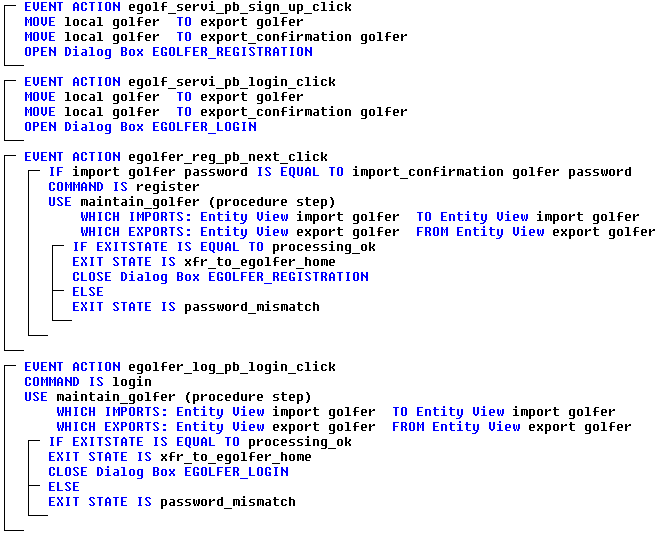
- The login push button performs a Click event. Let the Toolset generate the event name. The event logic is virtually identical to the event logic for the Registration dialog, except you do not need to check the passwords. You can just copy the logic from the Registration event to the Login event and double-click each element of the action diagram statements that you need to change. These two elements are the command, and the dialog you want to close. Make it the default push button and do not forget the disabling logic.
The following are the systematic instructions:
- Resize the window:
- In the Navigation Diagram, double-click the eGolf Services Login dialog. Then, in the Navigation Diagram, double-click the eGolf Services Registration dialog.
- Position the Login dialog over the Registration dialog, and with the cursor, click-and-drag the edges of the Login dialog until they are even with the Registration dialog. Close the Registration dialog and save your model.
- Add the two pictures:
- From the Menu Bar select Add, then select Picture…. In the Picture Properties drop-down list, select golfrainback, in the Name: entry field enter picture1, in the HTML Extension: entry field enter gif, and then select the OK push button. Position the picture at the top of the window.
- Add another picture on top of the previous picture. In the Picture Properties drop-down list select golfrain_banner, in the Name: entry field enter picture2, in the HTML Extension: entry field enter gif, and then select the OK push button. Center this picture on top of the previous picture.
- Add the heading:
- From the Menu Bar select Add, then select Literal…. Then enter eGolfer Login, un-check Center Vertically and Center Horizontally, and then select the OK push button.
- Position the literal roughly as indicated in the example shown earlier. Then, with focus on the literal, from the Toolbar select the Video Properties…
 icon. Uncheck the Automatic checkbox for Font and press the Select… pushbutton to bring up the Font dialog. Change the Font properties to Arial/Bold/16 and select the OK push button. Resize the literal so that all of the lettering shows.
- Add the line:
- From the Menu Bar select Add, then select Literal…. Then, enter the underscore key approximately 40 times. Un-check Center Vertically and Center Horizontally, select the OK push button and position the literal roughly as indicated in the example shown earlier.
- Select the underscore literal first, and then with the Ctrl key held down, select the eGolfer Login literal. From the Menu Bar select Edit, then Position…. Now select Align Vertically Left, select Separate Vertically by a Distance: of 5, select Move Horizontally Center, and then select the OK push button.
- Place the two fields on the screen:
- From the Menu Bar select Edit, then select Field Design…. Then from the Field Design panel, select EXPORT GOLFER USERID, select the Properties… push button, and verify that the EXPORT GOLFER USERID is mapped to the IMPORT. Then, from the Prompt: drop-down list, select User ID:, select the OK push button, and then select the Place push button and position the field (prompt first and then the field) on the dialog in roughly the position indicated on the example.
- From the Menu Bar select Edit, then Field Design…. Then from the Field Design panel, select EXPORT GOLFER PASSWORD, select the Properties… push button, and verify the EXPORT GOLFER PASSWORD is mapped to the IMPORT. Then, from the Prompt: drop-down list, select Password:, check the Password check box, select the OK push button, and then select the Place push button and position the field (prompt first and then the field) on the dialog in roughly the position indicated on the example. Resize the prompt if necessary.
- Select the Password prompt and then, with the Ctrl key held down, select the User ID prompt (not the fields). From the Menu Bar, select Edit, select Position…, check the Equal Width check box, and then select the OK push button. Then select the Password field and, with the Ctrl key held down, select the User ID field.
- After making sure that only the Password field and the User ID field have focus, from the Menu Bar select Edit, then select Position…. Then select Align Vertically Left, select Separate Vertically by a Distance: of 5, check Arrange prompts against the fields, and then select the OK push button.
- Finally, using the cursor, lasso both the fields and prompts (but not the two literals) by click-and-dragging a box around them. Then select Edit, select Position…, select Move Horizontally Center, and then select the OK push button.
- Add the back push button:
- From the Menu Bar select Add, then select Push Button.
- In the Text: field enter <Back, select the radio button Special Action, in the drop-down list select Cancel – Close without Execution, and then select the OK push button and position the push button roughly as indicated in the example.
- Add the login push button:
- From the Menu Bar select Add, then select Push Button. In the Text: field enter login, check the Is the Default Push Button check box, select the Events… push button, select the Add push button to automatically add a new event, select the Close push button, and then select the OK push button and position the push button roughly as indicated in the example.
- Resize the login push button with the cursor, making it not quite so tall. Then with the Ctrl key held down, select the <Back push button. From the Menu Bar select Edit, then Position…. Then select the Equal Height and Equal Width check boxes, select Align Horizontally Bottom, select Separate Horizontally by a Distance: of 20, select Move Horizontally Center, and then select the OK push button.
- Disable the login push button:
- Select the login push button. Then from the Menu Bar, select Detail, then Disabled By….
- In the Disabling States dialog, select THE Push Button 'login' IS DISABLED WHEN, select the condition Entry Field 'User ID:' does not have data, and then select the Add push button. Then, select the OR state, select the condition Entry Field 'Password:' does not have data, select the Add push button, and then select the Close push button.
- Add the action diagram logic:
- Since the login logic is very similar to the registration logic, we can just copy the registration logic and modify it. From the Toolbar, select the Action Diagram icon. In the EVENT ACTION egolfer reg pb next click event handler, click-and-drag the cursor from the COMMAND IS statement to the bracket ending the IF EXITSTATE IS statement to highlight the section of code shown:

- Select the F8 (copy) key and, with the cursor (which now resembles a hand), select the EVENT ACTION egolfer_log_pb_login_click event handler. Then double-click the command value register in the login click event, select the expression command value in the Change panel, select the Command LOGIN, select the OK push button, and then select the Change push button.
- Now, double-click EGOLFER REGISTRATION in the CLOSE Dialog statement in the login click event, select Dialog Box EGOLFER LOGIN in the Window Selection panel, and then select the OK push button.
- Save your model.
- The completed action diagram should look like the following example. Close the action diagram.


- Close the eGolf Services Login window.
Copyright © 2013 CA.
All rights reserved.
 
|
|


