

This scenario describes how to put a collection of transaction frames in the shelf to generate artifacts.
You shelve transactions and frames into the shelf to create virtual services, baselines, and documentation.
Follow these steps:
Analyze Transactions window displays captured transactions in list view by default.
The transactions display in the path graph.
In graphical and list view, a blue pin icon displays above the shelved transaction frame. The frame is added to the shelf. The total number of shelved transactions in the shelf increases by one.
You can shelve all the transactions and frames that occurred during a captured transaction into the shelf instead of shelving them separately. The shelf displays all the occurred transactions as one transaction. You create virtual services, create baselines, and create documentation as a single shelved item. For example, when you shelve all the transactions occurring in the same path at the root transaction level then all the frames are added to the shelf as one transaction.
Follow these steps:
Analyze Transactions window displays in list view by default.
The transactions display in the path graph.
In graphical view and in the path graph, a blue pin and the word All displays above the shelved transaction frame. The frame is added to the shelf. The total number of shelved transactions in the shelf increases by one.
The following graphics displays a transaction that has been shelved with all the occurred transactions in the path:

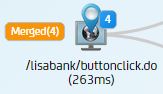
You can shelve merged transactions with repeated paths. Adding a group of repeated paths into the shelf lets you create artifacts for several transactions at once instead of one transaction at a time. When merged transactions are shelved, the number of merged repeated paths display in a blue badge.
Note: Stateful baselines are not supported for merged transactions. You can create consolidated and expanded baselines only.
Follow these steps:
The merged transactions are placed in the shelf.
You can delete transaction frames that you do not want to generate artifacts for. Transaction frames can be deleted using the shelf dialog and using the one-click method. See the topic, Using Shelf for information about the one-click method.
Follow these steps:
For the shelf dialog
The shelf dialog displays a list of shelved frames.
The frame is removed from the shelf.
For the one-click method popup
The search capability lets you search for paths in the shelf by entering full text search criteria.
Follow these steps:
The shelf displays a list of all the shelved components.
The shelf returns a list of components that are based on the search criteria.
You generate the following business artifacts for transaction frames that are in the shelf:
The types of artifacts that can be generated are indicated with colored labels in the list of transactions.
For detailed information about creating artifacts for specific types of transactions, see Creating Baselines and Creating Virtual Services.
The following procedure assumes that you have shelved a transaction frame. See the Add a Transaction Frame to the Shelf topic for information about how to shelve a transaction frame.
Follow these steps:
One-click method:
The shelf displays with a list of shelved transaction frames.
Shelf dialog method:
The shelf displays with a list of shelved transaction frames.
You remove all the transactions that are currently in the shelf by clicking Clear Shelf from the shelf dialog.
|
Copyright © 2014 CA Technologies.
All rights reserved.
|
|