

Basic Proxy Recording
Proxy recording is a common method for recording a messaging application.
The following graphic shows the main components of proxy recording:
The message-oriented middleware (MOM) is the platform on which messages are exchanged.
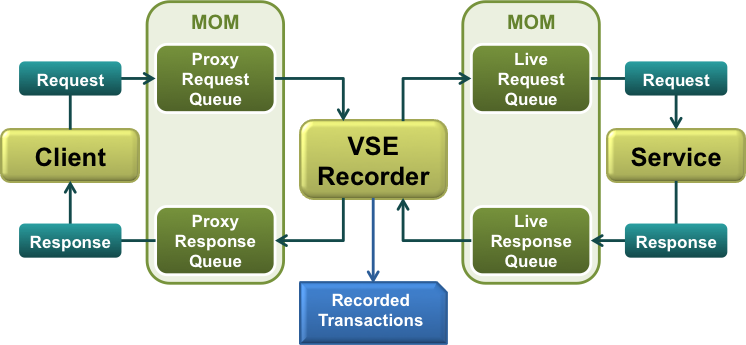
The VSE recorder is inserted into the message flow between the client and the service. Each request message goes through the recorder before it reaches the service. Each response message goes through the recorder before it reaches the client.
A channel is the pairing of a proxy queue and a live queue.
The proxy request queue and the live request queue form a request channel.
The proxy response queue and the live response queue form a response channel.
The following graphic shows the request channel and the response channel in a proxy recording.
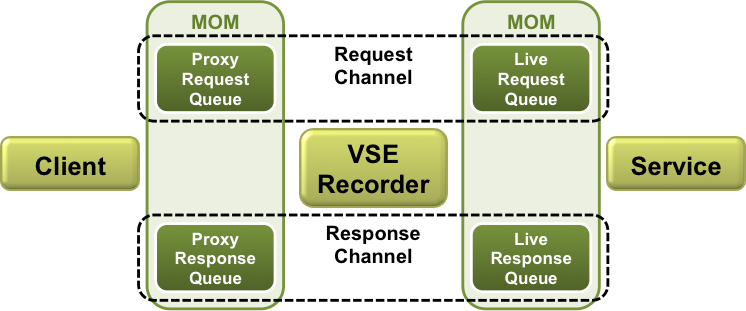
A proxy recording can have multiple request channels and multiple response channels.
In this procedure, you select an asset for each queue. An asset is a set of configuration properties that are grouped into a logical unit. For more information about assets, see Using CA Application Test.
Follow these steps:
The proxy recorder setup page opens.
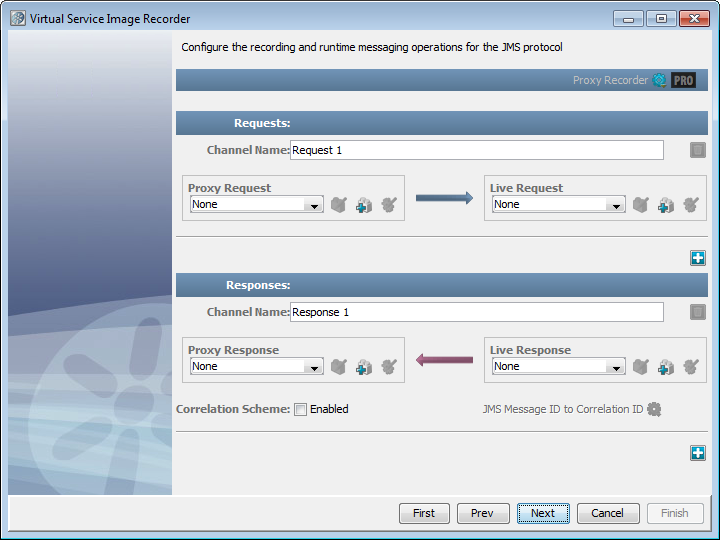
The proxy recorder setup page has basic and advanced parameters. To display the advanced parameters, click PRO at the top of the editor.
Each channel must have a unique name. This channel name is the means by which the virtual service model and the service image communicate about which queues are being used in the transaction.
The recording feedback page opens.
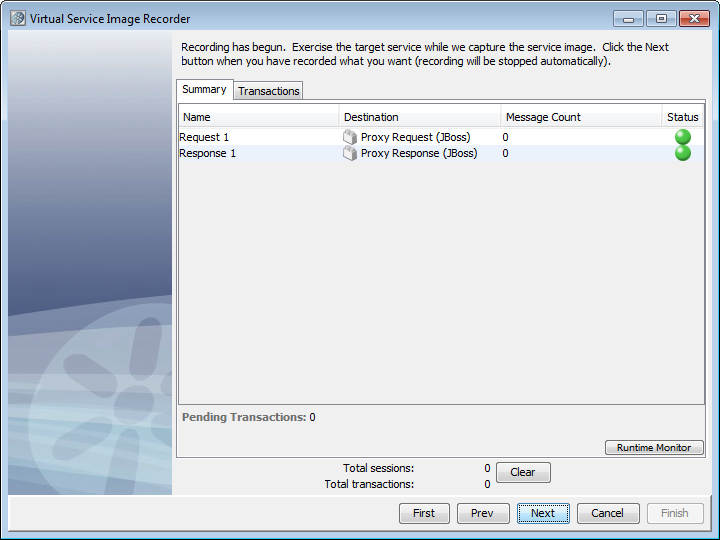
The table in the Summary tab llists each request channel and response channel. Each row includes the channel name, the selected destination asset, the number of messages that have flowed through the channel, and the status.
You can click a cell in the Destination column to see the proxy destination that is associated with the channel.
The bottom of the page shows the number of pending transactions, the number of sessions, and the total number of transactions.
If an error prevents the recording session from starting, a dialog opens and you return to the proxy recorder setup page.
Errors can also occur during the recording session. Errors that are associated with a specific request channel or response channel appear in the Status column. The status icon turns red, and a tooltip displays the error message. More general errors appear at the top of the recording feedback page.
You can use the run-time monitor to view the assets that are used in real time. For information about how the run-time monitor works, see the documentation for the JMS Send Receive step in Using CA Application Test.
The service image and the virtual service model are created.
|
Copyright © 2014 CA Technologies.
All rights reserved.
|
|