
Reference › Test Case Reference › Test Step Descriptions › JMS Messaging Steps › JMS Send Receive Step › Tutorial - Send and Receive a JMS Message
Tutorial - Send and Receive a JMS Message
This tutorial provides an introduction to using the JMS Send Receive test step.
Prerequisites
- The registry is running.
- The demo server is running.
Step 1 - Create JMS and JNDI Assets
In this procedure, you create JMS and JNDI assets from test steps in an example test case.
Follow these steps:
- Go to DevTest Workstation and open the examples project.
- In the Tests folder, open the jms.tst test case.
- Select the first JMS Messaging (JNDI) step. This step has the name jms-1.
- Click the Generate assets from the selected steps button in the model toolbar.
- Select the second JMS Messaging (JNDI) step. This step has the name send-msg-post-update.
- Click the Generate assets from the selected steps button in the model toolbar.
- In the Configs folder, open the project configuration.
- Confirm that the JMS and JNDI assets were generated. In the next procedure, you select two of the JMS destination assets.
Step 2 - Configure the JMS Send Receive Step
In this procedure, you perform the following actions:
- Add the JMS Send Receive step to a new test case.
- Configure the step to send a JMS text message to a queue and receive the response from a different queue.
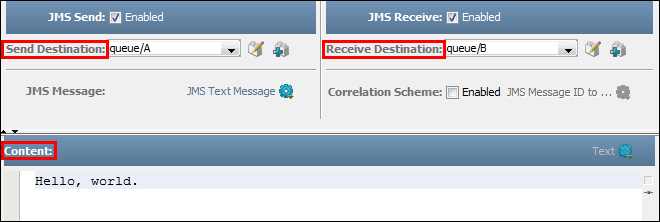
The following graphic shows a portion of the step editor. The fields that you change are highlighted.

The Send Destination field specifies the queue to which the message is sent.
The Receive Destination field specifies the queue from which the response is received.
The Content area specifies the text of the message.
Follow these steps:
- Create a test case in the examples project.
- Add a JMS Send Receive step.
The step editor appears.
- In the Send Destination list, select queue/A.
- In the Receive Destination list, select queue/B.
- In the Content area, type a sentence.
- Save the test case.
Step 3 - Examine JMS and JNDI Assets
In this procedure, you examine one of the JMS destination assets that the JMS Send Receive step uses. You also examine the JNDI context asset that the JMS destination asset uses.
Follow these steps:
- Click the Edit Selected Asset button that appears to the right of the Send Destination list.
The editor for the JMS destination asset appears.
- Review the parameters, but do not change them. You can place the mouse pointer over the parameter names to display tooltips.
- Click the Edit Selected Asset button that appears to the right of the JNDI Context list.
The editor for the JNDI context asset appears.
- Review the parameters, but do not change them.
- Click Cancel to return to the editor for the JMS destination asset.
- Click Cancel to return to the step editor.
Step 4 - Test the JMS Send Receive Step
In this procedure, you verify that the JMS Send Receive step is configured correctly.
Follow these steps:
- Click the green Execute button in the step editor.
- Confirm that the Request tab and the Response tab contain the same sentence.
- Close the step editor.
Copyright © 2014 CA Technologies.
All rights reserved.
 
|
|


