

Setting up the ENS Components › Using the DECwindows Interface to the Configuration Editor › Add Events
Add Events
See the chapter Understanding ENS for information about events.
To add an event
- Start the configuration editor as shown in Chapter 4, “Modifying the Configuration Database.
- Pull down the Edit menu and choose the Edit / Create Event submenu. This displays the Event Name dialog box.
- Click the space provided for the name of the event and enter the name you want to give the event. For example, Login Warnings.
- Click OK. This displays the Event dialog box as shown in the following figure.
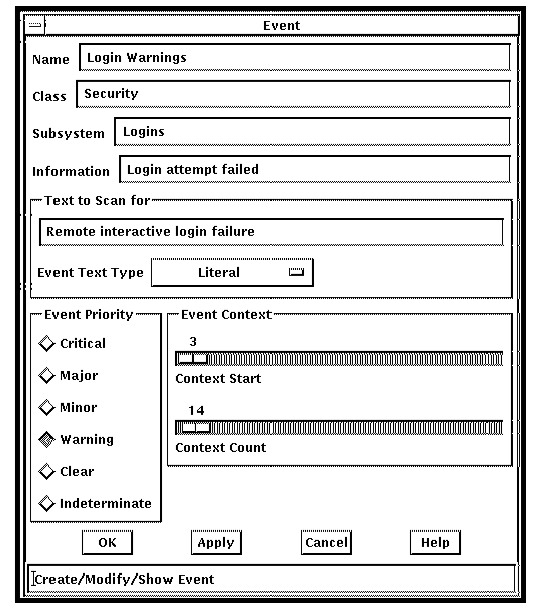
- Complete the fields in the dialog box as follows, using the table in section Relationship Between Events and Scans in Chapter 10, “Understanding ENS,” to help you.
- Enter an identifier in Class only if you intend to place several similar events in the same category. For example, all events relating to logins could have the class Security.
- Enter the part of the serviced system being referred to in Subsystem. For example, if the event refers to login attempts, the subsystem could be Logins.
- Enter a fuller description of the event in Information. For example, Login attempt failed.
- Enter the text to be scanned for on the console in Text to Scan for. For example, Remote interactive login failure.
- Click the small button to the right of the Event Text Type field to choose whether the event is a literal or regular expression (see Chapter 10, “Understanding ENS,” for a description of regular expressions). In the example, Literal is chosen.
- Click the priority you want to give the event in the Event Priority box. For example, Warning.
- Use the slider bar on Context Start to choose where the event starts, and on Context Count to determine how long it will last. For example, a start of 3 and a count of 14 means that the event starts 3 lines before the text Remote interactive login failure and continues on from the start for 14 lines.
- When you have finished, click OK.
- Continue to enter other events, if you wish.
Copyright © 2010 CA.
All rights reserved.
|
|