

This section applies to Identity Management only.
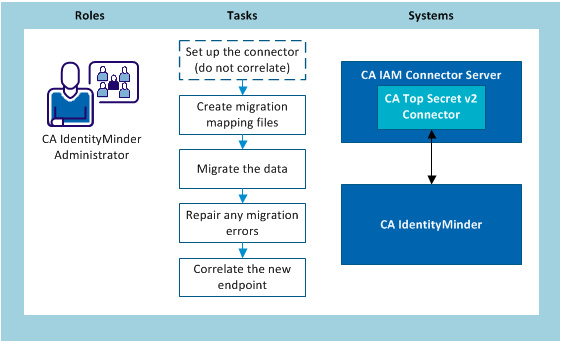
CA IAM Connector Server comes with a tool that helps you migrate account templates and their associations to objects in the new connector. If Identity Management already manages the CA Top Secret endpoints using the plug-in connector, you can use the existing CA Top Secret data with the new connector.
The migration tool migrates data from the CA Top Secret plug-in connector. It cannot migrate from the TSS TSSCFILE connector or from the CA GovernanceMinder import connector.
The migration tool migrates the following data:
The migrated account templates have the same name as the old account templates.
You cannot use the migration tool to migrate endpoint objects. Before you can migrate other data, acquire and explore the endpoints with the new connector.
The migration tool works with two mapping files:
The endpoint mapping file uses the following format:
OldEndpointName=NewEndpointName
The custom attribute mapping file uses the following format:
from-custom-attribute=to-endpoint-attribute
The mapping file has the same format and contents as the schema_map.txt used in Provisioning Manager and Provisioning Server. You can use schema.txt as the mapping configuration file for the migration.
Follow these steps:
When you run the mapping tool, use the –c option to specify the path to the mapping file.
When you run the mapping tool, use the –m option to specify the path to the mapping file.
Example: Endpoint mapping file
In the example below, the administrator chooses to keep the endpoint name the same:
MFTSS.org.com=MFTSS.org.com
Example: Custom attribute mapping file
CustomAttribute001=VSE-IES-Dflt-Usercat
CustomAttribute002=VSE-IES-Fld1
Before you migrate your data, we recommend that you run a simulation first. Simulation generates an HTML report that lists the following items:
You can then use the same migration tool to run the real migration.
Follow these steps:
cs_home/bin
TSSv2Migrate -h mycomputer -d im -p 20390 -u admin -c c:\endpointconfig.txt -m c:\schema_map.txt -r S
TSSv2Migrate -h server32 -d im -p 20389 -u etaadmin -n -r R -c tss_endpoints.properties -l logging.properties
The tool migrates the data and saves a report in cs_home/jcs/resources/tss.
|
Copyright © 2013 CA.
All rights reserved.
|
|