

The system administrator can upgrade CA Clarity™ Agile to the new release so that users can benefit from the new and enhanced features. Release 13.3.00 is the latest release of CA Clarity™ Agile. The upgrade includes installing and deploying the package, and configuring user profiles.
The following diagram describes how the system administrator upgrades CA Clarity™ Agile to the new release.
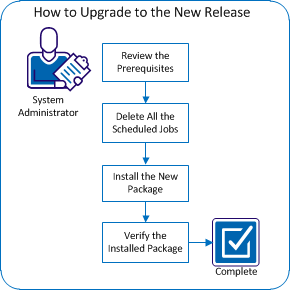
To upgrade to the new release, perform these steps:
To help ensure that you can successfully upgrade to the new release, review the following prerequisites.
Note: If you integrate with other products such as CA Clarity™ PPM, upgrade CA Clarity™ Agile and the Add-ins at the same time.
Before you upgrade to the new release, delete all scheduled jobs in Salesforce. Deleting scheduled jobs ensures that you successfully upgrade the product.
Follow these steps:
The Personal Setup page appears.
You are prepared to install the new package.
Before you install, determine whether to install the package on the production or test environment.
The following table lists the access levels for each profile.
|
User Profile |
Access Level |
|
Agile Super-User |
Agile Super-User |
|
Agile User |
Agile User |
|
Requirements Super-User |
Requirements Super-User |
|
Requirements User |
Requirements User |
|
Agile/Requirements Super-User |
Agile/Requirements Super-User |
|
Agile/Requirements User |
Agile/Requirements User |
Follow these steps:
https://login.salesforce.com/packaging/installPackage.apexp?p0=04tA0000000K27T
https://test.salesforce.com/packaging/installPackage.apexp?p0=04tA0000000K27T
CA Clarity Agile 13.3
5.0
CA Technologies
The Handle Component Name Conflicts page appears.
Note: This page appears only for an upgrade. For fresh installation, the process starts from the Approve Package API Access page.
The Approve Package API Access page appears.
The Choose security level page appears.
The Install Package page appears.
The Processing page appears indicating that your request is in process. The installation can take over 30 minutes, depending on the current load for the Force.com platform.
When the installation completes, you will receive an ‘Install Successful’ email from Salesforce.com to the email address that you used to log in. If your email server blocks email from SFDC, check the Junk email folder.
After you install the new package, the package is automatically deployed. Verify that the package is the correct version.
Follow these steps:
The Personal Setup page opens in Salesforce.com.
Note: The date of the installation is not updated. The original date of the installation appears.
|
Copyright © 2013 CA.
All rights reserved.
|
|