

As a system administrator, you can integrate Version One with CA Clarity™ PPM. Using this integration, product owners can create and manage requirements in an agile environment while adhering to the traditional project governing process.
The integration allows the following capabilities:
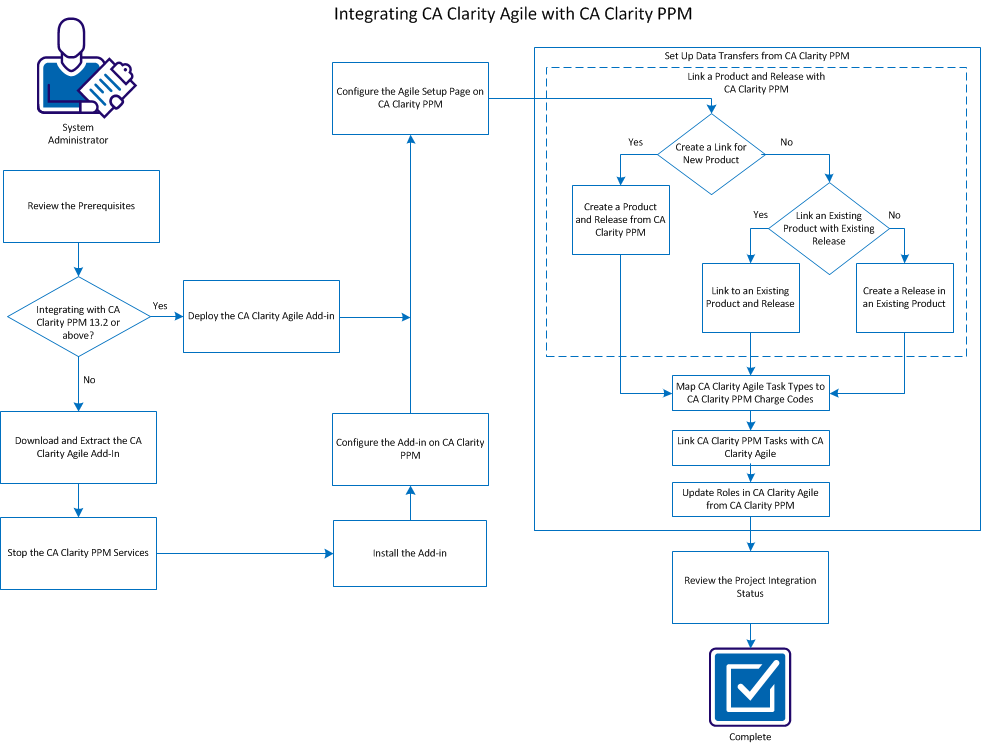
The following diagram describes how a system administrator can integrate CA Clarity™ Agile with CA Clarity™ PPM.
 To integrate CA Clarity™ PPM with CA Clarity™ Agile, follow these steps:
Before you integrate CA Clarity™ Agile with CA Clarity™ PPM, ensure that CA Clarity™ Agile license is available.
For CA Clarity™ PPM Release 13.2 and above, the CA Clarity™ Agile add-in files are included in the installation. Any updates to add-ins are delivered with CA Clarity™ PPM updates. You execute a command to deploy CA Clarity™ Agile add-in.
Follow these steps:
admin content avee
The add-in is deployed and you can see the Agile subpage on CA Clarity™ PPM. After you complete the installation, configure CA Clarity™ PPM and set up data transfers to complete the integration.
For CA Clarity™ PPM 13.1.x or earlier releases, you can download the required files from support.ca.com to your computer or an accessible network location. The files contain the required installation scripts CA Clarity™ Agile add-in.
Follow these steps:
For v12 CA Clarity™ PPM
For v13 CA Clarity™ PPM
The .jar file includes the following files:
The .jar file iX installation script.
The Windows installation script.
The Ant installation script includes the following files:
The UNIX installation script.
The directory of updated files.
The directory of supporting files.
Before you install the add-in, stop the CA Clarity™ PPM application (app) and background (bg) services to avoid any problem.
Follow these steps:
After you have stopped the CA Clarity™ PPM application and background services, Install the add-in to update the objects, reports, and database.
Important! Back up your CA Clarity™ PPM installation before installing this add-in so that you can restore the application to the prior version if necessary. When you install an add-in, you can overwrite your customized views for out-of-the-box CA Clarity™ PPM objects, such as projects. If your organization has customized views, carefully consider the installation in a test environment before installing this add-in into your production environment. Once you have installed the add-in, you cannot uninstall it.
Follow these steps:
install
You can configure the CA Clarity™ Agile add-in on CA Clarity™ PPM, so that the add-in subpages are available on CA Clarity™ PPM. You can follow one of the following instructions:
For a fresh installation of CA Clarity™ Agile add-in for CA Clarity™ PPM, you can use the following instructions to configure.
Follow these steps:
The objects list appears.
The property layout appears.
The section properties and layout appear.
The available processes list appears.
When validation completes, the status of the objects changes to Validated and mode changes to Active.
If you are upgrading CA Clarity™ Agile add-in for CA Clarity™ PPM, you can use the following instructions to configure.
Follow these steps:
The Add-In Details page shows the status for all the items as installed.
The available processes list appears.
When validation completes, the status of the objects changes to Validated and mode changes to Active.
The objects list appears.
The Project Properties - property fields displays.
The object definition view appears.
A confirmation prompt appears.
You can set up CA Clarity™ PPM to link to CA Clarity™ Agile, so that they can communicate and transfer data. After you install the CA Clarity™ Agile add-in, and before starting the background services, you can edit the URL that CA Clarity™ PPM uses to access Salesforce.com. The default URL points to the regular environment. You can create a Sandbox environment for CA Clarity™ Agile and can change the URL to allow the add-in to access the Sandbox environment instead.
Note: Change the URL only if you want to access a CA Clarity Agile Sandbox environment. Perform this step only if you have configured a sandbox environment. See the Salesforce.com Help & Training for more information.
Follow these steps:
The Agile Admin Settings page appears.
Defines the user name to login to CA Clarity™ Agile with system administrator privileges.
Defines the password to login to CA Clarity™ Agile with system administrator privileges.
Defines the security token used for server identification in case the login fails or if the CA Clarity™ PPM server is running from an untrusted network. You can retrieve this token from SalesForce.com from the Personal Setup Page. See the SalesForce.com online help for more information.
Specifies the URL that CA Clarity™ PPM uses to access the CA Clarity™ Agile production or sandbox environment.
https://login.salesforce.com/services/Soap/u/27.0
https://test.salesforce.com/services/Soap/u/27.0
Specifies the URL that CA Clarity™ PPM uses to access the requirements list in CA Clarity™ Agile.
Important! Do not change the default URL.
Defines the proxy server host name.
Defines the proxy server port.
Defines the proxy server user name.
Defines the proxy server password.
To set up data transfers, specify the CA Clarity™ Agile product details in a CA Clarity™ PPM project that you have associated. The following tasks show how to set up data transfers:
The following rules apply for linking projects between CA Clarity™ PPM and CA Clarity™ Agile:
Best Practice: To link a CA Clarity™ PPM project to CA Clarity™ Agile, verify the following prerequisites:
You can create a project in CA Clarity™ PPM, and specify the product name and release name in the project. When the synchronization job runs, a release in CA Clarity™ Agile is created.
Follow these steps:
The projects list page appears.
The properties page appears.
The Agile and Agile Task Type Mapping options become available in the Properties menu.
The Agile properties page appears.
Defines the name of the new CA Clarity™ Agile product you want to create.
Defines the name of the new CA Clarity™ Agile release you want to create.
Defines a unique prefix to add to the product name for the user stories and tasks. You cannot change the prefix after the product is created.
Limits: 6 characters
Note: Leave the following fields blank: Agile Product ID and Agile Release ID.
After the Agile Product Sync job runs, the following fields are automatically populated in CA Clarity™ PPM. The new product and release is created in CA Clarity™ Agile:
Displays the Agile product ID. This value is automatically populated from CA Clarity™ Agile.
Source: The Product ID field on the Product Detail page on CA Clarity™ Agile.
Displays the Agile release ID. This value is automatically populated from CA Clarity™ Agile.
Source: The Release ID field on the Release Detail page on CA Clarity™ Agile.
You can link an existing CA Clarity™ Agile product and release to a CA Clarity™ PPM project by specifying the product ID and release ID. You can link to a product release or a master release. Link to a master release to see all the user stories and tasks that are assigned to the master release in CA Clarity™ PPM.
Follow these steps:
The project properties appear.
The Agile properties page appears.
Source: Master Release ID field on the Master Release Detail page in CA Clarity™ Agile.
Note: Leave the following fields blank: Agile Product Name, Agile Release Name, and Product Prefix.
After the Agile Product Sync job runs, the following fields are automatically populated in CA Clarity™ PPM:
Create a release in an existing CA Clarity™ Agile product by specifying the product ID and release name in the CA Clarity™ PPM project. Leave the release ID, product name, and product prefix values undefined.
Follow these steps:
The project properties appear.
The Agile properties page appears.
Note: Leave the following fields blank: Agile Release ID, Agile Product Name, and Product Prefix.
After the Agile Product Sync job runs, the following fields are automatically populated in CA Clarity™ PPM:
If you have assigned charge codes to your project tasks in CA Clarity™ PPM, you can map these charge codes to the CA Clarity™ Agile task types. Mapping the task types to charge codes allows you to assign appropriate charge codes to actuals on linked tasks. A project manager can map task types to charge codes and run the Populate Agile Task Types process, if they have the following global and instance access rights:
Best practices:
See the CA Clarity™ PPM Administration Guide for more information.
If you have a new task type in CA Clarity™ Agile, create a new charge code in CA Clarity™ PPM and map the new task type to the charge code.
Follow these steps:
New Charge code is created.
After you have created a charge code, you can map it to the CA Clarity™ Agile task type.
Follow these steps:
The project properties appear.
The Agile Task Type Mapping page for the project appears.
The Create Agile Task Type and Charge Code Mapping page appears.
Defines the CA Clarity™ Agile task type for a task.
Defines the CA Clarity™ PPM charge code for the same task.
The CA Clarity™ PPM charge code is successfully mapped to the CA Clarity™ Agile task type.
You can link multiple tasks to a single requirement, and you can link multiple requirements to a single task.
Follow these steps:
The project properties appear.
The Mapped Task: Properties page appears with the Agile Requirement and Task Mapping List option selected in the menu.
The Create Agile Requirement and Task Mapping page appears.
The Mapped Task: Properties page appears with the requirement listed.
Note: After the requirement is added to the task, populate the requirement list with the CA Clarity™ Agile requirement information. If the list is empty, refresh the page.
CA Clarity™ Agile is updated with the information about linked tasks and requirements the next time the Agile Requirement and Task Mapping Sync job runs.
Note: The sync job does not synchronize the requirement version number and the version status from CA Clarity™ Agile to CA Clarity™ PPM.
You can download roles and role hierarchies from CA Clarity™ PPM to CA Clarity™ Agile. When you download roles, all roles in CA Clarity™ PPM are available in CA Clarity™ Agile.
To update roles in CA Clarity™ Agile from CA Clarity™ PPM roles, run the Agile Role Sync job.
Review the integration status from the Agile properties page after linking a CA Clarity™ PPM project to CA Clarity™ Agile.
Follow these steps:
The Agile properties page for the project appears.
Displays the status of the Agile Product Sync job as successful, pending, or failed.
Displays the details of the job status such as date and time when it was last run. If the job failed, displays details of the errors encountered.
A successful integration means that data is transferring between CA Clarity™ Agile and CA Clarity™ PPM. If the integration is not successful, it can mean one of the following issues:
If any information is entered incorrectly, try integrating again by reentering the correct values and running the Agile Product Sync job.
|
Copyright © 2013 CA.
All rights reserved.
|
|