

As a system administrator, you can configure custom attributes for CA Clarity™ Agile objects to provide more object details. The custom attribute you configure is available to all the products by default. You can also create new custom values for object fields at the application level. These custom values then show up on appropriate pages as values you can select from the drop-down lists.
You can create a maximum of 25 custom attributes for an object in a product. You can add custom attributes to the following objects:
For example, the team at First, Inc. wants to display the user story status to indicate the project progress. Dave, the system administrator, can add status field to the user story object and customize the lookup values. The team can use the status values to show their project status.
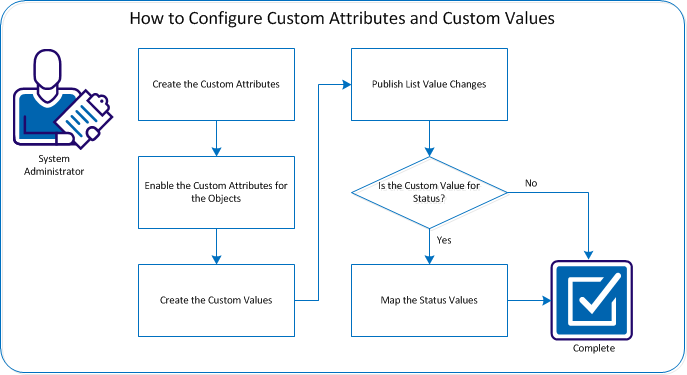
The following diagram describes how the system administrator can configure the custom attributes and customize the values.
To configure custom attributes, perform these steps:
You can create a custom attribute for an object and associate it with a product. For example, Dave creates a custom attribute named Status for the User Story object. The team can use the status of the user story to indicate their project progress.
Follow these steps:
After a custom attribute is created, enable the attribute for a product to make it available for the objects. When you enable a custom attribute for a product, it is no longer available to other products.
For example, Dave enables the attribute Status for the User Story object for the product Parking Pass Management System.
Follow these steps:
The field appears in the field labels list.
Note: To remove or disable a custom attribute from an object, select the attribute and click Delete.
After the custom attributes are created, you can add values to it. You can customize the following fields:
Include the values for issues, user stories, and epics that are associated with a product.
Include the values for issues, tasks, user stories, and epics that are associated with a product.
For example, Dave creates the custom values Planned, In Progress, Done, and Closed for the status field of the User Story object.
You can configure custom values in the following ways:
Best Practices:
Follow these steps:
You can set up default values for a user story, issue, or any custom CA Clarity™ Agile object.
Follow these steps:
The Salesforce.com Personal Setup page appears.
The Custom Objects page appears.
The User Story Custom Object page appears.
The Record Type page appears.
You can publish the changes so that the new values are available for all the users in your organization to see. These changes can include modified object or attribute labels, picklist labels, and translations; or deleted custom attributes.
For example, Dave publishes the new attribute and its values, so that changes are visible and available on the pages for the users to use.
Follow these steps:
If you create a custom attribute for the Status value of the user story or requirement objects, map the values as Open or Closed state. Specifying whether the state is open or closed ensures the accuracy of the burndown and velocity charts.
For example, Dave maps the custom values to the following values:
|
Status Value |
Mapped Value |
|---|---|
|
Planned |
Open |
|
In Progress |
Open |
|
Done |
Closed |
|
Closed |
Closed |
Follow these steps:
Note: Click Recalculate Chart to refresh the sprint information, and repopulate the burndown and velocity charts for the user stories and issues in the current sprint.
You have successfully configured custom attributes and custom values, which the users can use to provide details for the objects.
|
Copyright © 2013 CA.
All rights reserved.
|
|